

How to Create Excel-Like Custom Views / Segmented Views
When you want to analyze only limited yet important data from a ton, Excel provides this mind-blowing benefit.
What are custom views?
When you want to analyze only limited yet important data from a ton, Excel provides this mind-blowing benefit. Show / hide data columns, apply filters and save it. This is a custom view.
Similar to Excel, Smart Manager allows you to create custom views for all WordPress custom post types (like WooCommerce products, orders, coupons, users, blog posts, etc.) and all WordPress custom taxonomies (like Product Categories, Product tags, Product Brands, etc.)
Custom views are very useful to view only limited data for the following and any custom post types:
- Products – stock fields like name, regular and sale price, stock quantity, category
- Orders – name, email, address, order status, payment method, line items (products purchased in the order)
- Coupons – coupon code, amount, discount type, validity, usage limit
- Users – name and address, lifetime value, last order date
- Posts / Pages – Title, content, meta description, publish date
Here’s how to create a custom view
- On the Smart Manager dashboard, select a dashboard from the dropdown (Products in this example).
- Show or hide the required columns using Manage Columns, apply search filters, or perform any other operation like inline edit, bulk edit, etc. as per your requirement.
- Click on the ‘Custom view’ dropdown at the top of the grid. A list of existing custom views for that dashboard will appear, along with a ‘Create Custom View’ button at the bottom.
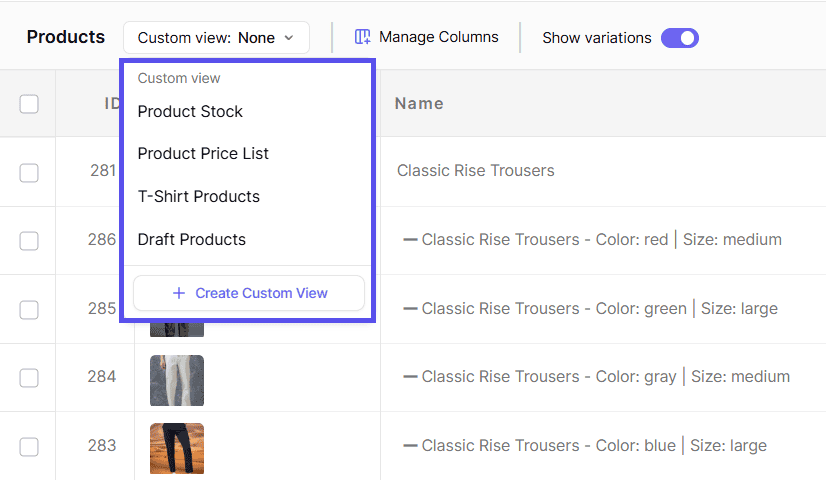
- Click on ‘Create Custom View’. This will open the Custom Views modal.
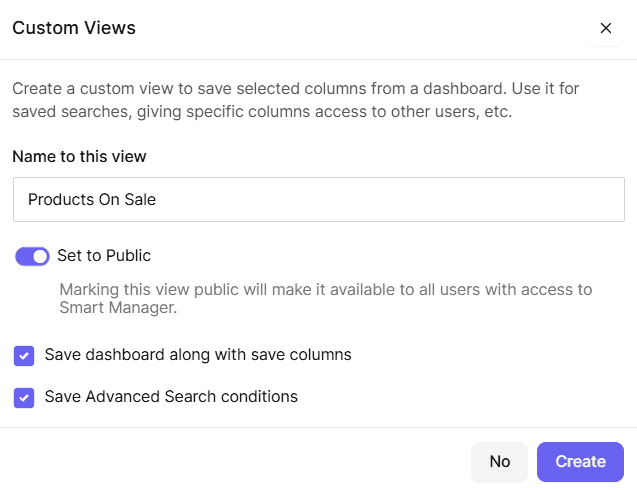
- In the Custom Views modal:
- Enter a unique name for the custom view in the ‘Name to this view’ field.
- Toggle ‘Set to Public’ to grant access to anybody having access to that particular post type for this view. If left off, only the creator of this view and any user role or specific user granted access can access it.
- Check ‘Save dashboard along with save columns’ if you want the view to also remember the selected dashboard along with the column settings.
- Check ‘Save Advanced Search conditions’ if you want to save any applied Advanced Search filters along with the view.
- Click on ‘Create’.
Your custom view is created. Repeat the above steps to create multiple custom views.
How to Update / Delete a Custom View
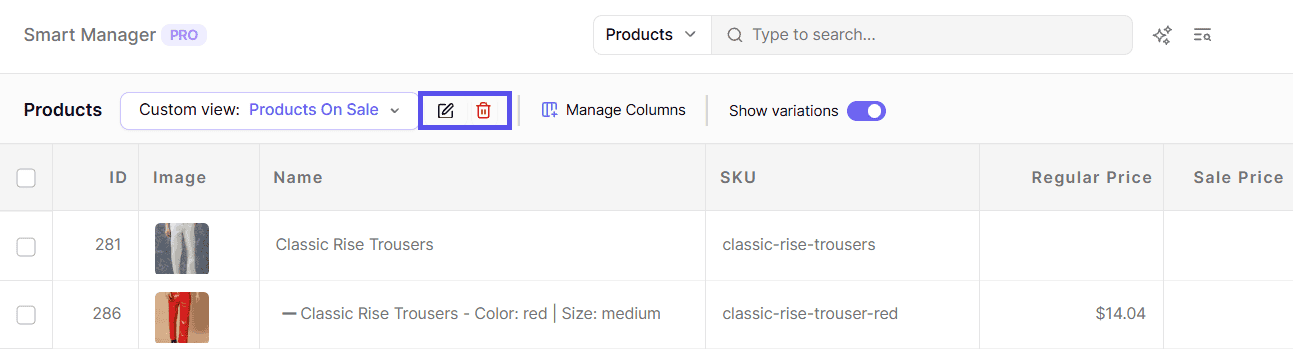
To update an existing custom view
- Select the custom view from the ‘Custom view’ dropdown at the top of the grid.
- Once a custom view is selected, an edit (pencil) icon and a delete (trash) icon will appear next to the Custom view dropdown.
- Make the required changes, such as showing/hiding columns or updating Advanced Search conditions.
- Click on the edit icon. This will open the Custom Views modal.
- If you want to rename the view, update the name in the ‘Name to this view’ field. Otherwise, simply click on ‘Update’ to save the changes to the custom view.
Your current custom view will be updated.
To delete an existing custom view
- Select the custom view from the ‘Custom view’ dropdown at the top of the grid.
- Click on the delete icon that appears next to the Custom view dropdown.
- A confirmation modal will appear. Click on ‘Delete’ to confirm.
The view will be deleted. Views once deleted cannot be restored.
You can also export data from custom views as CSV using the Export CSV feature.
Note:
- Only the user who created the view can update or delete the view.
- Admins can also update or delete Custom Views created by non-admin or deleted users, preventing orphaned views.