How to Create a Self-Expiring Temporary Login Link
Sometimes, the developers need to access your admin area to investigate plugin and theme issues, code debugging, etc., editors require access for blog changes, shop manager for product-related changes and so on.
However, it’s not recommended to share passwords via email. Also, it’s quite a hassle in creating, managing and sharing usernames and passwords all the time for the users.
Therefore, in such cases, the Temporary Login Without Password plugin is your best bet.
Using this plugin, you can create a self-expiring login link using which users can log in to your site without the need for a username and password.
How to create login links using the Temporary Login Without Password plugin?
Go to your WordPress Admin panel > Plugins > Add new. Search for “temporary login without password”. Install and activate the plugin.
Once activated, navigate to Users > Temporary Logins. Click on the ‘Create New’ button. Now follow these steps:
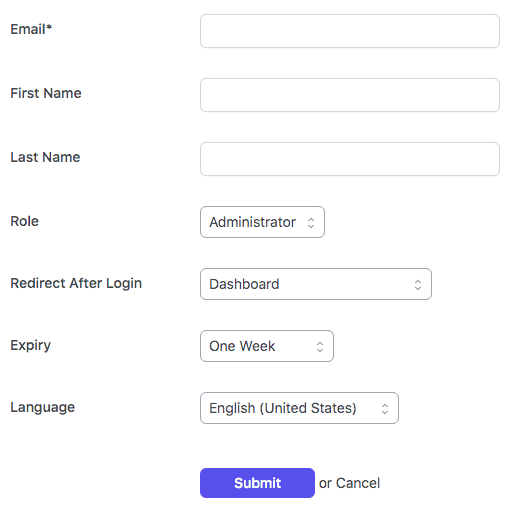
- Enter the email address of the person you want to share the login link with.
- Enter their first name and last name.
- Choose Role as ‘Administrator’. You can also choose other roles based on the work requirement. For example – choose the role of the editor to allow that user to modify your blog post.
- Choose a page where you want to redirect users after they log in.
- Choose expiry duration for this temporary account– one hour, three hours, one day, three days, one week or one month. This is the period after which the login will expire automatically. The default is set to one week.
- Set the Language. We recommend setting it to English (United States).
- Click on the ‘Submit’ button to save your changes.
- After submitting the form, please click the clipboard icon to copy the link and share it via email.
If you face any difficulty on your site and require us to investigate it, generate a temporary login as mentioned above and share the link with us.
We’ll be able to log in without any password and the account will be automatically removed after the set period.
How to manage temporary logins?
In some cases, you may need to extend the temporary login expiry, delete the account before expiry or change the redirect page or the language. To update or manage a temporary login account:
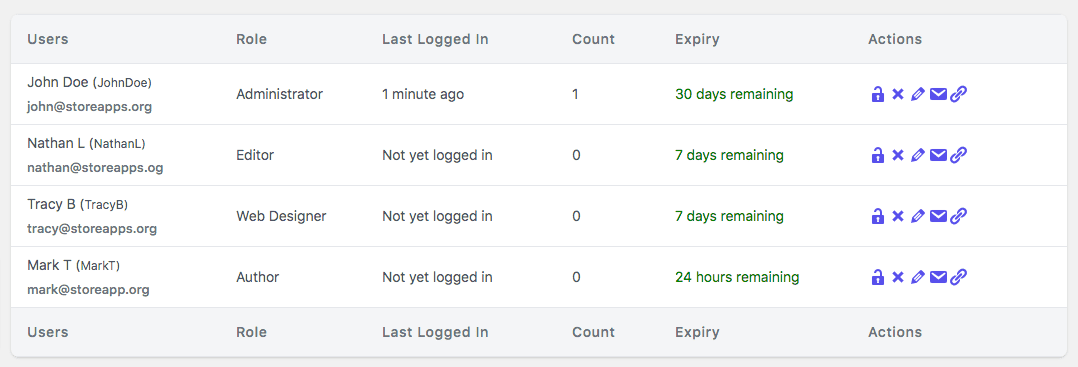
- Go to your WordPress Admin panel > Users > Temporary Logins.
- Click on the ‘pencil’ icon to modify account details – expiry, redirect page, user role, email, name and language.
- Make changes and click on ‘Submit’.
- Click on the ‘email’ icon to email the link to the user directly via your mailing service.
- Use the ‘copy link’ icon to copy the temporary login link and share it via email.
- To disable or delete the temporary login, use the ‘lock’ icon and ‘cross’ icon respectively.