

The WooCommerce checkout page is the final transactional boundary where a browser becomes a paying customer.
Every WooCommerce store launches with a standard checkout layout. That default layout collects essential customer details, calculates taxes and shipping rates, and hands off billing tokens to payment processors.
Many store owners monitor top-of-funnel traffic or raw pageviews while ignoring checkout completion rates.
Consider two stores. A store with ten thousand monthly visitors and a 1.2% checkout conversion rate produces 120 orders. A store with five thousand visitors and an optimized 2.8% checkout flow produces 140 orders. Trimming unnecessary fields, matching checkout layouts to buyer intent, and clarifying modern block settings directly increase merchant revenue.
What is the default WooCommerce checkout and how does it work?
The default WooCommerce checkout is a standardized template that gathers billing addresses, shipping destinations, customer contact details, and payment authorization to create an order record.
When a customer initiates checkout, WooCommerce queries the session database for cart items. It checks inventory availability, computes shipping zone rates, applies tax rules, and presents available payment gateways. Once the buyer submits the form, WooCommerce creates an order record in pending or processing status and triggers transaction webhooks.
The four stages of the WooCommerce checkout lifecycle
The standard transactional flow moves through four sequential stages:
-
Cart review: The customer confirms selected product quantities, verifies coupon discounts, and reviews estimated taxes.
-
Customer identification: The shopper logs into an existing store account or proceeds as a guest by entering an email address.
-
Billing and shipping details: The buyer provides physical addresses for physical goods or contact details for virtual downloads.
-
Payment authorization: The customer selects a payment gateway, enters payment credentials, and submits the order.
Common checkout problems that hurt store conversions
Default checkouts function reliably across different hosting environments. However, generic designs introduce friction that depresses conversions:
-
Unnecessary form fields: Asking for physical shipping addresses when selling downloadable audio files or digital licenses causes immediate cart abandonment. According to 2024 Baymard Institute research, 17% of shoppers abandon checkout due to overly complex checkout forms.
-
Autofill address errors: Inconsistent field names between browser autofill profiles and checkout input tags lead to failed shipping calculations.
-
Mobile session loss: Shoppers switching between browser apps often lose cart state or active discount codes.
-
Isolated coupon prompts: Prominent empty coupon boxes tempt buyers to leave the checkout tab to hunt for discount codes on search engines.
-
Micro-delays during calculation: Ajax fragments that refresh the entire checkout table on every address keystroke create frustrating input lag on mobile devices.
What is the difference between WooCommerce Checkout Blocks and Classic Checkout?
WooCommerce Checkout Blocks are React-based Gutenberg block components introduced as the platform default in version 8.3. Classic Checkout relies on server-rendered PHP templates powered by the [woocommerce_checkout] shortcode.
Understanding which checkout engine powers your store determines how you customize layout, manage fields, and resolve third-party plugin compatibility.
| Feature or attribute | WooCommerce Checkout Blocks | Classic Shortcode Checkout |
|---|---|---|
| Default status | Default for fresh installs (WooCommerce 8.3+) | Legacy standard prior to WooCommerce 8.0 |
| Rendering architecture | Client-side React components via atomic blocks | Server-side PHP template |
| Visual editing | WordPress Site Editor | Requires custom page templates or CSS |
| Native field toggles | Toggles for company phone and address 2 | Requires custom code or field editor plugin |
| Express payment placement | Native top-level placement (Apple Pay and Google Pay) | Placed inside gateway payment options |
| Extensibility model | Slot-fill API and block checkout components | Traditional PHP action hooks and filters |
| Legacy plugin support | Requires block-compatible payment and shipping extensions | Compatible with virtually all WooCommerce extensions |
Native controls in the Gutenberg Checkout Block
Store owners using block-based themes can customize their checkout without writing code. Navigate to Appearance → Editor → Templates → Checkout (or edit the Checkout page directly in the block editor).
The Checkout Block provides native inspector settings in the right sidebar:
-
Field visibility controls: Toggle company name, address line 2, and phone number between hidden, optional, or required.
-
Order summary placement: Position the cart summary column on the right side or beneath the primary forms.
-
Express payment buttons: Enable one-touch digital wallet buttons at the top of the form, allowing mobile shoppers to pay without filling address inputs manually.
-
Terms and privacy check: Enable or modify terms of service links and compliance checkboxes directly inside the block settings.
Why do fields display padlock icons in Checkout Blocks?
Many store owners open the block editor to edit individual billing fields and discover padlock icons next to customer name, email, and address components.
Padlocks indicate core structural elements protected by WooCommerce’s atomic block API. WooCommerce locks these inputs to prevent layout breakage, guarantee schema validation, and protect payment gateway security.
You cannot delete these core fields using the delete key in the canvas. You must control their visibility using the sidebar settings panel.
When should a store revert to Classic Checkout?
While Checkout Blocks represent the future of WooCommerce development, certain business scenarios still require the classic shortcode:
-
Legacy payment gateway requirements: Regional banks or custom merchant gateways that have not implemented the WooCommerce Store API.
-
Complex conditional field logic: Stores that show or hide fields based on custom user roles, B2B tax exemptions, or specific product categories.
-
Established custom PHP hooks: Existing child theme templates built around actions such as
woocommerce_checkout_before_customer_detailsorwoocommerce_after_order_notes.
To switch back to Classic Checkout, edit your Checkout page and remove the Checkout Block. Then add a standard Shortcode block and insert [woocommerce_checkout]. For detailed hook implementations, read our guide on how to edit WooCommerce checkout page.
How can store owners customize and streamline checkout fields?
Streamlining checkout fields means removing every non-essential input so buyers complete purchases with minimal cognitive fatigue.
Every extra field added to a checkout form increases drop-offs. In 2024 usability benchmarks, mobile checkout abandonment climbs over 65% when forms require more than 12 form fields. Virtual keyboards also obscure submit buttons on mobile screens.
Deciding which fields to keep, hide, or require
Audit your checkout fields by product category:
-
Digital and downloadable products: Eliminate shipping address, shipping method, and delivery phone number. Require only first name, last name, and email address.
-
Physical goods: Set Company Name and Address Line 2 to hidden unless your store caters primarily to commercial office addresses.
-
Telephone numbers: Make phone numbers optional unless your freight carrier strictly mandates SMS notifications for parcel delivery.
-
Order comments: Disable order notes if your fulfillment workflow does not process custom delivery instructions.
Using dedicated checkout field managers
When native block toggles are insufficient, dedicated checkout field plugins allow merchants to expand functionality:
-
Create custom field types including date pickers for deliveries, file uploads for custom print orders, and VAT validation fields.
-
Reorder billing and shipping sections to match international postal conventions.
-
Implement conditional rules that display gift packaging checkboxes only when physical merchandise is present in the cart.
Explore comprehensive plugin options in our guide to checkout field customization.
How to add custom checkout fields with PHP code
For stores running Classic Checkout ([woocommerce_checkout]), you can add, validate, and store custom checkout fields without a plugin. Add three core action hooks in your child theme’s functions.php file.
First, render the custom field on the checkout form using the woocommerce_form_field() utility function:
<?php
/**
 * Display custom age verification field on the checkout page
 */
add_action( 'woocommerce_after_order_notes', 'storeapps_add_custom_checkout_field' );
function storeapps_add_custom_checkout_field( $checkout ) {
	echo '<div id="custom_checkout_field"><h3>' . __( 'Verification' ) . '</h3>';
	woocommerce_form_field(
		'customer_age',
		array(
			'type'        => 'text',
			'class'       => array( 'form-row-wide' ),
			'label'       => __( 'Enter your age' ),
			'placeholder' => __( 'Age' ),
			'required'    => true,
		),
		$checkout->get_value( 'customer_age' )
	);
	echo '</div>';
}
Second, enforce server-side validation during the checkout submission cycle to ensure the field is not left blank:
<?php
/**
 * Validate the custom field during checkout submission
 */
add_action( 'woocommerce_checkout_process', 'storeapps_validate_custom_checkout_field' );
function storeapps_validate_custom_checkout_field() {
	if ( empty( $_POST['customer_age'] ) ) {
		wc_add_notice( __( 'Please enter your age before completing checkout.' ), 'error' );
	}
}
Third, save the submitted input to order meta using $order->update_meta_data(). This modern method supports both High-Performance Order Storage (HPOS) and legacy post tables:
<?php
/**
 * Save custom field data to order meta (HPOS and legacy compatible)
 */
add_action( 'woocommerce_checkout_update_order_meta', 'storeapps_save_custom_checkout_field' );
function storeapps_save_custom_checkout_field( $order_id ) {
	if ( ! empty( $_POST['customer_age'] ) ) {
		$order = wc_get_order( $order_id );
		if ( $order ) {
			$order->update_meta_data( 'customer_age', sanitize_text_field( $_POST['customer_age'] ) );
			$order->save();
		}
	}
}What are the five core types of WooCommerce checkout flows?
Different buyer mindsets require distinct checkout architectures, ranging from single-click instant purchases to structured multi-step sequences.
One-page checkout for faster conversion
A one-page checkout combines product selection, cart review, and payment fields onto a single screen.
Buyers complete their purchase on a single unified interface. They never bounce between separate cart and checkout pages.
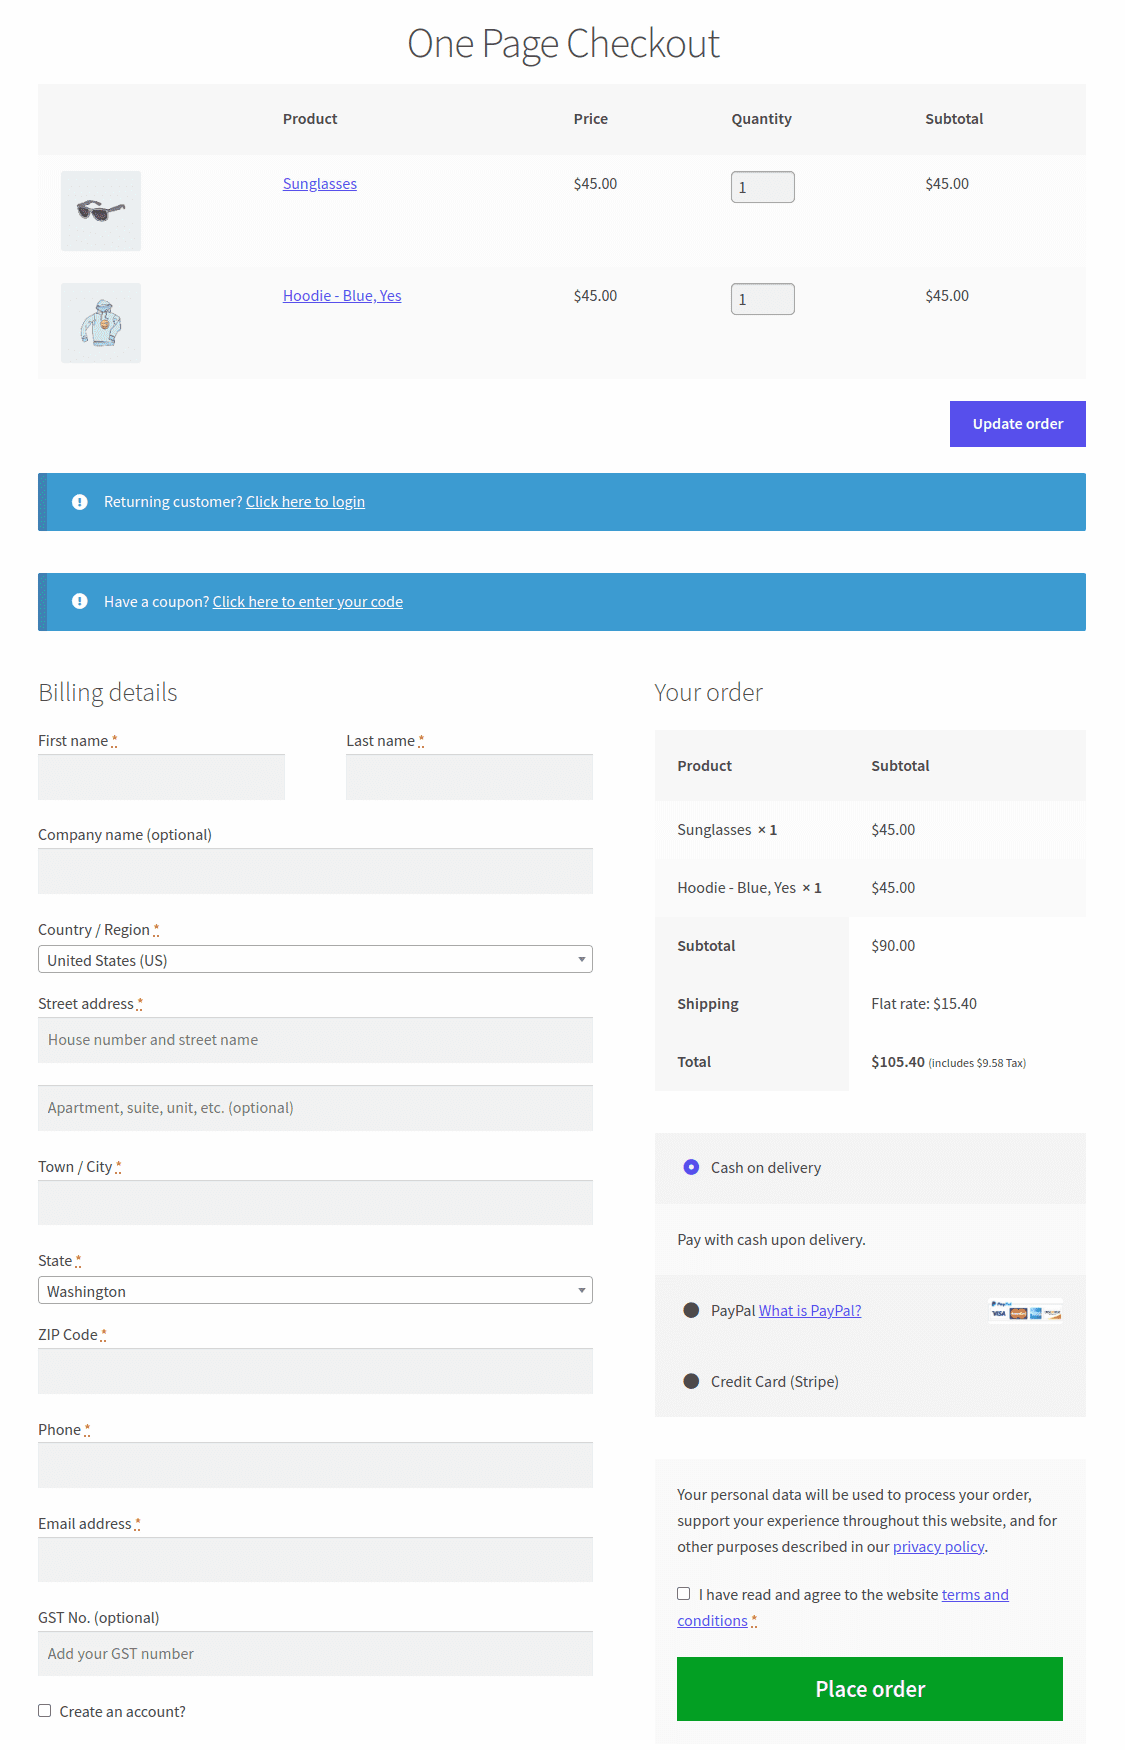
Collapsing steps into a single page cuts page load friction. High-volume eCommerce case studies show a 7% to 10% lift in completed impulse orders.
Best suited for:
- Single-product stores and direct-to-consumer hero items.
- Event ticket sales and digital membership registrations.
- Targeted pay-per-click landing pages.
Learn how to configure this layout with our step-by-step tutorial on WooCommerce one page checkout.
Multi-step checkout for structured purchases
A multi-step checkout breaks the standard form into sequential stages, such as Details → Shipping → Payment → Confirmation.
Presenting twenty form inputs on one screen intimidates mobile buyers. Multi-step layouts display three or four related fields at a time. Clear progress breadcrumbs guide buyers smoothly forward.
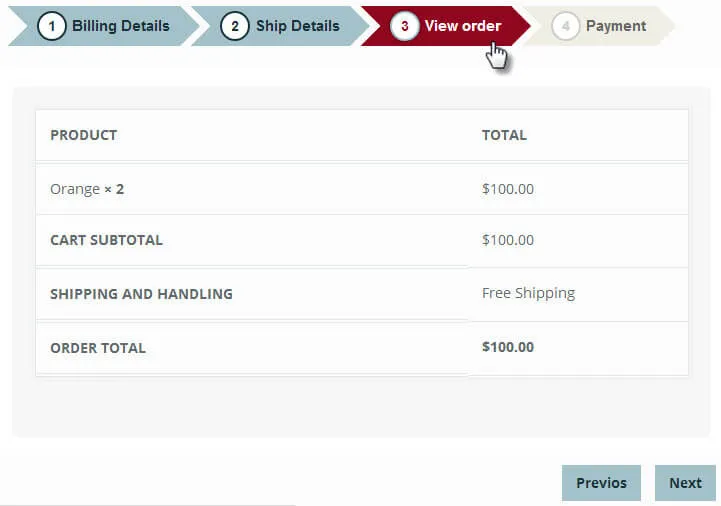
Multi-step layouts improve clarity by validating each section independently. If a user enters an invalid postal code on step two, they resolve it before reaching credit card submission.
Best suited for:
- Physical merchandise requiring distinct billing, shipping, and delivery instructions.
- Custom-made or personalized items where buyers review custom configurations.
- Wholesale and B2B orders with corporate purchasing guidelines.
See setup instructions in our guide to multi-step checkout.
One-click checkout for returning customers
One-click checkout allows returning customers to complete an order with a single click, using previously stored shipping addresses and tokenized payment details.
Modeled after Amazon’s 1-Click purchase system, this layout bypasses form entry for authenticated users. It relies on stored credit cards and default shipping addresses.
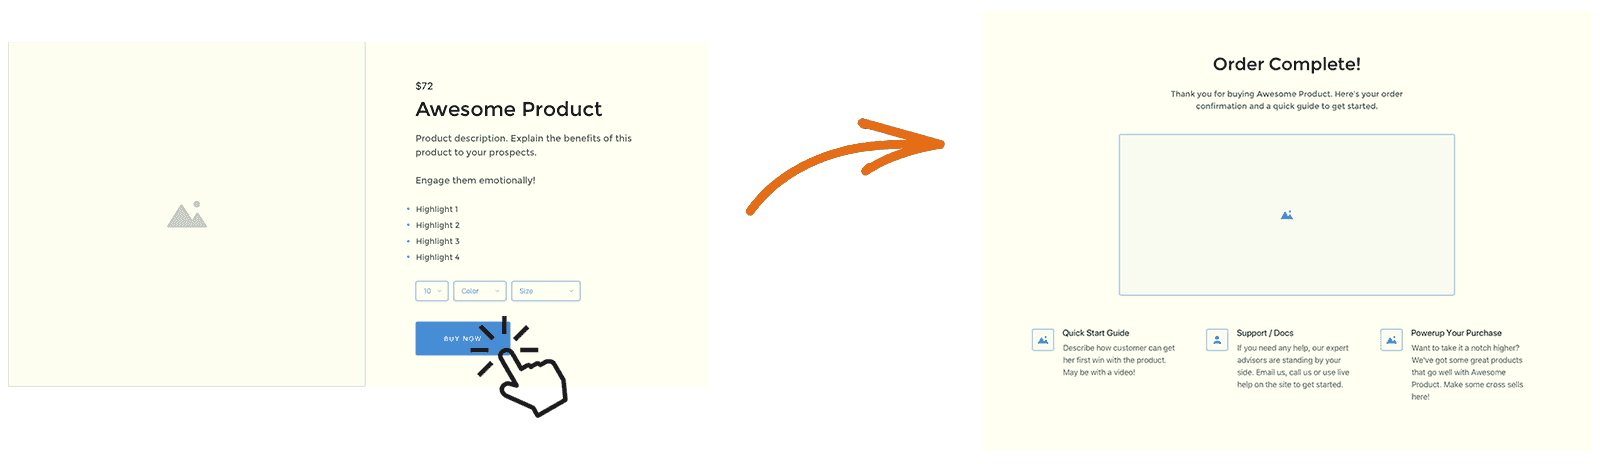
One-click buying eliminates friction for repeat purchases. When a customer knows their preferred card and delivery location are already secured, repurchasing becomes an instantaneous decision.
Best suited for:
- Consumable products with frequent reorder cycles (coffee, supplements, pet food).
- Subscription renewals and account upgrades.
- VIP customer loyalty programs.
Direct checkout to skip the cart
Direct checkout bypasses the traditional cart page, routing shoppers straight from the “Buy Now” button to the checkout form.
On standard stores, adding an item to the cart displays a view cart banner. The customer clicks to the cart, reviews totals, and clicks again to reach checkout. Direct checkout eliminates that middle step.
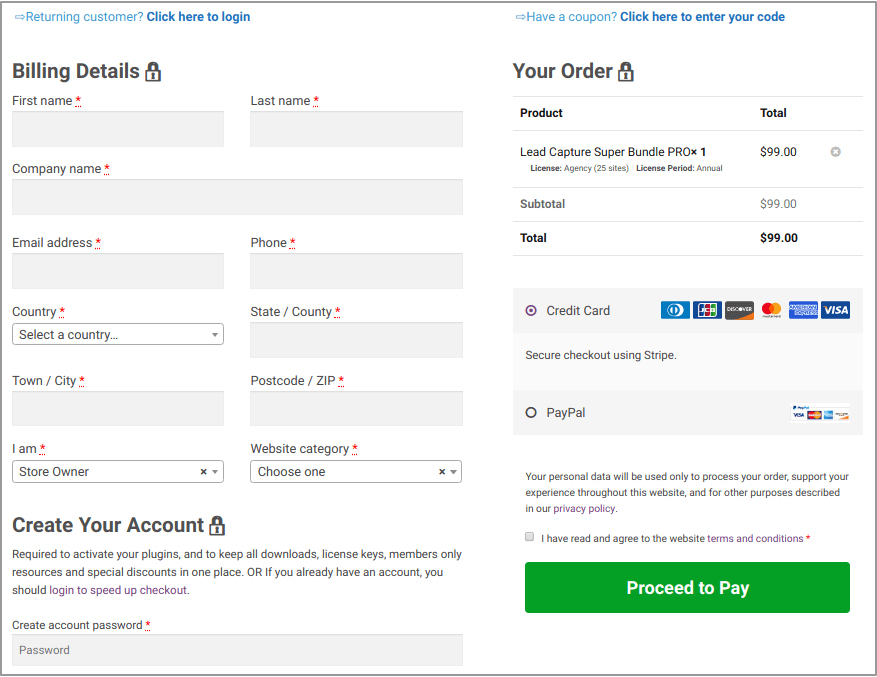
Direct checkout captures buying intent before motivation fades. It pairs cleanly with slide-in cart drawers and auto-applied discount links.
Best suited for:
- Stores selling one or two core products.
- Limited-time promotional emails and holiday flash sales.
- Paid social ads linking directly to product checkouts.
Read our full walkthrough on WooCommerce direct checkout and explore overall WooCommerce cart optimization.
Popup modal checkout
A popup checkout opens the billing and payment form inside an overlay window directly on the product or landing page.
Instead of navigating away from the catalog or content page, the customer completes the transaction within the modal and receives instant confirmation.
Best suited for:
- Digital downloads, software licenses, and eBook sales.
- Media-heavy sites where preserving user browsing context matters.
- Donation collections and non-profit fundraising campaigns.
Review practical setups in our guide to WooCommerce popup checkout.
Which checkout architecture best fits your business model?
Selecting the right checkout architecture depends on your catalog diversity, average order value (AOV), and customer buying frequency.
Single-product brands and paid traffic landing pages
When running paid ads on Google or Meta, acquisition costs mount quickly. Every unnecessary page reload depresses return on ad spend (ROAS). Use a direct Buy Now link or embed a one-page checkout on dedicated landing pages.
Stores selling physical merchandise with multiple variations
Stores selling physical goods with sizing, colors, and shipping choices require buyer reassurance. Pair a modern slide-in mini-cart with a clean multi-step checkout. Customers review variations without getting overwhelmed by form fields.
Subscription boxes and consumable reorders
Stores that sell coffee beans, vitamins, or monthly subscriptions depend on repeat buying velocity. In WooCommerce 8.0+ stores, tokenized payment vaults allow one-click renewals on account and product pages. Storing verified payment methods accelerates repurchases.
High-ticket and B2B stores
When orders exceed $500, buyers prioritize security over raw checkout speed. Corporate purchasing agents look for PO numbers, company tax IDs, and clear shipping timelines. Use a structured multi-step checkout with distinct review steps.
How do checkout plugins and tools map to specific store jobs?
Rather than installing half a dozen overlapping plugins that bloat your WordPress database, map specific checkout extensions to verified store bottlenecks.
| Store bottleneck | Recommended solution | Core capability | Key integration or alternative |
|---|---|---|---|
| Multi-step navigation friction | Cashier | Combines One-Page Checkout Direct Buy Now and Side Cart | Cashier vs CheckoutWC comparison |
| Checkout field clutter | Checkout Field Manager | Add remove and reorder custom billing and shipping inputs | checkout field customization |
| Low average order value (AOV) | Smart Offers | In-checkout order bumps dynamic BOGO and one-click upsells | Automated conditional checkout rules |
| Checkout abandonment on exit | Cart recovery automation | Captures emails early and triggers automated recovery sequences | abandoned cart recovery |
| Cart friction before checkout | Slide-in drawer cart | Sticky cart panel with real-time AJAX edits and instant checkout link | slide-in mini-cart |
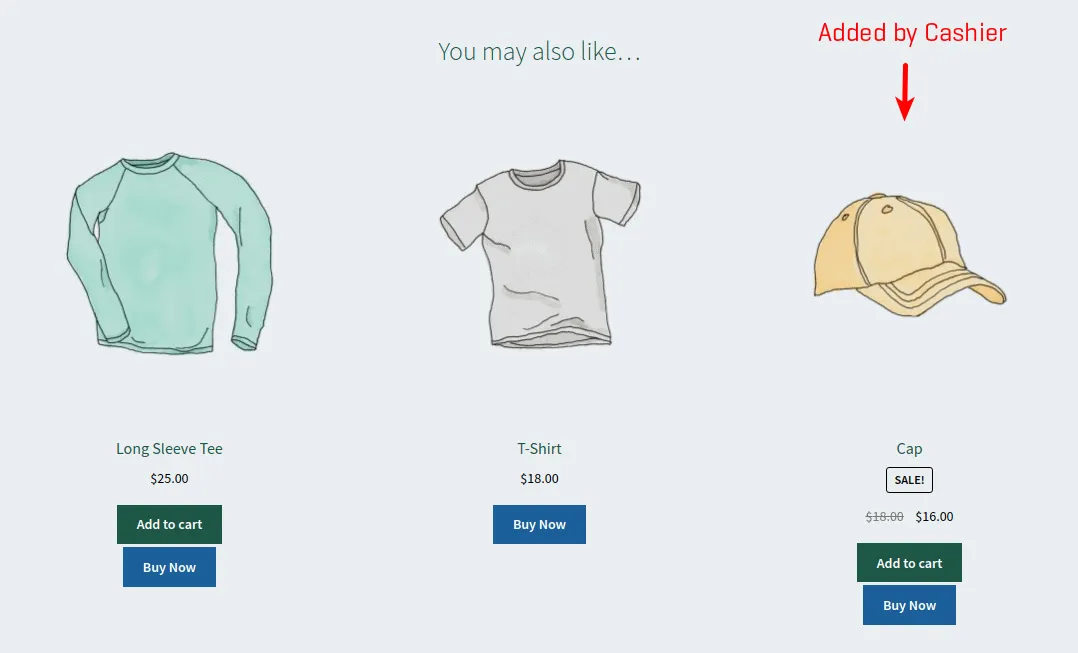
Cashier: all-in-one checkout velocity
Cashier consolidates multiple speed and layout optimizations into one lightweight plugin without forcing full theme template overrides.
It provides store operators with:
-
One-page checkout flows: Embed product selection, cart totals, and payment forms on any standard WordPress page or post.
-
Direct Buy Now buttons: Generate links and buttons that skip the cart and auto-apply coupon discounts directly from marketing emails.
-
Slide-in side cart: A modern drawer cart allowing customers to update quantities and checkout without reloading the screen.
-
Checkout field editing: Add, hide, or reorder default fields to remove virtual product friction.
Pricing: $149/year (StoreApps single-site license).
Best for: Stores seeking faster checkouts, one-page buying, and field streamlining without heavy funnel builder bloat.
CheckoutWC: Shopify-style checkout replacement
CheckoutWC replaces the native WooCommerce checkout template entirely with a high-conversion, multi-step interface modeled after Shopify’s checkout system.
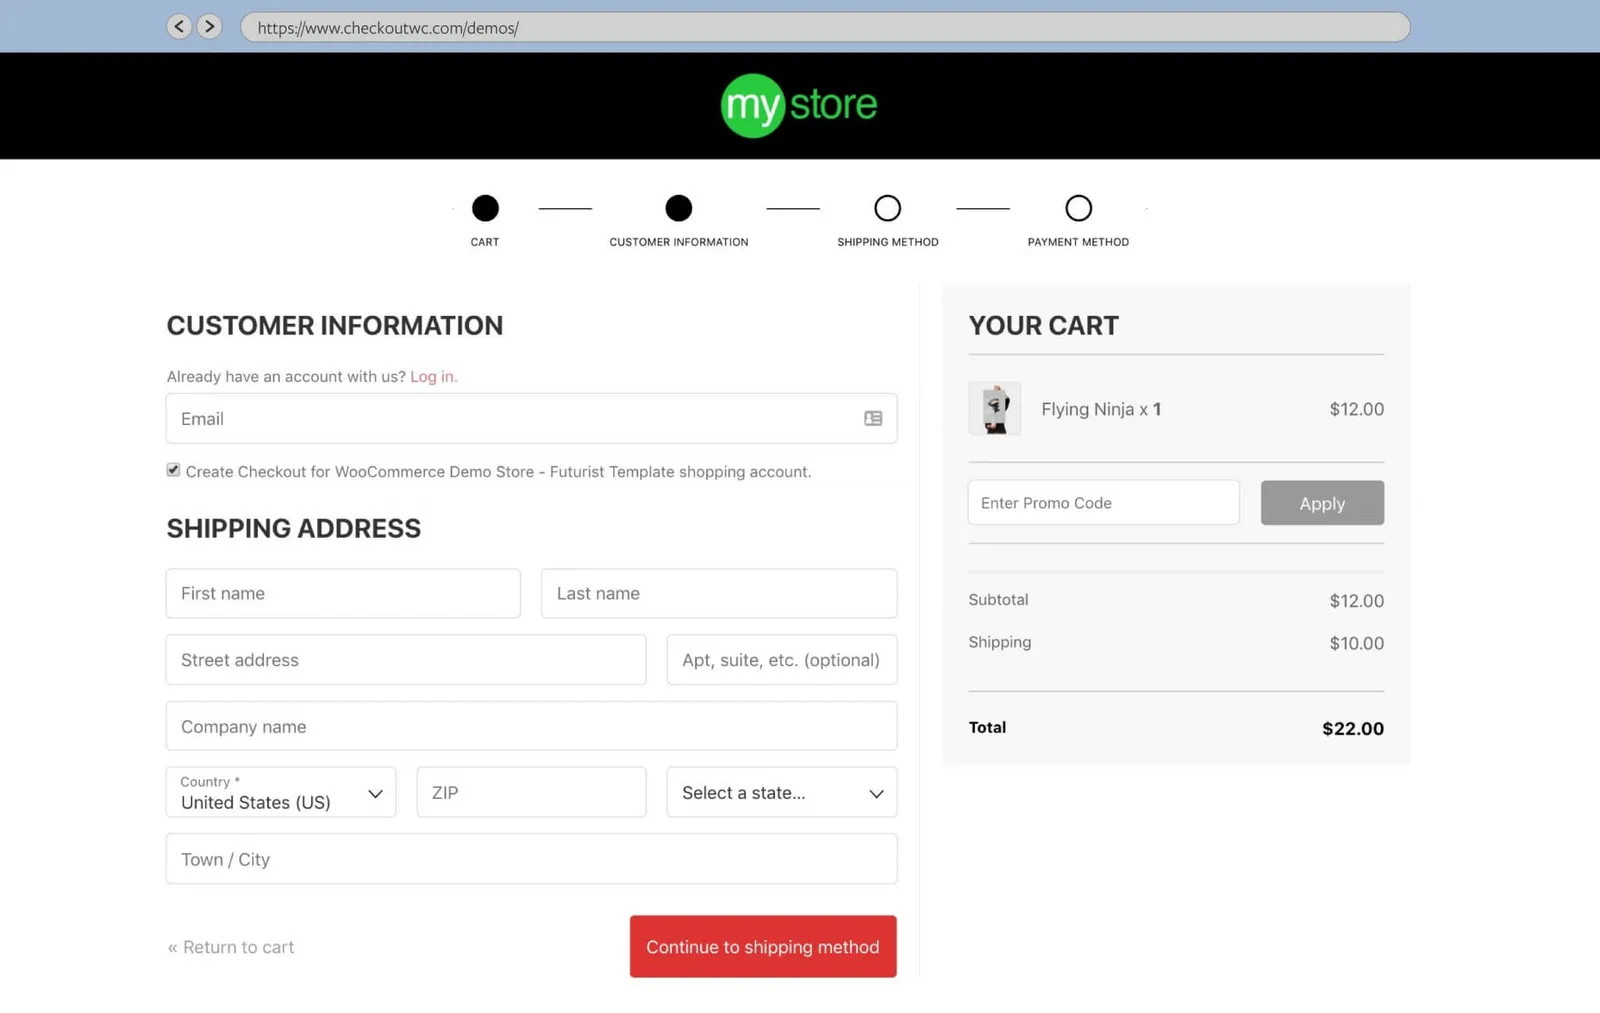
Key capabilities include:
-
Distraction-free multi-step layout: Separates customer contact info, shipping methods, and payment details into three clean stages.
-
Google address autocomplete: Auto-completes shipping addresses to reduce postal errors and mobile typing.
-
Built-in side cart and order bumps: Integrates floating cart drawers and pre-purchase bumps into the template.
Pricing: Free version available on WordPress.org; premium tiers start at $149/year.
Best for: Stores selling physical goods with complex shipping requirements that want a proven Shopify-like checkout experience out of the box.
WooCommerce One Page Checkout: landing page product tables
The official WooCommerce One Page Checkout extension by Automattic combines product selection with billing fields on custom landing pages.
Key capabilities include:
-
Template options: Pre-built templates for single products, product pricing tables, and curated product lists.
-
Shortcode integration: Insert checkout forms into any landing page created with your preferred WordPress editor.
-
Compatibility: Tight integration with official Automattic extensions including Subscriptions and Bookings.
Pricing: $79/year.
Best for: Single-product promotions, event registrations, and dedicated marketing landing pages.
Smart Offers: conditional in-checkout order bumps
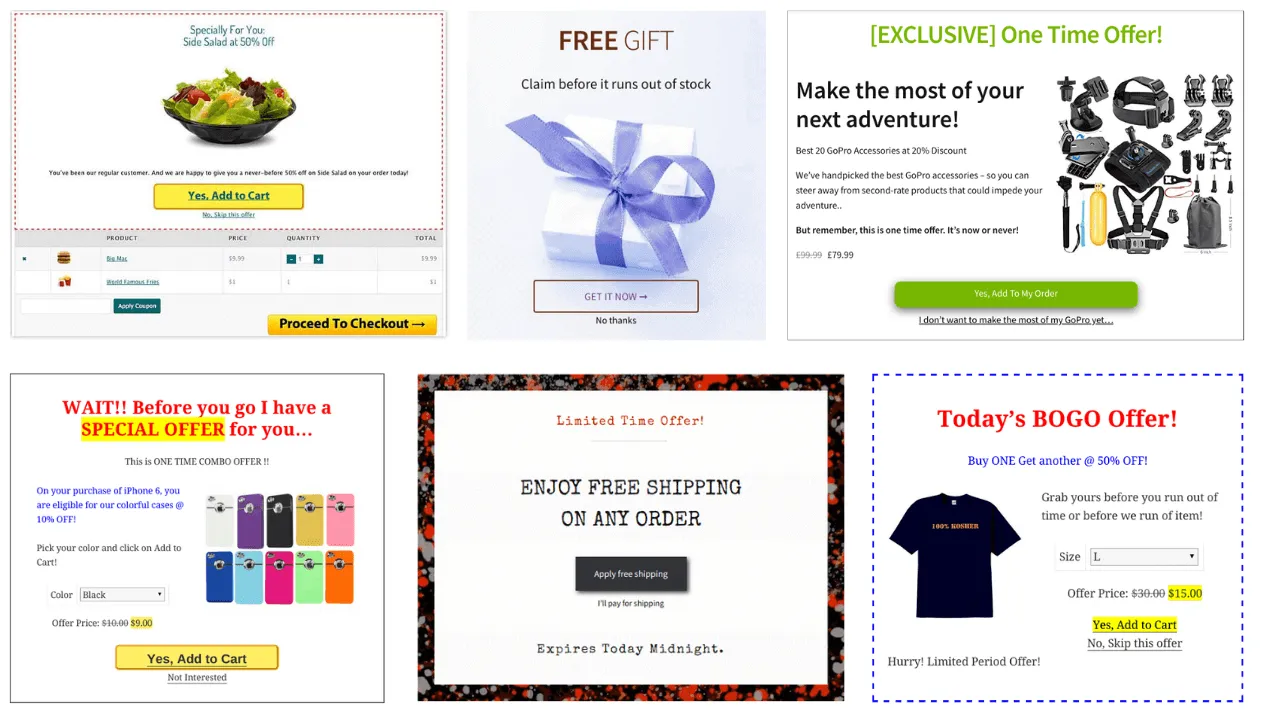
Smart Offers is a specialized conversion engine that displays targeted upsells, cross-sells, BOGO offers, and order bumps directly inside the checkout funnel.
Key capabilities include:
-
Granular targeting rules: Trigger offers based on cart total, product categories, customer purchase history, or user roles.
-
Flexible placements: Display offers as in-checkout order bumps, inline product recommendations, or post-purchase popups.
-
One-click upsell acceptance: Add accepted offers directly to the active cart without forcing form re-entry.
Pricing: $149/year.
Best for: Stores focused on lifting average order value (AOV) through automated, rule-based cross-sells and bumps.
PeachPay: express product page checkout
PeachPay adds a quick checkout window directly on product pages, enabling one-click purchases with stored customer details.
Key capabilities include:
-
Express payment integration: Full support for Apple Pay, Google Pay, PayPal, and credit cards in a compact popup.
-
Returning buyer recognition: Automatically fills billing and shipping details for returning shoppers across participating stores.
-
Multicurrency handling: Native currency detection for cross-border eCommerce.
Pricing: Free core version on WordPress.org; premium features at $99/year.
Best for: Mobile-first impulse buy stores and brands with high repeat purchase rates.
For a comprehensive head-to-head evaluation of these plugins, read our guide on the best WooCommerce checkout plugins.
The complete checkout lifecycle: connecting the five sub-pillars
A successful checkout strategy extends beyond the checkout URL itself. Every customer journey spans five interconnected phases, each anchored by a core sub-pillar.
Cart and pre-checkout stage
The purchase begins long before the checkout template loads. Testing custom add-to-cart buttons and refining your cart page customization sets clear shipping and price expectations.
Checkout flow and layout stage
Selecting between one-page, multi-step, and direct purchasing paths defines the physical layout of the transaction screen. Explore complete design paradigms in our hub on WooCommerce one page checkout.
Form fields and data compliance stage
Collecting regulatory tax details, EU VAT numbers, and delivery instructions requires structured form management. Streamline your fields through our checkout field customization hub.
Order confirmation and thank you stage
The transaction does not end when payment clears. The confirmation screen validates order details, provides immediate next steps, and drives retention. Learn how to design high-converting receipt screens in our guide to custom WooCommerce thank you page and manage redirecting customers after checkout.
Leakage prevention and cart recovery stage
Even optimized checkouts lose roughly 70% of potential buyers. Setting up automated email sequences, SMS alerts, and exit prompts recovers lost revenue. Discover proven recovery playbooks in our hub on abandoned cart recovery and build automated sales funnels.
What strategies maximize conversions before and after checkout?
Maximizing store revenue requires optimizing the buyer journey on both sides of the payment gateway.
Pre-payment conversion tactics
-
Auto-apply coupon parameters: When driving traffic from promotional newsletters, embed discount codes directly into checkout URLs so shoppers receive promised discounts without hunting for coupon codes.
-
Offer in-checkout order bumps: Present low-cost complementary accessories (warranty, priority packing, gift wrapping) directly above the payment button using Smart Offers.
-
Display transparent shipping thresholds: Show a dynamic progress indicator (“Add $12 more for Free Shipping”) inside the cart or checkout header to lift average order value.
-
Enable guest checkout by default: Allow first-time visitors to purchase without forcing password creation. You can invite them to save their account credentials on the order confirmation screen.
-
Place security badges near payment fields: Display SSL encryption seals and verified gateway badges (Stripe, PayPal, Visa, Mastercard) directly adjacent to credit card inputs to reinforce transactional trust.
Post-payment retention tactics
-
Offer post-purchase one-click upsells: Present complementary items immediately after initial payment authorization, charging the customer’s stored token without requiring them to re-enter billing details.
-
Provide immediate onboarding resources: For software or digital courses, include direct download links and getting-started tutorials on the order-received page.
-
Trigger timely post-purchase check-ins: Schedule automated follow-up emails forty-eight hours post-delivery to confirm satisfaction and invite verified product reviews.
FAQ
How do I customize the WooCommerce checkout page without coding?
You can customize the WooCommerce checkout visually using the Gutenberg block editor. If your store runs a block theme with WooCommerce 8.3 or newer, navigate to Appearance → Editor → Templates → Checkout. From there, you can adjust field visibility (such as hiding company name or phone number), toggle address line 2, and reposition order summary blocks without touching code. For advanced customizations such as custom fields or one-page layouts, use a dedicated plugin like Cashier.
Can I switch back to classic WooCommerce checkout from checkout blocks?
Yes. You can switch back to Classic Checkout by editing your Checkout page in WordPress, deleting the Checkout Block, inserting a standard Shortcode block, and typing [woocommerce_checkout]. Update the page, and WooCommerce will instantly render the classic server-side template, restoring compatibility with legacy payment gateways and traditional PHP action hooks.
Why are fields locked with padlock icons in WooCommerce checkout blocks?
Padlock icons appear next to core fields (such as name, email, and address inputs) because they are protected components of WooCommerce’s atomic block API. WooCommerce locks these fields to prevent unintended deletions that would break order processing or fail gateway validation. While you cannot delete them on the canvas, you can toggle optional fields off using the block settings sidebar.
What is the difference between one-page checkout and direct checkout?
A one-page checkout displays product selection, cart totals, and billing forms on a single screen so buyers complete the transaction without page refreshes. Direct checkout skips the intermediate cart page entirely, sending the customer straight from a product “Buy Now” button to the checkout page. Many high-converting stores combine both techniques for maximum speed.
Does enabling guest checkout improve store conversion rates?
Yes. Forcing shoppers to create an account and verify an email address before paying is one of the top causes of checkout abandonment. Enabling guest checkout in WooCommerce → Settings → Accounts & Privacy removes that barrier. You can give customers the option to create an account on the thank-you page after their payment is complete.
Where should you start?
Improving your checkout flow does not require an immediate, site-wide redesign. Take three practical steps:
-
Audit your current checkout engine: Check whether your store runs modern Checkout Blocks or the classic
[woocommerce_checkout]shortcode to establish your customization baseline. -
Strip out two non-essential fields: Hide Company Name and Address Line 2 in your editor settings to immediately shorten your mobile form length.
-
Test a direct checkout flow: Deploy a “Buy Now” button on your highest-selling product to evaluate whether skipping the cart page lifts conversion rates.
To consolidate one-page layouts, Buy Now buttons, and custom field editing into one lightweight system, equip your store with Cashier.
Sany Majumdar
Good Initiative to make a list for good WooCommerce Checkout plugins.
John Bauer
Great list of plugins.
Another plugin I'd like to recommend is Checkout Address Autofill for WooCommerce, which is one of the best options for speeding up the checkout process on your online store. It assists customers in autofilling their address fields, saving them valuable time while remaining unobtrusive.