To use Paypal with WooCommerce, you need to integrate them.
And integrating PayPal with WooCommerce requires a PayPal Identity Token and Business Account, which can be created without any expenses. Upon completion, you can accept payments with a reasonable transaction fee.
So what exactly is the PayPal Identity Token and why is it required for integration? Let’s see the steps to set it up.
What is PayPal Identity Token and why do you need it?
A PayPal identity token is a unique code or security measure that verifies a user’s PayPal account with WooCommerce. It ensures secure communication between the two and confirms the legitimacy of PayPal payments.
After a customer makes a purchase with PayPal as their payment method, PayPal sends an Identity Token to the merchant’s website. The token provides information that helps the merchant verify the payment’s legitimacy and confirms that it was made through PayPal.
The absence of the Identity Token may result in incorrect recording or processing of PayPal payments, causing potential errors and fraud risks.
Essentially, the PayPal identity token is crucial for authenticating payments without relying on PayPal’s Instant Payment Notification (IPN). It allows customers to track their payment process through a secure channel.
Steps to get PayPal Identity Token for WooCommerce
- Log in to your PayPal account.
- Go to
Account Settings > Website payments. - Under
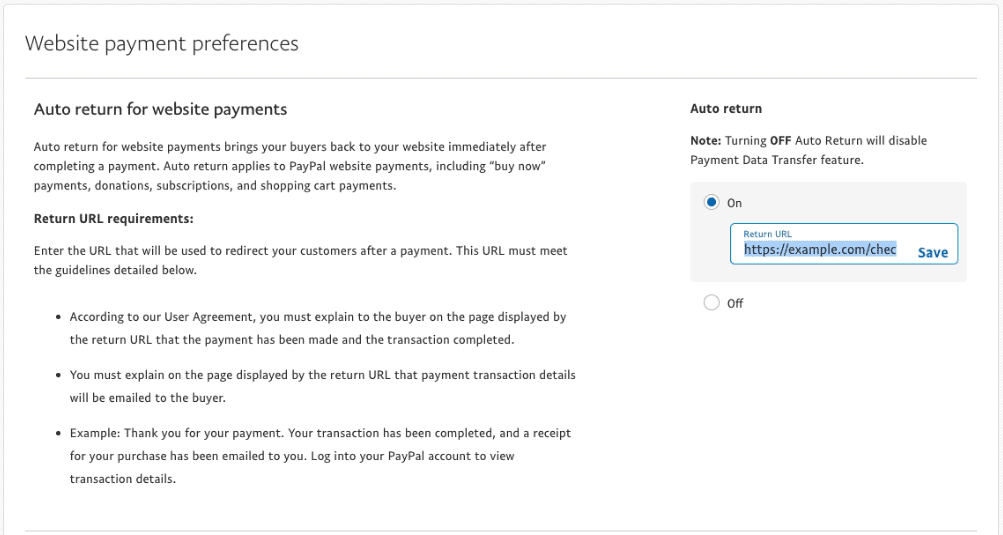
Website preferences, click on theUpdatelink. - Select
OnunderAuto return for website payments. - Add your store’s Thank You Page link to the Return URL field.
- Next, under Payment data transfer, select
On. - You should see your Identity Token listed at the bottom.
- Copy the Identity Token to your clipboard.
- Now, log in to your WordPress Admin dashboard. Go to
WooCommerce > Settings > Payments. - Click on the PayPal payment gateway.
- Paste the Identity Token into the
PayPal identity tokenfield. - Click the Save changes button.


That’s it! Your WooCommerce store should now be able to communicate securely with PayPal and process payments with the PayPal payment gateway.
Note – However, before you copy and paste the PayPal identity token, you must set up PayPal on your WooCommerce store using the below steps.
Setting up PayPal on WooCommerce
- Go to your WordPress Admin dashboard > WooCommerce > Settings.
- Click on the
Set Upbutton next to the enabled PayPal option located on thePaymentstab. - Next, configure the Standard settings by following these steps:
- Enable/disable – check the box to enable PayPal as your payment gateway
- Title – enter the checkout page heading
- Description – add a payment description or a message for your customers.
- PayPal email – input your PayPal email used for payment collection.
- Then, set up the Advanced options section as follows:
- PayPal sandbox – Leave the PayPal sandbox unchecked as it requires a developer account.
- Debug log – Check the Debug log box to log all PayPal events.
- IPN email notifications – tick the box to receive refund, chargeback, and cancellation notifications.
- Receiver email – add the email address to receive the notifications.
- PayPal identity token – enter the identity token from PayPal.
- Invoice prefix – if you connect the PayPal account to multiple stores, add a combination of letters and numbers to differentiate your invoices in the Invoice prefix field.
- Shipping details – check the box to allow PayPal to create shipping labels instead of billing customers directly.
- Address override – to prevent customers from modifying their address, leave the checkbox unchecked.
- Payment action – choose Capture to process the payments immediately or Authorize to approve them manually.
- Page style – input the name of the PayPal page style you want to use for the checkout page.
- Image URL – utilize this option to showcase a 150x50px image in the upper left corner of the checkout page.
Lastly, configure the PayPal API credentials section using the information provided by PayPal if necessary.
Once done, save your changes.
Conclusion
I hope this blog answers your questions like “how to find PayPal identity token”, “where to find PayPal identity token”, and other PayPal-related questions. For any questions or suggestions, drop a line below.