
Once your WooCommerce store is set up, you are ready to add products.
Believe me, it is very easy to add products, thanks to the combined utility of WooCommerce and WordPress.
In this article, we’ll first see the different product types and then how to add products in WooCommerce.
And lastly, how to easily manage hundreds and thousands of products in bulk.
The core WooCommerce product types
WooCommerce lets you use different product types based on what you sell.
There are four core product types to choose from:
- Simple product – The default one and doesn’t have options. For example – a cap.
- Grouped product – A combination of simple products. For example – a set of 6 dining plates.
- External/Affiliate product – A product listed on your site but sold elsewhere. This option is suitable for those having a dropshipping business, or an affiliate store.
- Variable product – Offers multiple variations like colors, sizes, etc. For example – iPhone 14 in different colors and storage options.
In addition to the core product types, you get two more options:
- Virtual – For those who sell a digital product but don’t require shipping. For example – a service contract, a store credit, etc.
- Downloadable – Digital product wherein customers are given a downloadable file as a link – audio file, ebook, plugin, etc.
Apart from these product types, there are extensions that add their own product types – subscriptions, bookings, memberships, etc.
Now let’s jump right into adding products.
How to add products in WooCommerce?
We’ll first see how to add a simple product in WooCommerce. The process is mostly the same for other product types, just that you’ll just get a few additional options. The images for adding products are taken from WooCommerce docs.
Go to your WordPress Admin panel > Products > Add New. Then configure as follows:
Add product title and a description
Enter your product name in the title. Then, add up your product description as to what it is and its benefits. You can use bullets and other elements for better readability.
While writing the description and title, optimize it for keywords to reap SEO benefits.
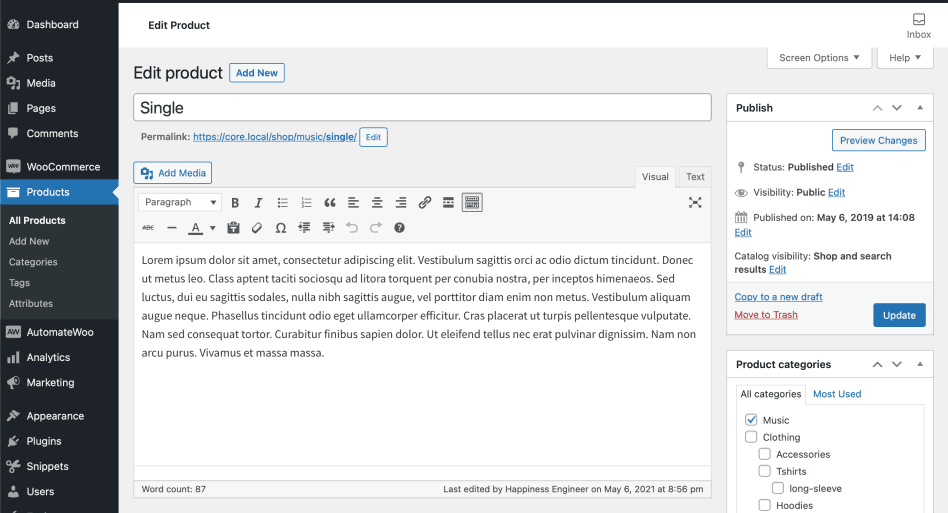
Product data
Locate the Product Data meta box where the majority of important data will be added for your products.
Choose product type
The product types are explained above. Select ‘Simple product’ from the drop-down. Select the downloadable or virtual option if applicable.
General tab
Enter the prices for your product under the Regular price and Sale price boxes respectively. If you wish to run a discount campaign, enter the sale price accordingly. If kept blank, shoppers will only see the regular price.
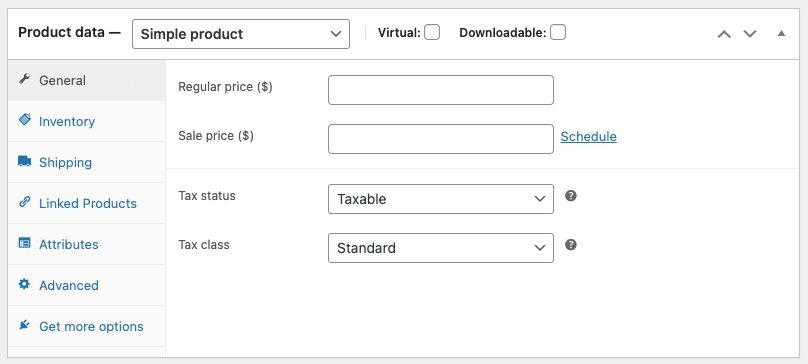
Below it, select the tax status and whether your product is taxable or not. If yes, select the tax class. This option is only visible if you have tax enabled in your store.
Inventory tab
The Inventory tab helps you manage your stock efficiently.
Enable Stock Management must be selected in the Products Inventory settings; otherwise, only the Stock status option is visible in the Product Data Inventory box.
The SKU, stock status, backorders and other options will be there by default.
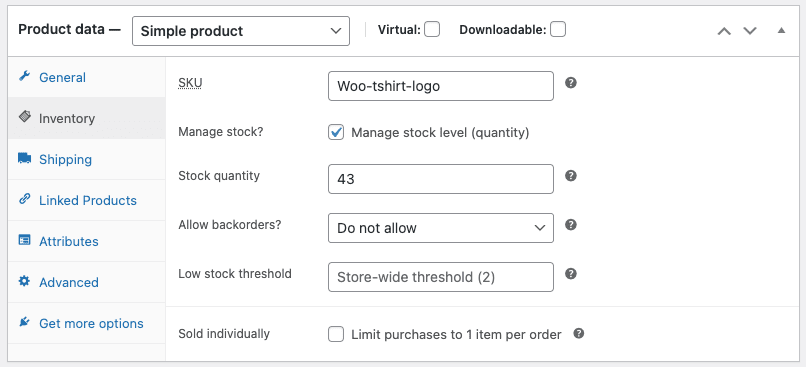
- You can either assign the SKU manually or use a WordPress plugin to generate unique SKUs.
- Check the
Manage stock?option to auto-update stock. - Enter the number of pieces available in the stock quantity, and it will auto-update.
- Allow backorders if the product will be available shortly.
- The low stock threshold is to notify you about the product’s stock going below the threshold.
- Use the sold individually option to allow only one product quantity to be purchased.
Shipping tab
Under the shipping tab, you can enter the required details for physical products – product weight, dimension and associated shipping classes.
Linked products tab
Use this section to recommend related products and boost your average order value. You can recommend any additional product (cross-sell) or a premium or better version of the existing product (upsell).
The default upsells and cross-sells are basic and lack rules for targeted conversions.
Attributes tab
Attributes will help you set colors, sizes, and more. To set default attributes, refer to this guide.
Advanced tab
- Purchase note – enter an optional note to send the customer after they purchase the product.
- Menu order – custom ordering position for this item.
- Enable Reviews – enable/disable customer reviews for this item. This is visible only if reviews are enabled on the store.
We are almost done. Time to add some finishing touches.
Product short description
Add an excerpt. This will appear next to product imagery on the shop page, and the long description appears in the Product Description tab.
Taxonomies
On the right-hand side of the Add New Product panel, you can add product categories and product tags like you do for any WordPress post.
Refer to our blog for more details on creating and managing WordPress custom taxonomies.
Product images
Add the main product image. It will be the largest image on the single product page and will also appear on the catalog page.
You can also add extra images that appear in the gallery on the single product page.
That’s it. Check once if all details are correct and hit the Publish button. In the Publish panel, you can set Catalog Visibility for your product.
Now let’s have a quick overview of adding other product types.
Adding a grouped product
Grouped products do not have prices or stock numbers of their own.
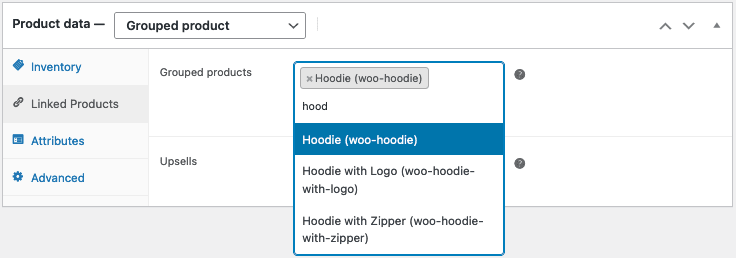
You need to create a Grouped product that is empty, then create simple products and add them to the Grouped product. Refer to the steps to create a grouped product.
Adding an external/affiliate product
- Select
External / Affiliateproduct type from the dropdown. - This will first remove the shipping section from the left side and will add two new fields in the General section:
- the Product URL – the destination where users can purchase this product.
- Button text fields – lets you change the normal Add to cart button text to your preferred text like Buy Now.

Adding a variable product
Creating a variable product lets you define variations of a single product where each variation may have a different SKU, price or stock level.
There are more steps involved here. So we recommend you check out WooCommerce Variable Product docs for a guide on creating a product with variations.
Another smart option is to duplicate a variable product and create similar variable products quickly. Here’s how to duplicate products in WooCommerce within minutes.
Adding a virtual product
When adding a Simple product, you can tick the Virtual checkbox box in the product type panel. With Variable products, the checkbox would be found for each variation.
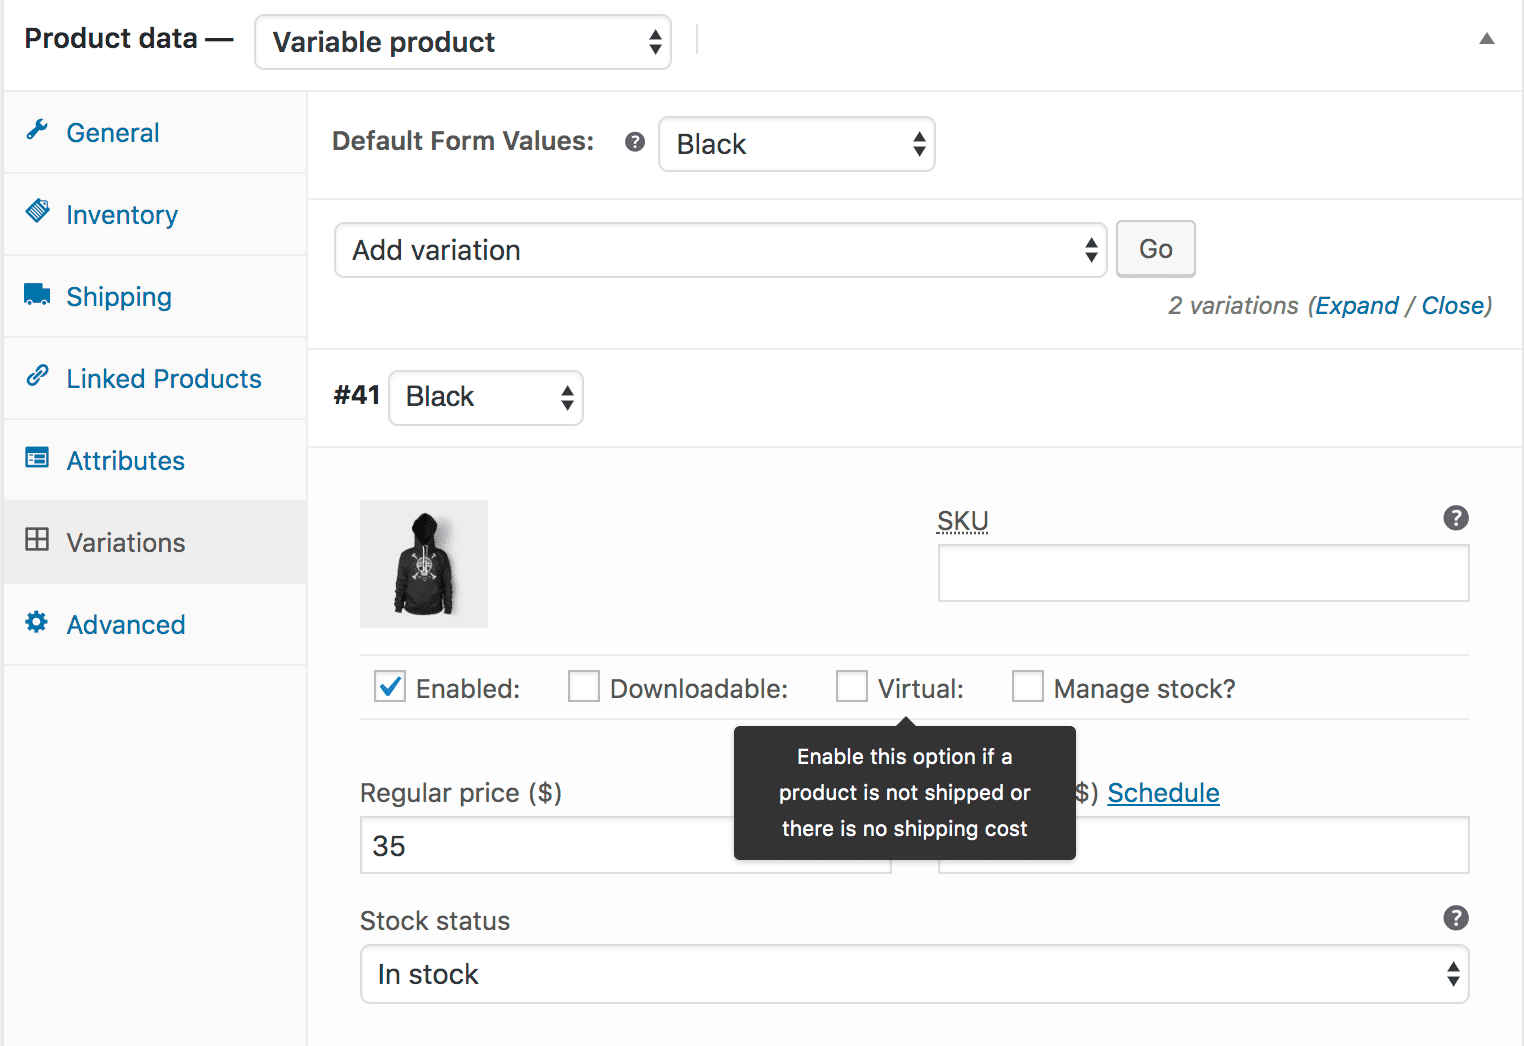
Enabling this disables all shipping-related fields such as shipping dimensions. A virtual product will also not trigger the shipping calculator in the cart and checkout.
Adding a downloadable product
When adding a simple product, tick the Downloadable checkbox box in the product type panel. This adds three new fields:
- File path – path or URL to your downloadable file.
- Download limit – limit on the number of times the customer can download a file. Leave it blank for unlimited downloads.
- Download expiry – the number of days before a download link expires.
Adding subscription, booking, membership products
If you use the WooCommerce Subscriptions, WooCommerce Bookings and WooCommerce Memberships extensions, you can create the respective product types.
It’s the same interface you saw above. The product type will be added to the ‘Choose product type’ dropdown and you can set the product data with additional options.
- For a subscription product, you can set the subscription price, sign-up fee, free trial option, expiry date, etc.
- For a bookable product, you can set the booking duration, booking dates, blocks, price, persons, etc.
- And for memberships, you can set membership access, duration, price, etc.
How to bulk edit and manage all WooCommerce products?
Creating products in WooCommerce is easy. But if your store has hundreds and thousands of products, it’s a nightmare to manage them and take care of the daily operations.
You need to visit each product page to make changes. Changing prices, assigning attributes and categories, adding descriptions…there are hundreds of tasks that will eat away your time.
But not when Smart Manager is around.
Smart Manager provides an Excel-like sheet editor to manage and bulk edit all your products from one place. Be it simple and variable products or even subscriptions and bookings, you can manage all product types.
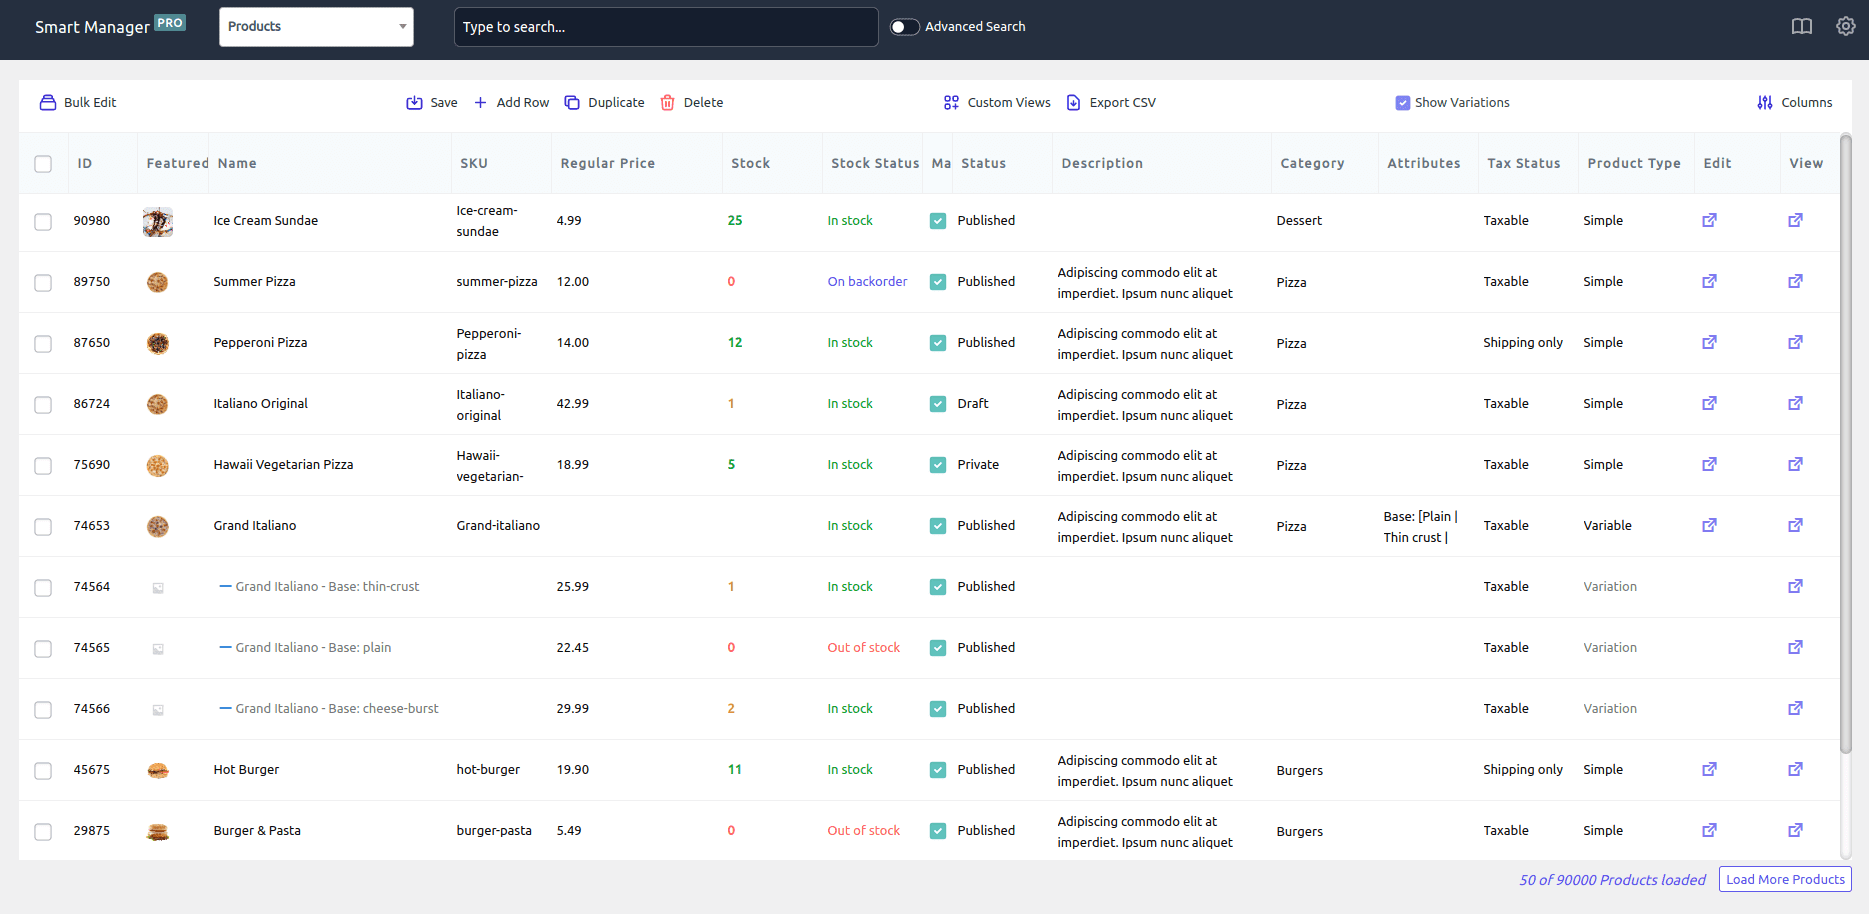
You can now accomplish these mundane tasks that take hours and days within minutes:
- Modify product description, quantity, price and other details directly using the sheet editor.
- Bulk reduce the regular price by 10% for all products in the store.
- Set the sale price the same as the regular price for all products in the Clothing category
- Bulk assign attributes to products
- Filter all products except simple and modify their prices.
- Filter products by date, category, attributes, tags, and other filters to fetch desired products.
- Delete all products or based on filters in one-click
- Duplicate products and create hundreds of variations
- Export product data to CSV
and more…
Not just products, you can also manage and edit WooCommerce orders, coupons, customers, any WordPress post type and custom taxonomies.
Wrapping up
That’s it from our side. I hope you are now well-versed in adding different product types to WooCommerce. And if you need a solid WooCommerce product manager to take care of your store tasks and save you precious time, use Smart Manager. You can use it without any coding knowledge.
It’s an investment you won’t regret.