That moment when a full cart turns into… nothing.
We’ve all been there — added everything to the cart, feeling great, and then poof… exit stage left.
No purchase. Just – I’ll do it later. That, my friend, is the power (or pain) of a bad checkout experience.
The checkout page is where deals are sealed — or sadly, lost.
So, what’s better for your store: a sleek WooCommerce one-page checkout that gets it all done in a flash, or a WooCommerce multi step checkout that walks shoppers through each stage like a helpful guide?
Don’t know the answer? In this post, we’ll break down both checkout styles, examine their pros and cons, and help you decide which is the real MVP for your store’s conversions.
So, which checkout style is better?
A one-page checkout can help customers complete purchases faster by displaying all checkout fields on a single page. A multi-step checkout breaks the process into smaller steps, which can make checkout feel less overwhelming and easier to navigate, especially when additional information is required.
Neither option is the best fit for every store. The right choice depends on factors such as your products, checkout complexity, customer preferences, and mobile experience. Understanding these differences can help you create a smoother checkout process and reduce cart abandonment.
First, let’s talk about the slower-but-sleek option — WooCommerce multi step checkout.
WooCommerce multi step checkout
WooCommerce multi step checkout, as the name suggests, breaks the entire checkout process into smaller, bite-sized stages, like adding product to cart, billing, shipping, payment, and review.
So instead of overwhelming users with everything at once, it guides them step by step, just like how you fill out a form at the doctor’s office (but way less stressful).
Each step focuses on a specific task, keeps your customers focused, avoids mistakes, and gives them more control over their purchases.
Taking it slow (and why that’s good)
- Organized flow: Keeps users focused with bite-sized steps.
- Fewer errors: Easier to double-check details.
- Professional feel: Looks more polished and trustworthy.
- Progress bar: Shows how far they’ve come—boosts confidence.
But wait, there’s a catch!
Not everything’s perfect though:
- Slower checkout: Studies show WooCommerce multi-step checkouts take 20–30% longer to complete on average, depending on the product type.
- Higher drop-offs: Every click is a chance to abandon.
- Setup hassle: Needs extra plugins or customization.
- Mobile friction: Not always mobile-friendly.
Is multi-step checkout right for you?
If you’re in one of these niches, WooCommerce multi step might be your best bet:
- Luxury brands: Customers expect a guided, polished experience.
- FMCGs & electronics: Helps users double-check complex orders.
- Custom products: Step-by-step flow works great for personalization.
- Subscription services: When explaining plans or add-ons in stages.
So, if multi-step checkout is for you, let’s go deep into the setup.
How to set up WooCommerce multi-step checkout with CheckoutWC?
If your checkout looks messy, then you can try CheckoutWC.
This is a popular and top-rated plugin that allows you to replace your checkout page with responsive, beautiful, faster and conversion-optimized pages.
The plugin comes with features like list of card editing, address autocomplete and support for most payment gateways and shipping providers.
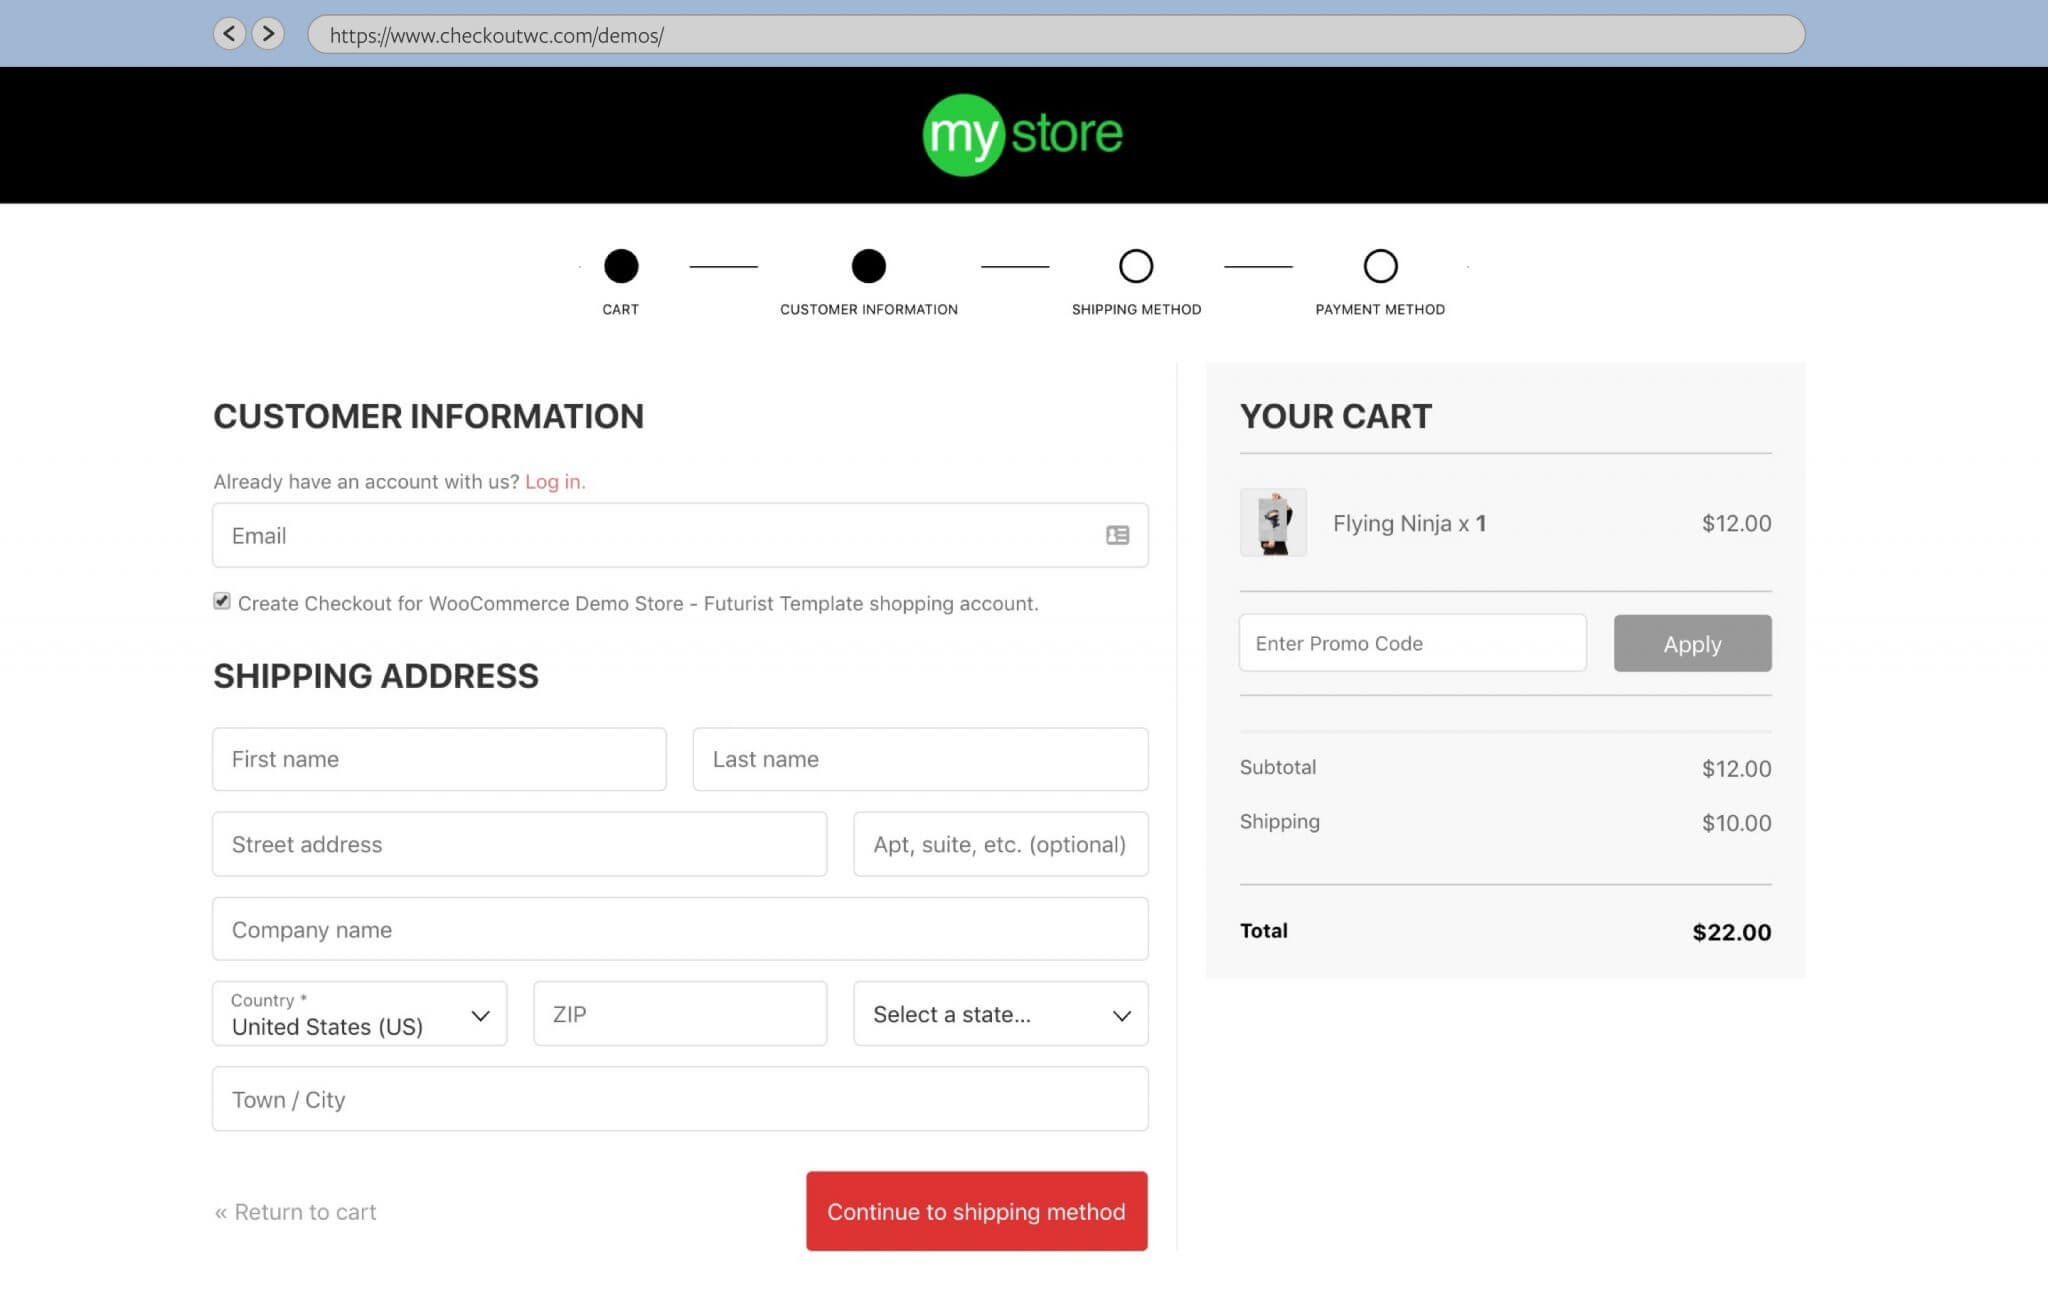
Here’s how to set up a WooCommerce multi step checkout using CheckoutWC:
- Install CheckoutWC and activate your license key from the General Settings.
- Deactivate all other similar plugins to avoid any conflicts.
- Once done, go to your store and test the checkout page to ensure everything works properly.
- Next, it’s time to add your brand colors. You can edit the layout and design based on your choice using several design templates available.
- Once you have chosen a template, you can configure the design in
WordPress admin > CheckoutWC > Appearance > Design. - Continuously monitor pixel configuration before launching the checkout page of the website.
- Once your checkout page is tested and configured according to your preference, head to General Settings and activate CheckoutWC for the world.
That’s it!
So yes, WooCommerce multi step checkout has its place—but what if your customers don’t want to play the long game?
That’s where the one-page checkout zooms in.
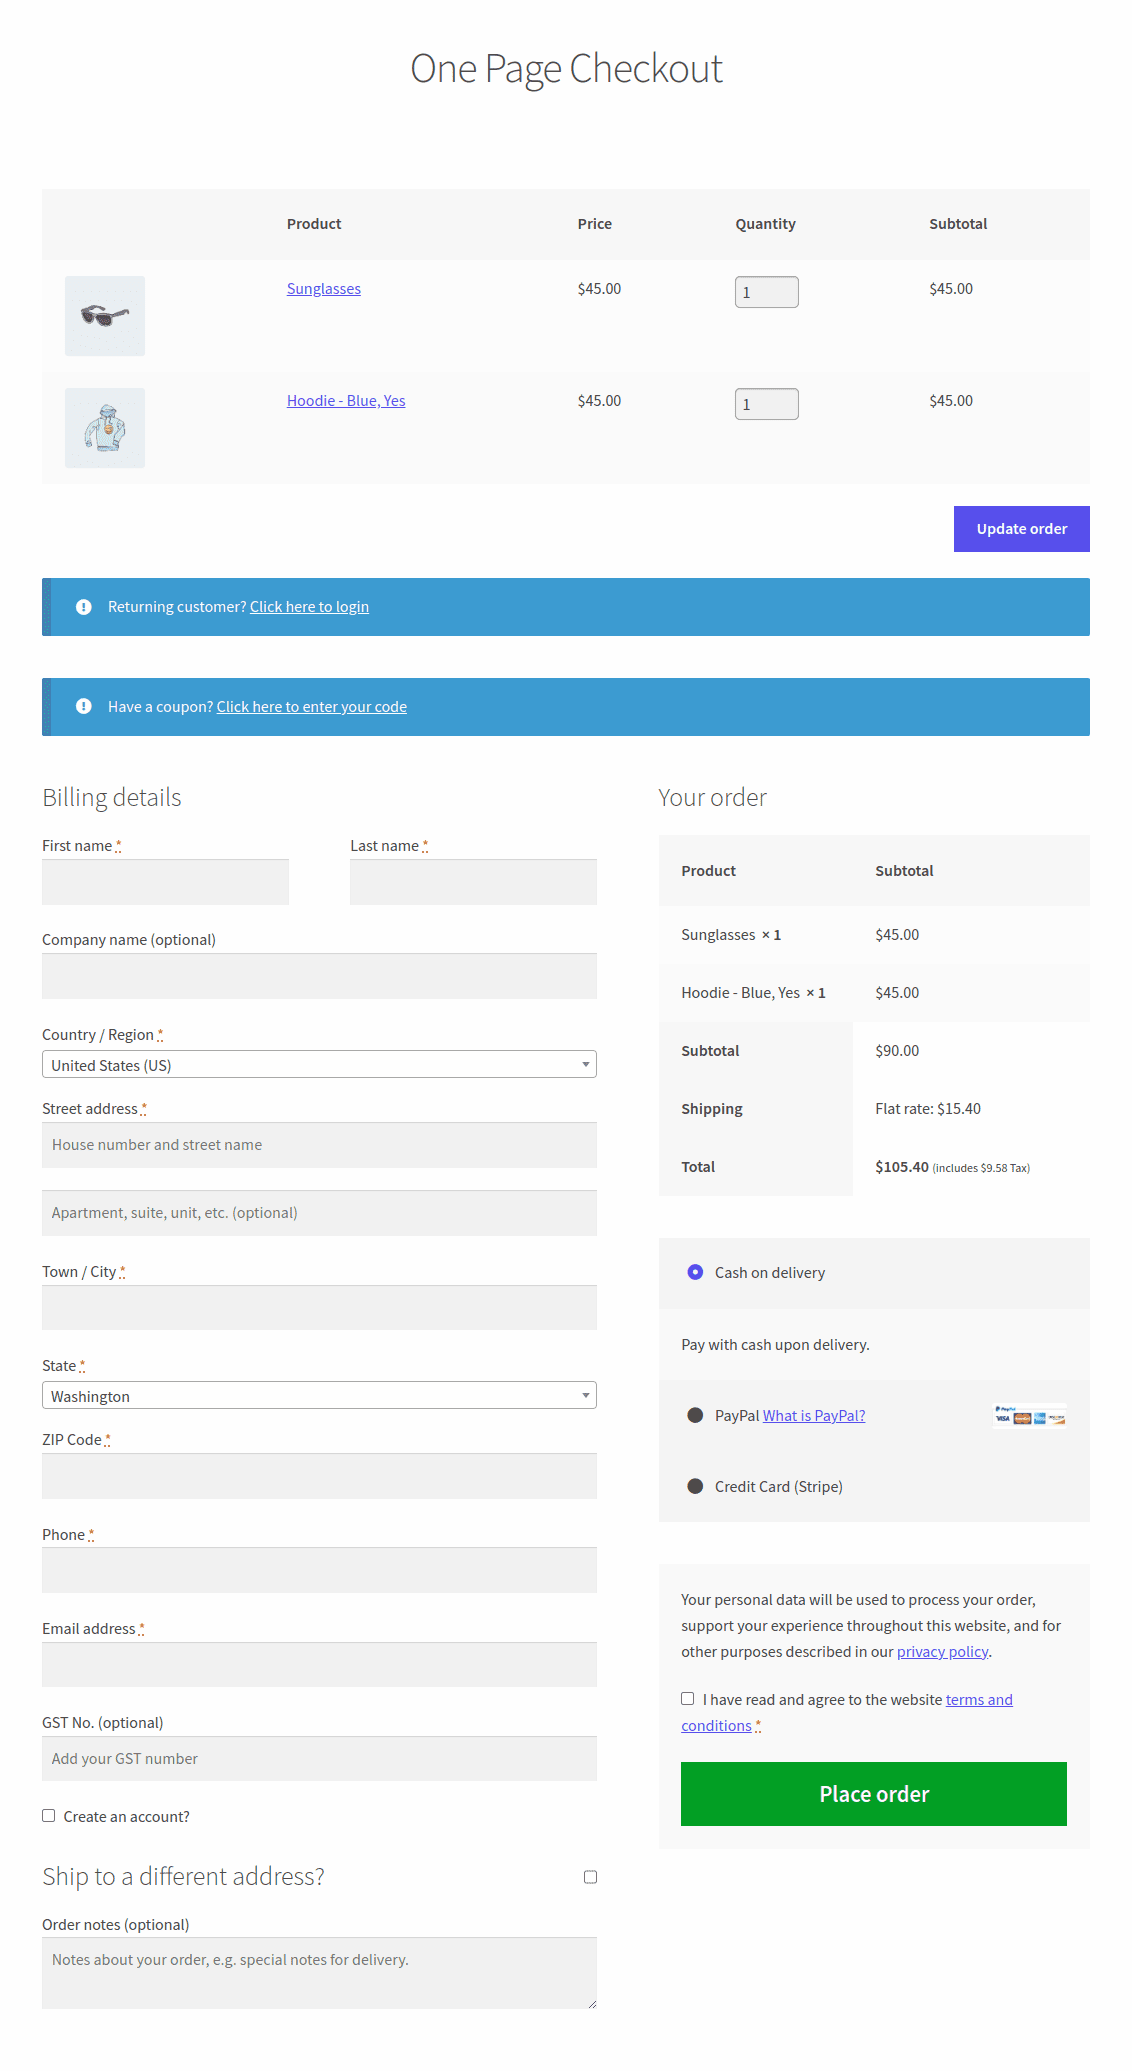
WooCommerce one page checkout
As the name suggests, one page checkout puts everything — billing details to payment — on a single page.
No flipping between tabs. No next-next-next. Just a clean, scrollable view where the entire checkout happens in one go.
It’s all about speed, simplicity, and keeping your customers in the buying zone.
Why go one-page?
Here’s what makes one-page checkout a fan favorite:
- Speedy process: Fewer clicks = faster conversions.
- Better for mobile: Less loading, more buying.
- Lower abandonment: All info visible at once keeps users moving.
- Simplicity: Clean layout, no fuss.
But before you get too excited, there are a few things to consider before choosing WooCommerce multi-step checkout.
The not-so-perfect side?
- Can feel cluttered: Too many fields at once = overwhelm.
- Harder to track: No stage-by-stage analytics.
- Limited customization: Fewer chances to guide or upsell.
- Not ideal for complex orders: Confusing for products that need options or configuration.
Is a one-step checkout right for you?
One-step checkout works great for:
- Fashion & accessories: Quick decisions, repeat buyers.
- Digital products: Instant delivery, instant checkout.
- Single-product stores: One product = no need for extra steps.
- Flash sale sites: Time-sensitive = faster is better.
- Small ticket items: Low-risk purchases don’t need lengthy checkouts.
So, if single page checkout is for you, let’s go deep into the setup.
How to set up WooCommerce one-step checkout with Cashier?
If you’re all about speed and simplicity, Cashier is your checkout BFF. It strips away the hassle of multiple pages and cramps everything — billing, shipping, and payment — into a sleek one-page experience.
Here’s what makes Cashier one of the best choices for one page checkout:
- Set one-page checkout based on specific products, product IDs, and product categories.
- Turn any page into a one-page checkout.
- Mobile optimization for faster loading.
- Easy setup with no complicated configurations.
- Works with all payment methods that WooCommerce supports.
Now, let’s see how to set it up.
But first, install and activate the Cashier plugin. Then go to WooCommerce > Cashier > Settings. Enable the One Page Checkout option using the toggle.
Now, follow these steps:
- Go to
WordPress Admin > Pages > Add New. - Add the page title. Let’s say One Page Checkout here.
- Select
OPCon the menu bar of the WordPress / Classic editor. If you are using the Gutenberg editor, refer to the documentation. - A popup window will appear. From the drop-down:
- If you choose pre-selected products, click
Create shortcodeand publish the page. - If you choose product IDs, search and select the products, click
Create shortcode, and publish the page. - If you choose a product category, search and select the category, click
Create shortcode, and publish the page.
- If you choose pre-selected products, click
- Publish your page.
Now you need to select products for one page checkout.
- Go to the
Productssection. - Select a product (simple or variable) to edit it and tick the
One Page Checkoutcheckbox, then clickUpdate. - To enable one-page checkout only for specific variations, tick the
One Page Checkoutbox only for that variation underProduct data > Variations tab. - Update the product.
That’s it.
Cashier does more than just one page checkout, it’s a complete checkout plugin. Here are some additional features of Cashier that you would enjoy:
- Checkout field editor: Add or edit custom fields in billing, shipping, or additional sections with zero coding.
- Auto product recommendations: Smart suggestions to encourage cross-sells and upsells.
- Buy now (one-click checkout): Skip the cart and checkout instantly with a direct payment link or button.
- Side cart / mini cart: Show a slide-out cart for quick access and real-time updates without page reloads.
- PDF invoice generator: Download or print order invoices in one click.
- Pre-applied coupons: Apply discounts automatically on product or checkout pages.
- And so much more.
The ultimate showdown: multi-step vs one-page
Now that we’ve covered both multi-step and one-page checkout in detail, let’s do a quick side-by-side comparison to help you determine which is best suited for your store:
| Parameters | Multi-step checkout | One-page checkout |
|---|---|---|
| UI & Layout | As the entire checkout process is divided into 2-4 pages, the UI and layout look more simple and appealing to the customers. | All the steps are on a single page. Without a proper layout, this may sometimes look intimidating to the customers. |
| Speed | Customers take more time to complete the checkout process. | Customers take very less time to complete the checkout process. |
| Google Analytics | Analyzing the checkout parameters and customer experience is easier due to the multiple pages. | It is difficult to analyze the exact step at which customers decide not to purchase. |
| Review process | Flexible to switch between multiple pages to review the order. This has a higher chance of customers dropping out. | Can review the order once before placing it. This has a higher chance of customers making a purchase. |
| Nudging customers | More opportunities to nudge customers to make a purchase using offers and messages. | Only one page to nudge customers with offers and messages to make a purchase. |
| More suitable for | High-ticket items, FMCGs | Digital products, less product portfolio stores |
In short, if you’re selling high-value or complex products, the guided calm of a WooCommerce multi step checkout might win.
But if speed and simplicity rule your store — one-page is the way to go.
Test, not guess?
There’s no universal answer—what works for one store might not work for another. That’s why the smartest move? Test, don’t guess.
Run A/B tests between multi-step and one-page checkout. Watch how your customers interact and let real data guide your final decision.

About the Author – Akshat Kothari
Engineer by training, marketer by instinct. Akshat is an integral part of the marketing team at StoreApps, where he takes complex WooCommerce concepts and turns them into strategies store owners can put to work immediately. When he steps away from the screen, he’s either exploring a new city or binge watching movies.