Your checkout page is like a handshake — it’s the final moment your customer remembers.
If it’s smooth and easy, they leave happy (and come back for more).
But if it’s slow or confusing? That turns into an abandoned cart.
The good news? You don’t need to be a developer or a WooCommerce wizard to make it better.
With the right plugin, you can customize your checkout in minutes. Want to go the extra mile? A few code tweaks can do wonders too.
In this article, we’ll show you exactly how to edit WooCommerce checkout page via both options.
So let’s get started. But first, let’s understand what are the things you can customize on the checkout page.
What parts of your checkout can you actually customize?
Short answer: more than you probably think.
Long answer? Let’s break it down.
- Replace the default WooCommerce fonts, colors, logo, styles to match your brand.
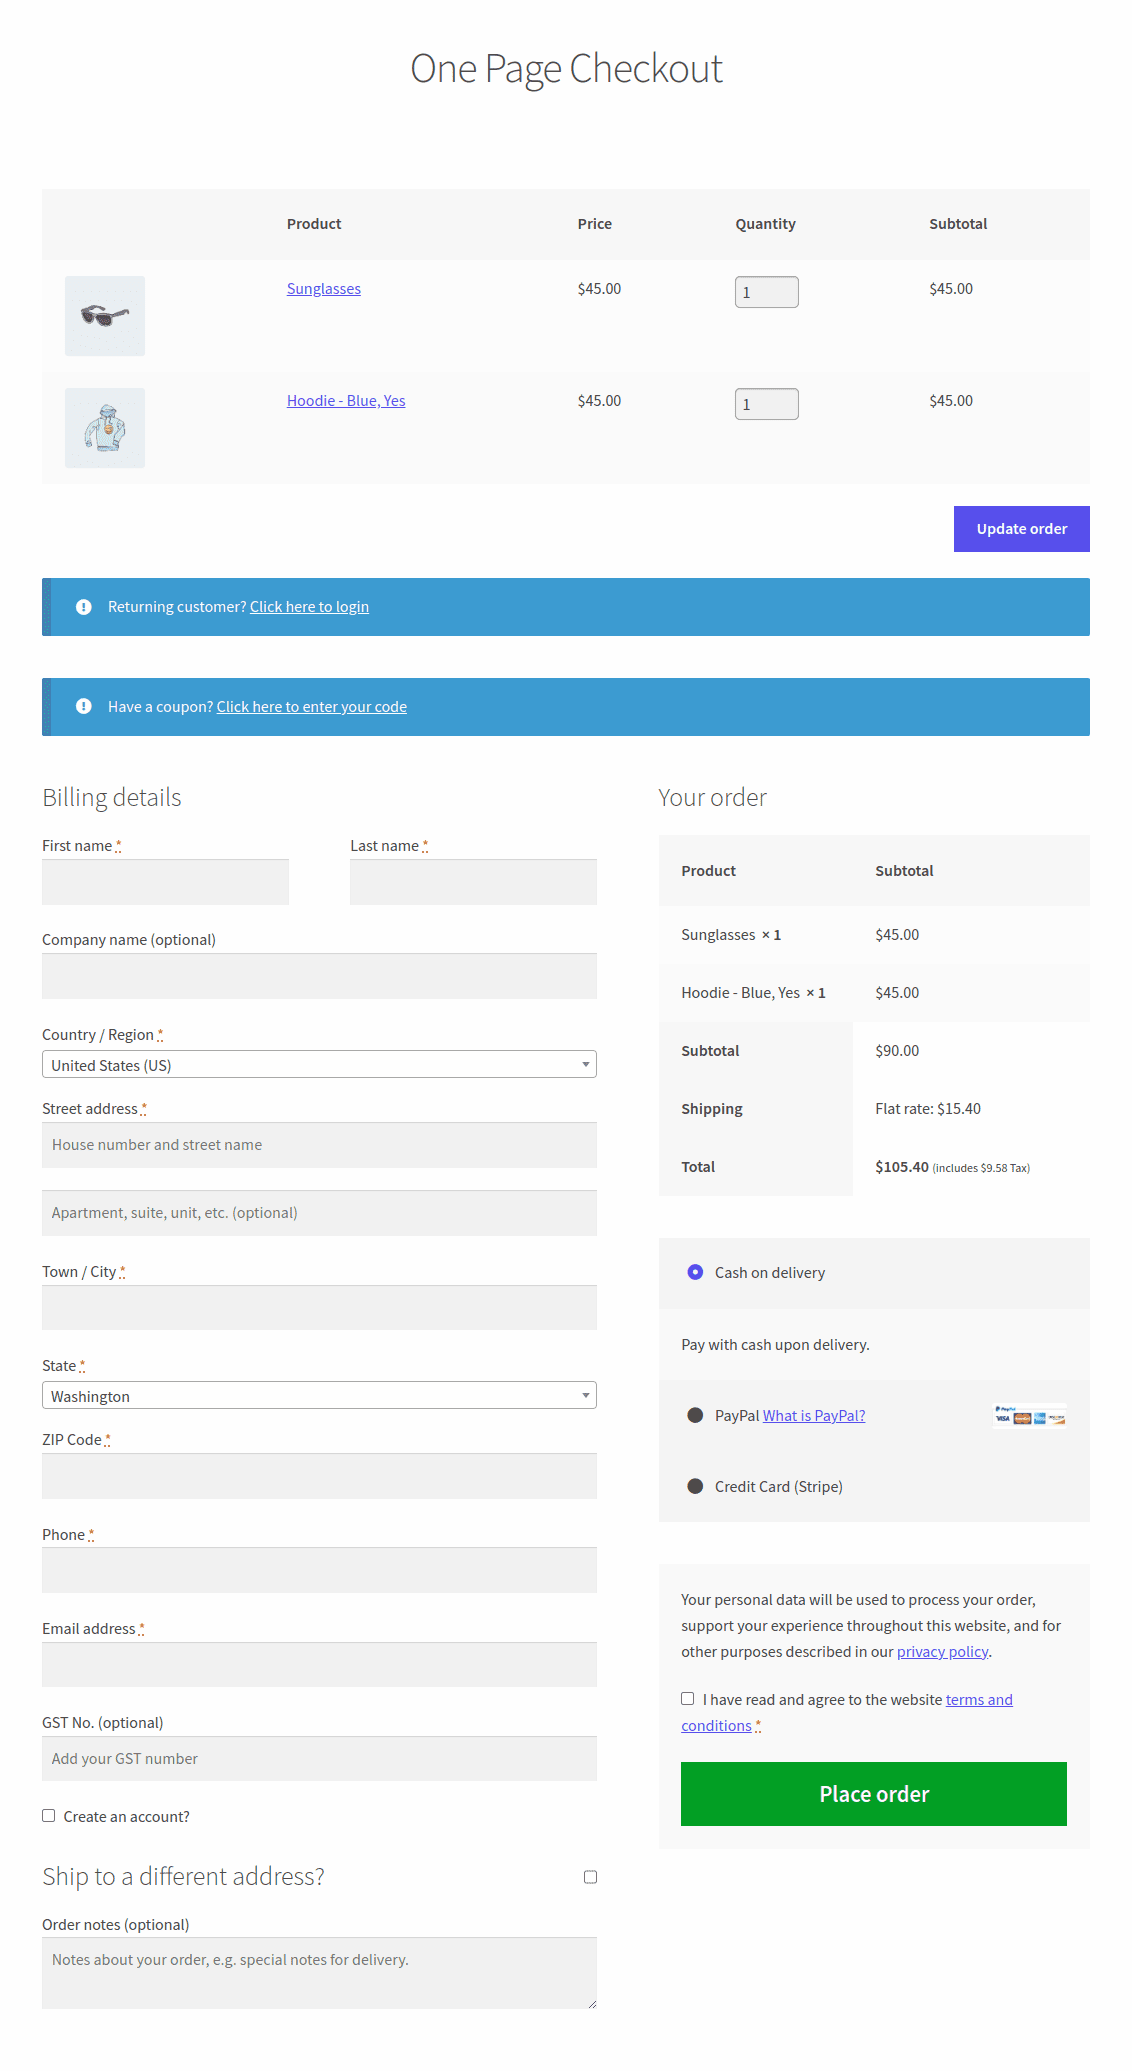
- Speed up the process by enabling one page checkout.
- Add relevant custom checkout fields or remove some additional information.
- Add order bumps to promote related products.
- Modify shipping options.
- Add tax options and coupons at checkout.
- Enable or disable payment gateways.
- Edit the CTA button text and preset field text.
and some more…
Here’s an example of one page checkout using Cashier plugin.
How to customize WooCommerce checkout without plugin?
Let’s see how to edit the WooCommerce checkout page with some code.
In coding, we can customize it in the following ways:
- Via the theme
- Using CSS
- Hooks (actions & filters)
- Custom code
Customizing via theme (checkout template)
You can do a majority of customization using hooks, but to edit the markup on the checkout page, you can do that in a theme also.
Now as per WooCommerce documentation, copy the checkout template to your theme in a folder structure like this: woocommerce/checkout/form-checkout.php.
You can then customize form-checkout.php as desired, and it will load instead of the default template.
Customizing via CSS
CSS classes may change based on your theme or plugins, but the default classes are usually available.
You can customize these classes using custom CSS in a child theme, or the customizer. Here are the main high-level tags, with classes and IDs you can use.
- <body class="woocommerce-checkout">
- <div class="woocommerce">
- <form class="woocommerce-checkout"> <div id="customer_details" class="col2-set">
- <div class="woocommerce-billing-fields">
- <p class="form-row">
- <div class="woocommerce-shipping-fields">
- <p class="form-row">
- <div class="woocommerce-additional-fields">
- <div id="order_review" class="woocommerce-checkout-review-order"><table class="woocommerce-checkout-review-order-table">
- <div id="payment"> <ul class="wc_payment_methods payment_methods methods"><div class="form-row place-order">
For example:
form.woocommerce-checkout input[type="text"] {
    border-radius: 3px;
    background-color: #ccc;
    color: #444;
}
Customizing using WooCommerce checkout hooks
There are 28 action hooks available to add or remove elements from the checkout page.
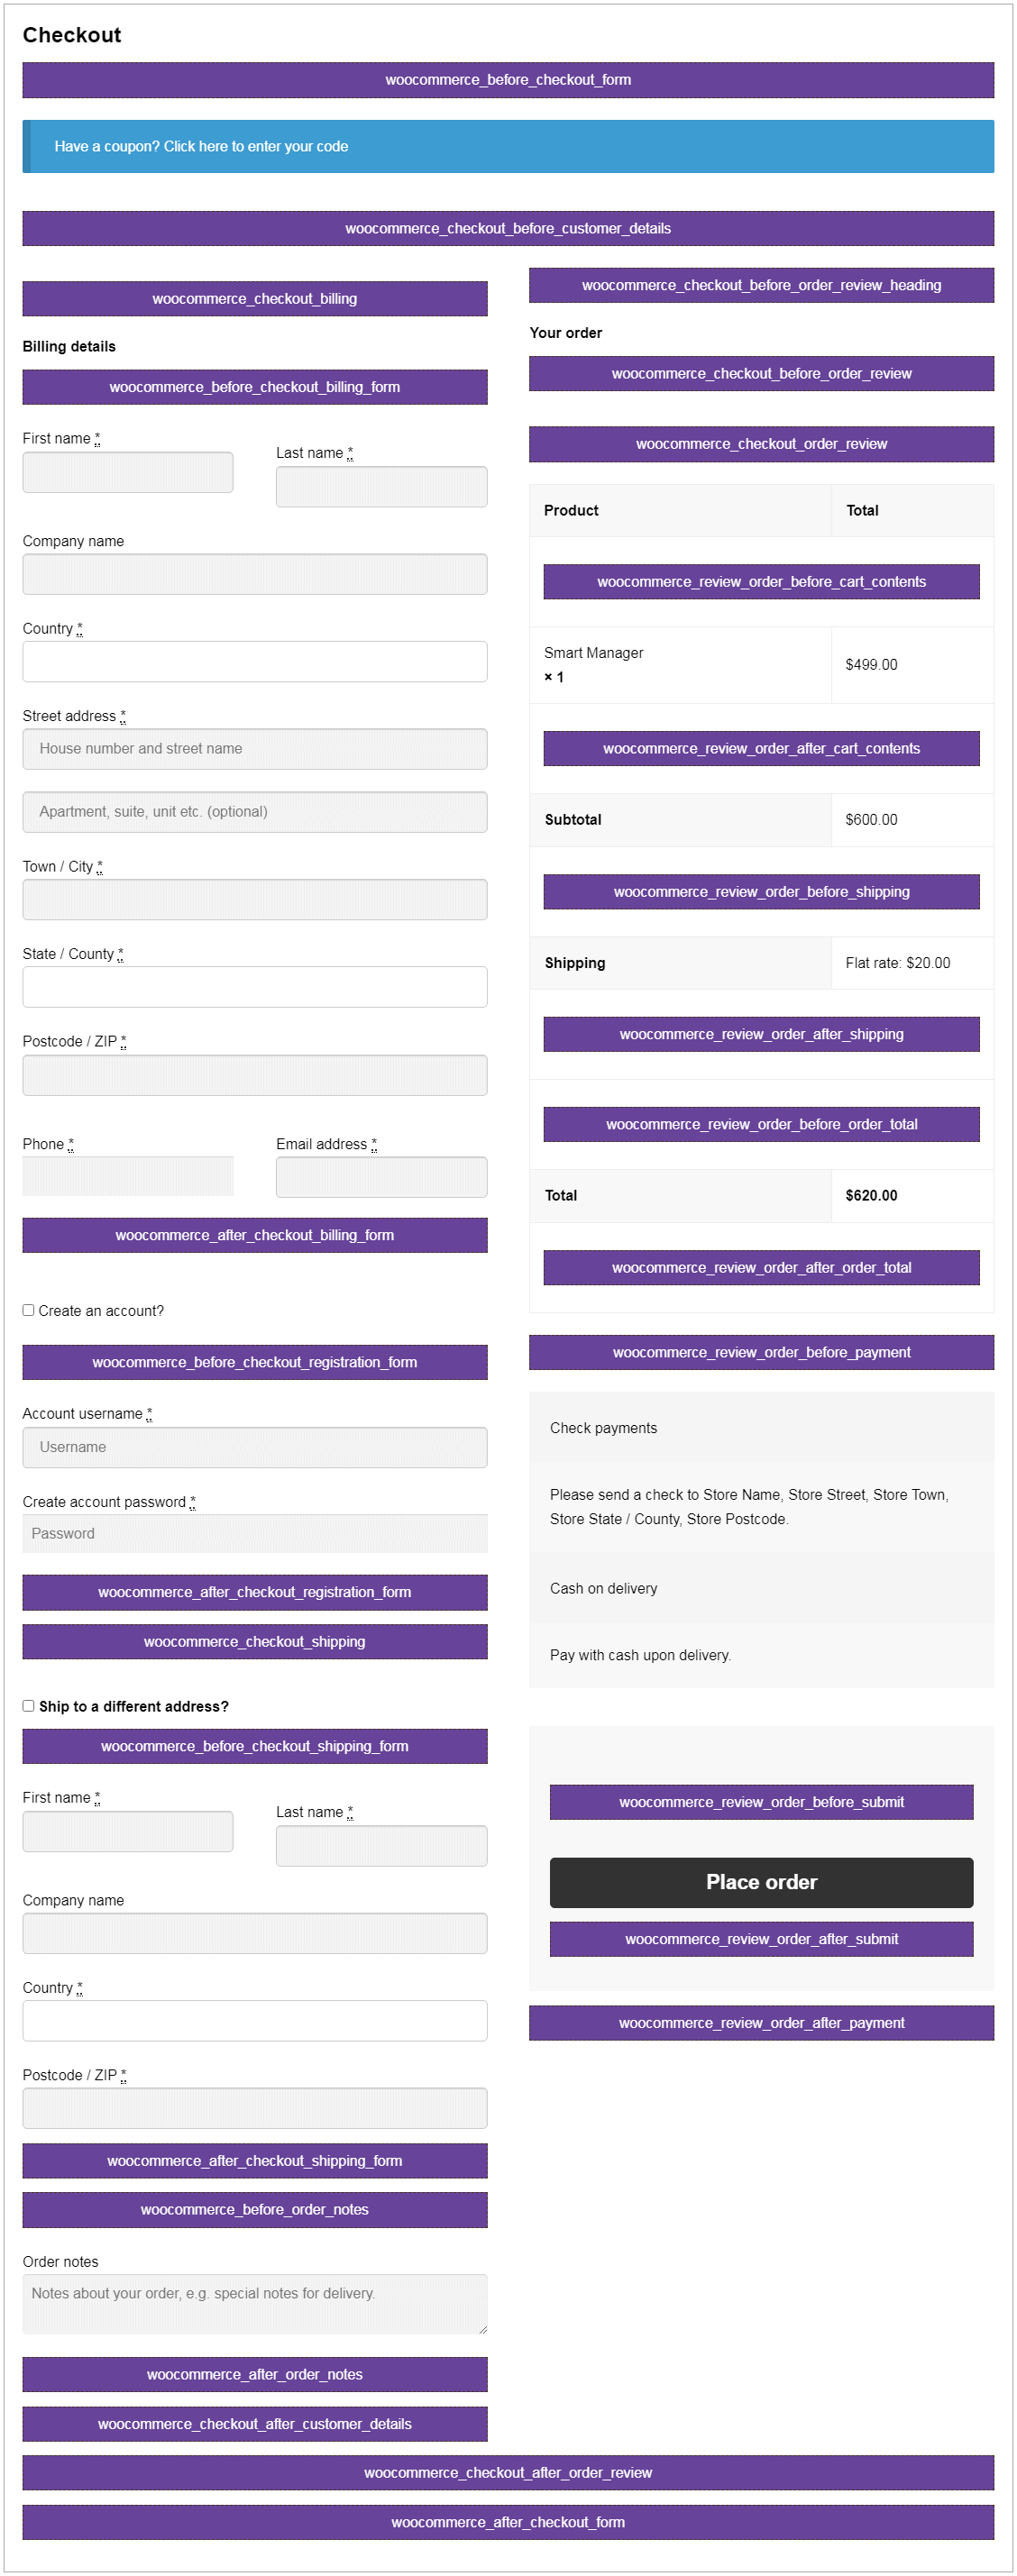
- woocommerce_before_checkout_form
- woocommerce_checkout_before_customer_details
- woocommerce_checkout_billing
- woocommerce_before_checkout_billing_form
- woocommerce_after_checkout_billing_form
- woocommerce_before_checkout_registration_form
- woocommerce_after_checkout_registration_form
- woocommerce_checkout_shipping
- woocommerce_before_checkout_shipping_form
- woocommerce_after_checkout_shipping_form
- woocommerce_before_order_notes
- woocommerce_after_order_notes
- woocommerce_checkout_after_customer_details
- woocommerce_checkout_before_order_review_heading
- woocommerce_checkout_order_review
- woocommerce_checkout_before_order_review
- woocommerce_review_order_before_cart_contents
- woocommerce_review_order_after_cart_contents
- woocommerce_review_order_before_shipping
- woocommerce_review_order_after_shipping
- woocommerce_review_order_before_order_total
- woocommerce_review_order_after_order_total
- woocommerce_review_order_before_payment
- woocommerce_review_order_before_submit
- woocommerce_review_order_after_submit
- woocommerce_review_order_after_payment
- woocommerce_checkout_after_order_review
- woocommerce_after_checkout_form
For example, to add a form or field after billing details on the checkout page, you can use the following hook:
add_action( 'woocommerce_after_checkout_billing_form', 'storeapps_after_checkout_billing_form', 10 );
function storeapps_after_checkout_billing_form() {
	echo '<h2>woocommerce_after_checkout_billing_form</h2>';
	// Add your form or field here
}
For more details on how to use each hook, refer to our WooCommerce checkout hooks guide.
Custom code
This is trickier but if you are a developer, here’s how you do it:
WooCommerce has several filters available to edit checkout fields, including woocommerce_checkout_fields, woocommerce_billing_fields, and woocommerce_shipping_fields.
You can use the ‘woocommerce_checkout_fields’ filter to manipulate all the checkout fields.
Remove the billing phone number field
add_filter( 'woocommerce_checkout_fields' , 'storeapps_modify_checkout_fields' );
function storeapps_modify_checkout_fields( $fields ) {
	unset($fields['billing']['billing_phone']);
	return $fields;
}
Add the shipping phone number field
add_filter( 'woocommerce_checkout_fields' , 'storeapps_modify_checkout_fields' );
function storeapps_modify_checkout_fields( $fields ) {
	$fields['shipping']['shipping_phone'] = array(
		'label'       => __('Phone', 'woocommerce'),
		'placeholder' => _x('Phone', 'placeholder', 'woocommerce'),
		'required'    => false,
		'class'       => array('form-row-wide'),
		'clear'       => true
	);
	return $fields;
}

/**
 * To display field value on the order edit page
 */
add_action( 'woocommerce_admin_order_data_after_shipping_address',
'storeapps_custom_checkout_field_display_admin_order_meta' );
function storeapps_custom_checkout_field_display_admin_order_meta( $order ){
	global $post_id;
	$order = wc_get_order( $post_id );
	echo '<p><strong>'.__('Field Value', 'woocommerce').':</strong> ' . get_post_meta($order->get_id(), '_shipping_field_value', true ) . '</p>';
}
To edit a field, you can access the field attributes. For example, let’s change the placeholder for Zip to Postal Code.
Change the field placeholder
add_filter( 'woocommerce_checkout_fields', 'storeapps_modify_checkout_fields' );
function storeapps_modify_checkout_fields( $fields ) {
	$fields['billing']['billing_postcode']['placeholder'] = __( 'Postal Code', 'woocommerce' );
	return $fields;
}
We suggest you refer our blog on safely adding code snippets.
How to customize WooCommerce checkout with plugin?
Okay, so WooCommerce’s default options are decent — but let’s be real, they only take you so far.
If you want full control without diving into code, it’s time to bring in a plugin.
Need a recommendation? Go for Cashier for WooCommerce.
This plugin makes your job easy; you don’t have to bury your head in complex coding.
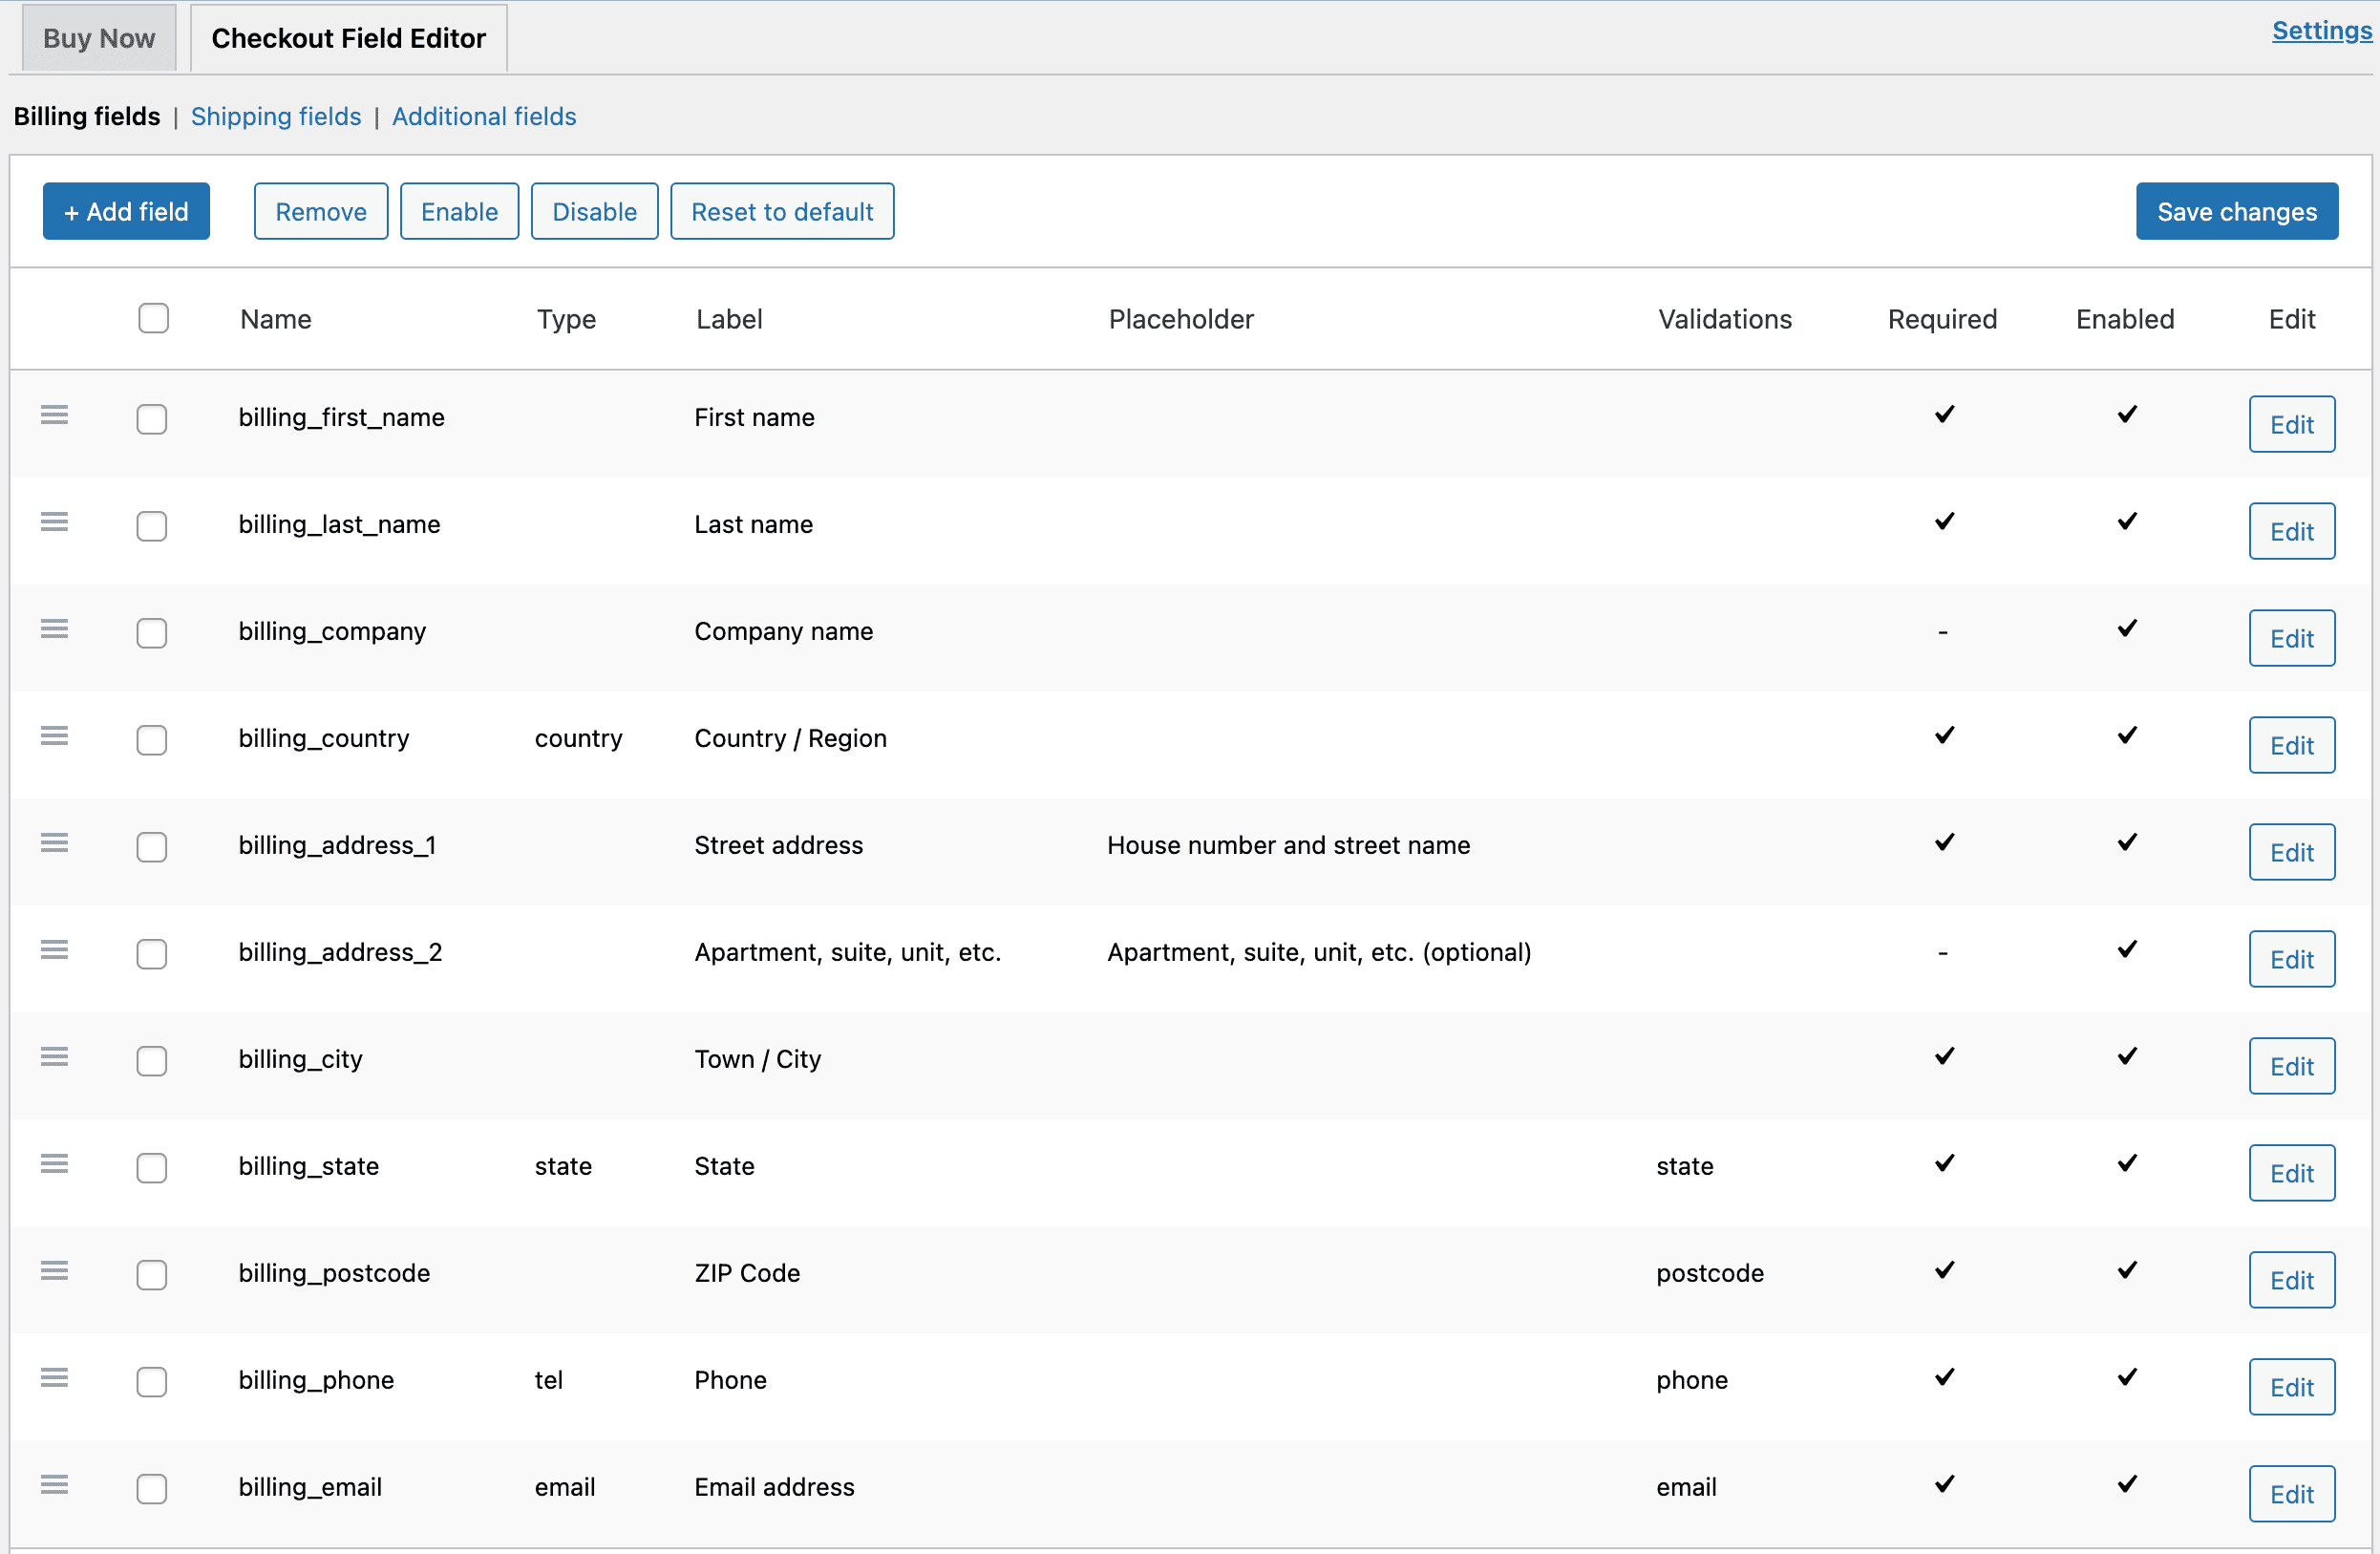
You can follow these steps to customize WooCommerce checkout fields and also add custom fields to your WooCommerce checkout page.
- Once you install the plugin, go to
WooCommerce > Cashier > Checkout Field Editortab. - Here, you will see the default WooCommerce checkout fields under field sets that should be enabled:
- Billing fields
- Shipping fields
- Additional fields
- Select the section you want to work on.
- There are different attributes/options available for fields to customize.
- You can add new custom fields to your WooCommerce checkout page.
More control?
Besides editing and adding fields, you can also:
- Enable or disable specific fields using the checkboxes
- Remove fields completely if they’re not needed
- Reset everything back to the default WooCommerce layout in one click
And that’s not all — Cashier is packed with powerful features:
- One-page checkout: Speed things up by collapsing everything into a single, frictionless page.
- Buy now buttons: Let shoppers skip the cart and head straight to checkout.
- Side cart functionality: Customers can view and update their cart without leaving the page.
- Frequently bought together bundles: Boost AOV by offering smart product combos at checkout.
- User-friendly interface: No code, no stress — just clean, intuitive customization.
With Cashier, your checkout becomes faster, smarter, and tailor-made for your store.
All without writing a single line of code.
Protect your store: testing & backups
Before you go live, cover your bases.
Why testing matters
- Test all fields (required/optional)
- Try full checkout flow (guest + registered)
- Check mobile + desktop views
How to back up?
- Use plugins like UpdraftPlus or Jetpack
- Or create a backup via your hosting dashboard
- Use a staging site to test safely
If things break
- Reset fields in Cashier
- Disable recent plugins/themes
- Restore from backup
- Contact support if needed
A few minutes of testing can save a day of cleanup.
Quick wins to improve checkout experience
Want to make your WooCommerce checkout page not just functional but fantastic? Try these quick wins:
- Add a progress indicator: Show your customers exactly where they are and how long it will take to complete the process.
- Enable express payments: Try integrating faster payment options like Apple Pay and Google Pay to make checkout faster, especially on mobile.
- Use trust badges: Display SSL certificates and secure payment icons to build trust.
- Simplify forms: Just ask only for essential details and enable autofill for returning customers.
- Offer guest checkout: Allow users to make purchases without creating an account.
- Add smart upsells: Show relevant products or bundles at checkout. How? Check Smart Offers.
- Mobile-first design: Make sure the page looks and works great on all devices.
- Show clear shipping info: Real-time rates help reduce surprises.
- Inline error handling: Highlight mistakes immediately—no one likes playing “spot the error.”
Choose your path and start customizing!
You’ve got two roads ahead — the “I’ll keep it simple” lane and the “let’s make this checkout page legendary” highway.
If you’re cool with basic tweaks, WooCommerce’s default tools will get the job done. But if you want drag-and-drop magic, custom fields, upsells, and ninja-level control — plugins like Cashier are your best friend.
Whichever route you pick, just don’t leave your checkout page untouched. Because a great product deserves a checkout experience that feels just as good.
Now go on — your high-converting checkout awaits!
FAQ
- How do I add custom text to the WooCommerce checkout page?
You can add custom text to the checkout page using WooCommerce hooks in your theme’s functions.php file.For example, use the following code to add custom notes to thank customers for their purchase:
add_action( 'woocommerce_after_checkout_form', 'storeapps_after_checkout_form', 10 ); function storeapps_after_checkout_form() { echo '<h2>woocommerce_after_checkout_form</h2>'; } - How do I display coupons on the WooCommerce checkout page?
You can use the Smart Coupons plugin by StoreApps to display coupons on the checkout page. To do this, enable a storewide coupon that appears on the checkout, cart, and every other page.Go to
WordPress Admin > Marketing > Coupons, and select the ‘Enable store notice for the coupon’ option. Lastly, hit the save button. - How do I display tax on the WooCommerce checkout page?
Go toWooCommerce > Settings > Generaland check theEnable taxes and tax calculationsbox. Save the changes, and you are done. The taxes will be automatically calculated and displayed based on your tax settings for the customer’s location. - How do I enable/disable guest checkout?
Guest checkout allows customers to complete their purchases without creating an account. You will find this documentation helpful to enable this feature. - Will WooCommerce checkout page customization will affect the mobile user experience?
Yes, it can affect the mobile user experience, particularly if the design is not responsive. Ensure that any customizations are mobile-friendly and test the layout across different devices.

About the Author – Akshat Kothari
Engineer by training, marketer by instinct. Akshat is an integral part of the marketing team at StoreApps, where he takes complex WooCommerce concepts and turns them into strategies store owners can put to work immediately. When he steps away from the screen, he’s either exploring a new city or binge watching movies.