
Apart from PayPal, Stripe and credit cards, if you don’t offer other popular payment methods on your WooCommerce store, it may lead to abandonment, lost sales and customers.
Customers today are becoming more reliant on digital and UPI mobile payment solutions, with Apple Pay and Google Pay topping the charts.
In this article, we’ll see how to set up Apple Pay for WooCommerce Payments, Stripe, Square and other payment gateways.
First, we begin with why WooCommerce Apple Pay is a must.
Why configure Apple Pay WooCommerce payment solution on your store?
Apple Pay allows users to make payments using their Apple devices (iPhone, iPad, Apple Watch, etc.) using near-field communication (NFC) technology.
The user can add their credit or debit cards to Apple Pay, eliminating the need to carry physical cards.
Apple Pay is also considered more secure than traditional card transactions as it uses biometric authentication (such as Touch ID or Face ID) and doesn’t reveal the card number to merchants.
So here are some benefits of using Apply Pay:
- Ensures simple and faster checkout – Customers can experience a faster checkout and complete purchases with a single touch since it doesn’t require customers to fill out lengthy forms with multiple fields.
- High security and privacy for customers – Biometric authentication prevents fraud and chargebacks to a great extent.
- Higher purchase frequency – The simplicity of the digital payment solution makes customers more likely to return to your WooCommerce store and purchase products.
- Huge market share – Apple Pay holds a considerable market share, which is growing exponentially; a whopping 43.9% share in the U.S. alone.
We now move to set up Apply Pay with different payment gateways in WooCommerce.
How to set up Apple Pay for WooCommerce Payments?
WooCommerce Payments solution is built by the WooCommerce team. It allows you to accept major credit and debit cards, and local payment methods on your site with no setup costs or monthly fees.
The best part, Apple Pay is automatically enabled on WooCommerce Payments.
Here’s how to enable it:
- Go to
Payments > Settings. - Under the
Express checkoutssection, check the box forApple Pay / Google Pay. - Click on Save changes.
Note – There is no way to enable only Apple Pay without Google Pay. The two must be enabled together.
When Apple Pay is enabled, the Apple Pay button can appear on:
- Checkout page
- Cart page
- Individual product pages
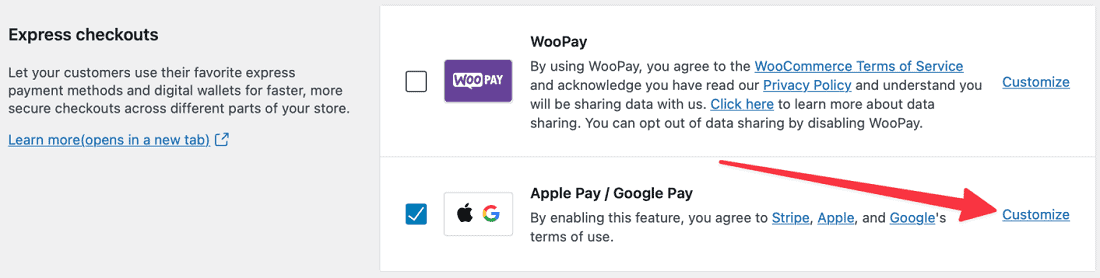
Go to Payments > Settings and then in the Express checkouts section, click Customize link for Apple Pay / Google Pay to customize which of the above locations show the Apple Pay button.
Once the transaction is authorized via Touch ID or Face ID, WooCommerce Payments then processes the transaction and redirects the customer to the Order Received or Thank you page.
For more information on testing Apple Pay, refunds with Apple Pay, Apple Pay for subscription products and supported countries, refer to this doc.
How do I enable Apple Pay for WooCommerce with Stripe?
The Stripe payment gateway provides Apple Pay support, and it’s a reputable processor with reasonable fees and an intuitive setup process.
You can refer to this video for the steps or follow the instructions below.
Install WooCommerce Stripe plugin
Download the WooCommerce Stripe plugin, install and activate it. It is a free plugin and very popular as it is active on 900000+ sites.
You can refer to this tutorial on how to set up Stripe in WooCommerce.
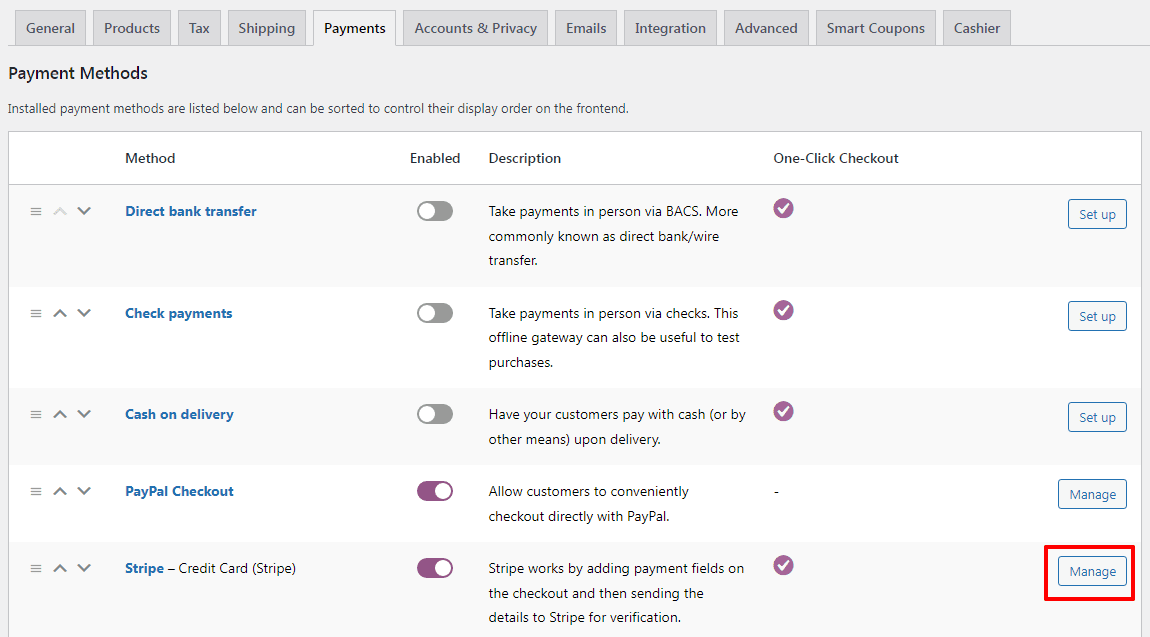
- Go to your WordPress Admin panel and click on
WooCommerce > Settings > Payments. - For the
Stripe - Credit Card (Stripe)method in the list, click on theManagebutton located at the extreme right. - Check the
Payment Request Buttonsbox and click on Save.
Add your domain to Apple Pay in Stripe
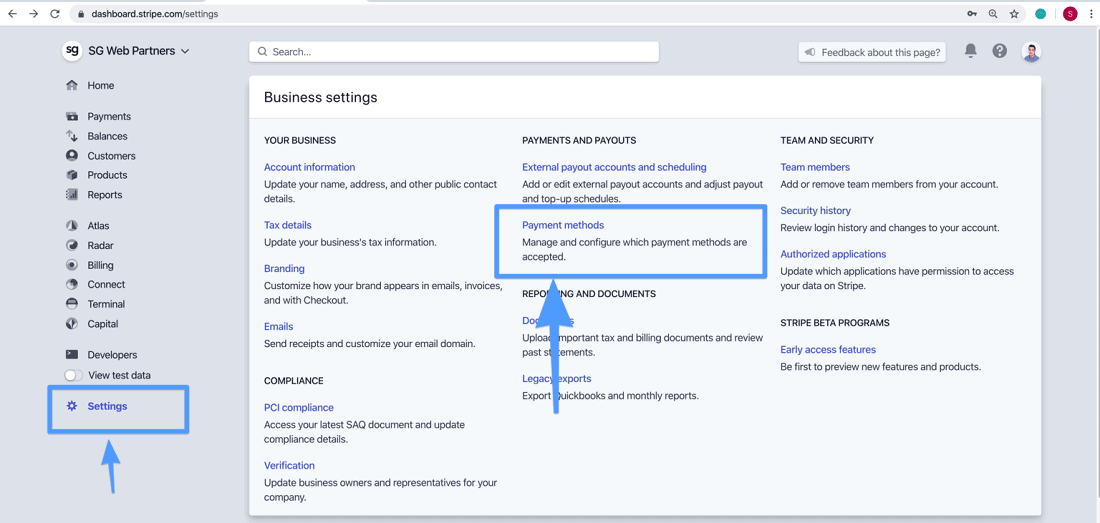
- Now login to your Stripe dashboard.
- Go to
Settings > Payment Methods > Apple Pay. - Click on
Add new domainand enter your domain. - Download the verification file to your computer.
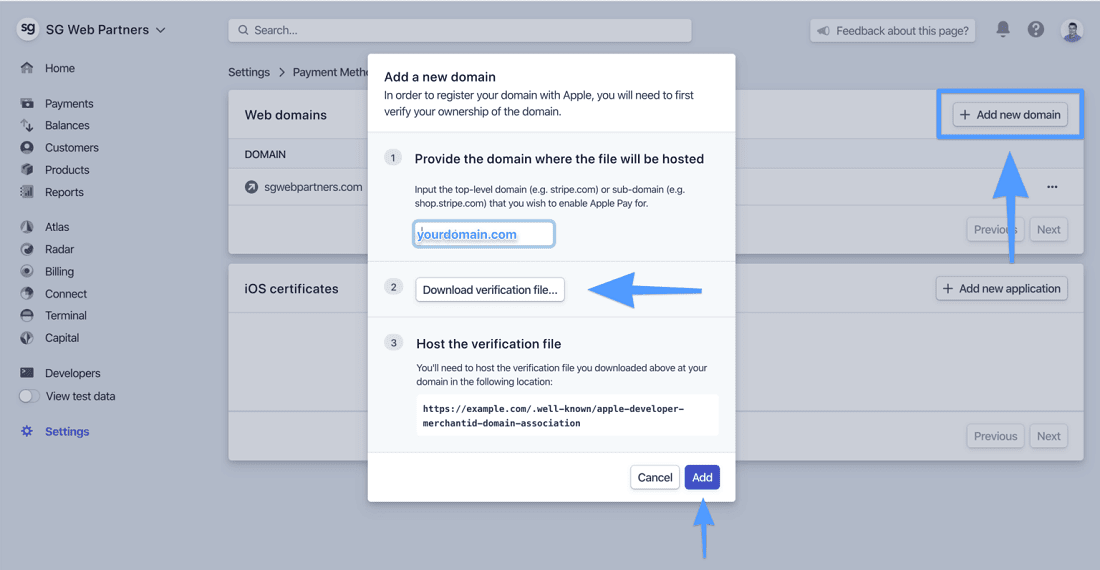
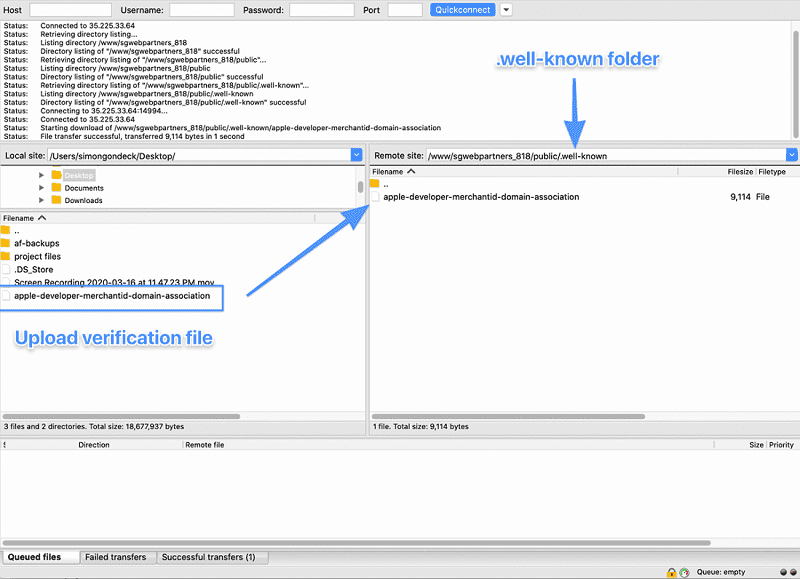
Upload verification file to document root
- Connect to your server via SFTP or SSH using a tool such as FileZilla.
- Then, upload the
apple-developer-merchantid-domain-associationfile to the .well-known folder in your document root. - To make sure you followed this step correctly, navigate to – https://yourdomain.com/.well-known/apple-developer-merchantid-domain-association.
You should see a string of many randomly generated numbers.
Test whether Apple Pay is working
- Open up the Safari browser on your computer or mobile
- Go to your website and add a product to the cart.
- You should see the option to pay with Apple Pay.
- Go through the Checkout process.
That’s it. Image and steps reference – SimonGondeck.com
WooCommerce Square Apple Pay
Apple Pay for WooCommerce can be set up using the Square payment gateway.
Square is available in the U.S., Canada, Australia, Japan, the UK, France, Spain and Ireland.
Refer to this doc for the steps.
WooCommerce Braintree Apple Pay
Apple Pay for WooCommerce is also available through Braintree, Authorize.Net and 20+ other payment methods. But the availability also depends on the country.
Check the list for supported gateways and countries.
Final thoughts
WooCommerce Apple Pay benefits you and the customer with security, more payment options, and a mobile-first approach.
If you are using Stripe, WooCommerce Payments or Square payment methods, this blog can be very handy to you.
Would you like to cover Apple Pay setup with Braintree or other payment methods in detail? Comment below.