With WooCommerce, you can display the Add to Cart buttons on product pages/product list pages, or any other page with minimal effort.
Being visually appealing and convenient, these WooCommerce Add to Cart buttons contribute greatly to the success of online stores. Moreover, they help boost sales by allowing customers to add multiple products in a click to their carts.
In this blog, you will learn to set up custom WooCommerce Add to Cart URLs/buttons, including customizing them using code and plugins.
Further, you’ll learn how to reduce friction in the purchasing process and improve customer experience by replacing Add to Cart buttons with Buy Now buttons.
Let’s get started.
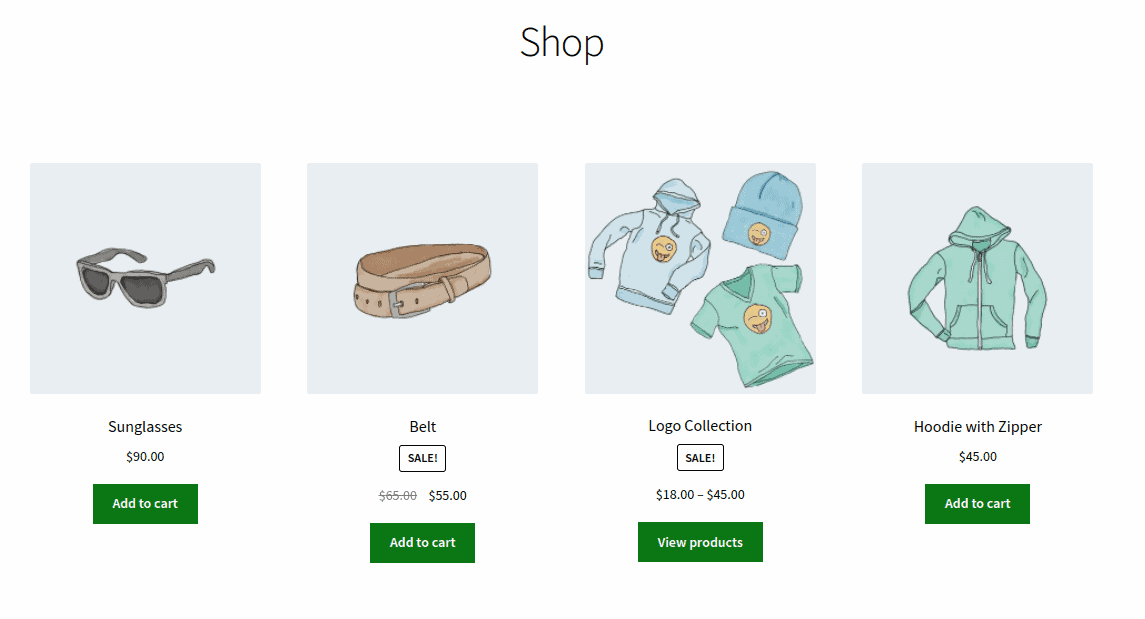
The default WooCommerce Add to Cart button always appears on all single product pages except the external/affiliate products that belong to other sources.
You can also see Add to Cart buttons under the products on the shop page where all products are displayed, category pages, tag pages, or any product filter pages.
The button text may vary depending on the type of product. For example, there will be a Buy Now button instead of an Add to Cart button for faster checkout.
First, we will see how you can customize the Add to Cart button.
How to create a custom Add to Cart URL?
Here, you can simply replace the default URL for the button and the rest is taken care of. This method is useful for placing Add to Cart buttons on custom landing pages, pricing tables, blog posts and other pages.
Let’s see how to create custom WooCommerce Add to Cart HTML links/buttons for simple and variable products.
Add to Cart URL for simple products
You can add simple products to the cart via a custom URL easily.
Go to WooCommerce > Products. Hover under the product title to locate the product ID and use the following link:
https://yourdomain.com/?add-to-cart=X&quantity=Y
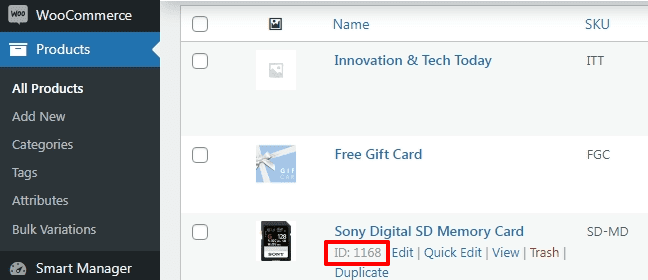
Here, X stands for product ID and Y for the product quantity. Obviously, replace the domain name and the product ID with your domain and desired product ID respectively.
This will add a single product to the cart. To add the same product with more quantity, use this URL:
https://yourdomain.com/?add-to-cart=1168&quantity=5
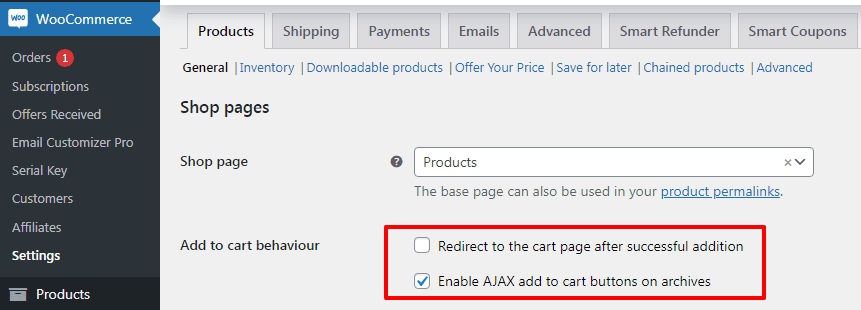
Add to cart and redirect to checkout
When a product is added to the cart, the best option is to redirect customers to the checkout page.
So, the URL, in this case, will be:
https://yourdomain.com/checkout/?add-to-cart=1168&quantity=1
Remember, for this to work, you must tick the “Enable AJAX add to cart buttons on archives” option under WooCommerce > Settings > Products > General and also disable “Redirect to the cart page after successful addition”.
Instead of checkout if you want to redirect users to other pages than the checkout page, the URL will be:
https://yourdomain.com/your_custom_page/?add-to-cart=1168&quantity=1
Add to Cart URL for variable products
This is also very easy. Like simple products, you need to replace the product ID with the product variation ID.
Go to WooCommerce > Products. Select a variable product. Click on the Variations tab. You’ll find the product IDs as shown. Once you have the IDs, creating URLs is a walk in the park.
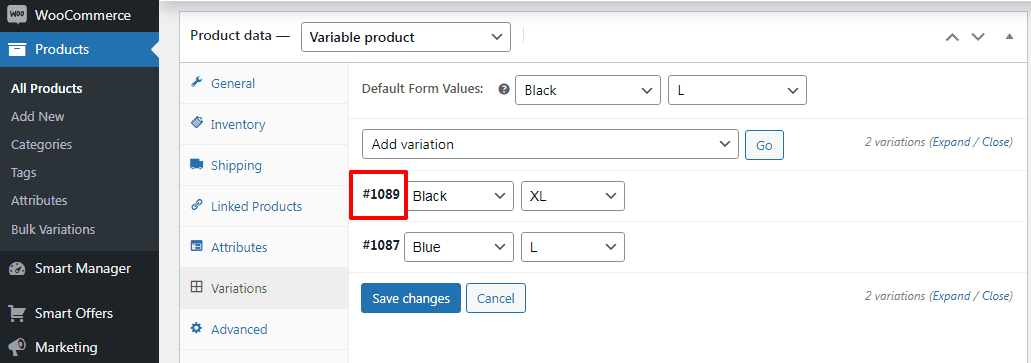
To add a product variation with quantity one, the URL will be:
https://yourdomain.com/?add-to-cart=1089&quantity=1
To add a product variation with quantity five, the URL will be:
https://yourdomain.com/?add-to-cart=1089&quantity=5
To add a product variation with quantity one to the cart and redirect to the checkout page, the URL will be:
https://yourdomain.com/checkout/?add-to-cart=1089&quantity=1
To add a product variation with quantity one to the cart and redirect to any other page than the checkout page, the URL will be:
https://yourdomain.com/your_custom_page/?add-to-cart=1089&quantity=1
Simple enough? Let’s move to the customizing Add to Cart button.
Imagine visiting any WooCommerce store to purchase groceries and having to pay for each item individually. Wouldn’t it be inconvenient for you as a buyer to make the purchase?
Further, initiating multiple transactions for purchases is no doubt time-consuming.
This is where the Add to Cart feature of WooCommerce proves to be a boon for online shoppers.
Shoppers can choose desired items and put them in the cart. Once all items are placed in the cart, the shoppers can move towards checkout. This constitutes a great customer experience.
Though WooCommerce default settings can do the basic job, the “one size fits all” approach can’t work in the long run. So, you need to customize buttons depending on the product type and your portfolio.
Store owners can offer a quick purchasing option by eliminating the Add to Cart step and redirecting clients to the checkout page. This method works especially well in stores selling only one product, or in case customers would like to purchase a single product in a multi-product store.
On the other hand, the Add to Cart button is extremely useful for stores that sell a lot of products. Visitors can browse multiple products in the shop and keep adding/removing products from the cart before proceeding to the checkout page.
Based on requirements and brand voice, a customized button (text, color, icon and placement) can improve conversion rates.
Sometimes, the default Add to Cart buttons may not look attractive on the website. You may want to match them with your brand color. Or the wrong placement may hamper conversions.
In such cases, WooCommerce offers excellent flexibility to customize Add to Cart buttons at all levels. You can customize the buttons with minimal effort.
We’ll look at some technical ways, plugins and alternate ways to customize these Add to Cart buttons. Technical ways can be a little tricky for some store owners. So to safely add code snippets, refer to this doc.
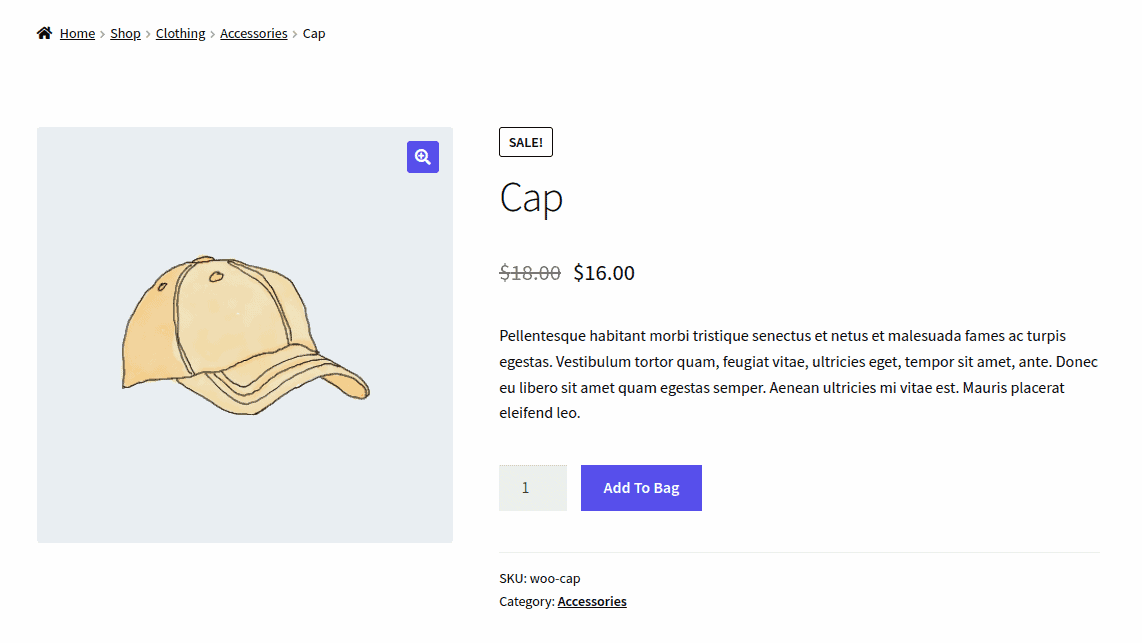
You can change the WooCommerce Add to Cart button text to make it more engaging and appealing to customers. Here are some button text ideas you can use for your Add to Cart buttons:
- Add to Bag
- Add Item(s) to Cart
- Add to My Shopping Cart
- Add to My Shopping Bag
- Add to Basket
- Add Item(s) to Bag
- Add to My Bag
To change the default Add to Cart button text, follow these steps:
- Go to the
WordPress Admin panel > Appearance > Theme Editor. - Open Theme Functions / functions.php file.
- Add the following code at the bottom of the
function.phpfile.
// To change add to cart text on single product page
add_filter( 'woocommerce_product_single_add_to_cart_text', 'storeapps_custom_single_add_to_cart_text' );
function storeapps_custom_single_add_to_cart_text() {
    return __( 'Add To Bag', 'woocommerce' );
}
// To change add to cart text on shop page
add_filter( 'woocommerce_product_add_to_cart_text', 'storeapps_custom_product_add_to_cart_text' );
function storeapps_custom_product_add_to_cart_text() {
    return __( 'Add To Bag', 'woocommerce' );
}
As you can see, this code is for single product and collection. It will let you change the text to Add To Bag. However, you can turn it into any other custom text you wish by replacing all of the “Add To Bag” phrases in the code with your desired texts.
Click the Update File button to save changes and go to the front end to check how your WooCommerce Add to Cart button custom text is shown on your store.
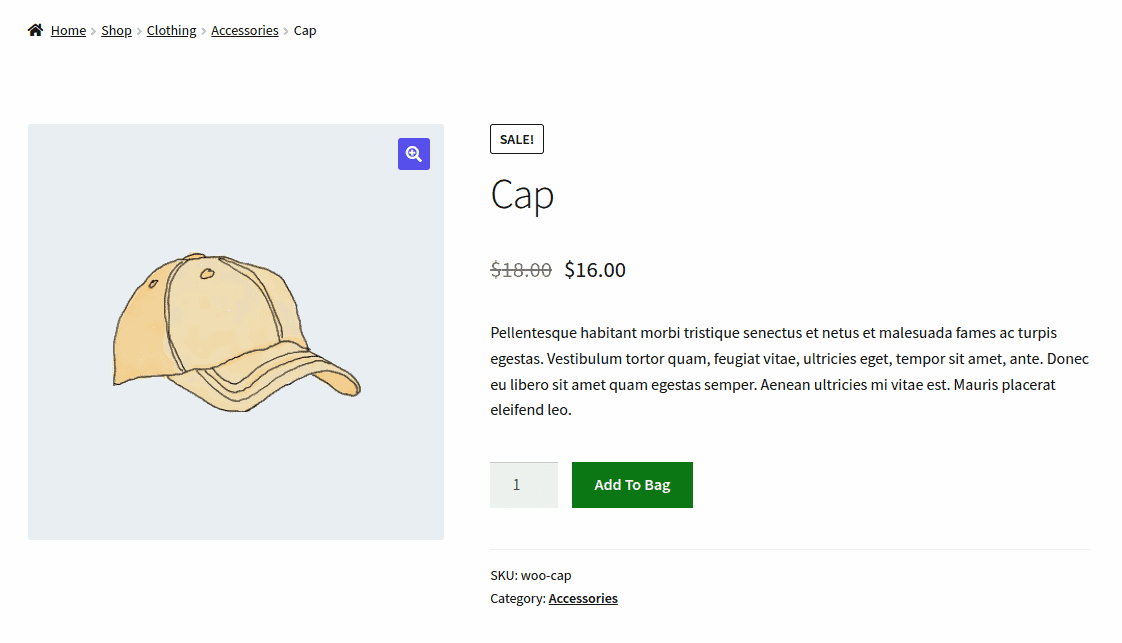
The add-to-cart button color plays a major role in influencing customers to buy products. Ensure that the button color matches the website’s color scheme.
Even though most WooCommerce themes offer default colors for all button types throughout the website, make sure they match your store’s design and change when needed to make it stand out.
To change the WooCommerce Add to Cart button color, you will need to add a CSS code snippet to your theme’s stylesheet (mostly known as the ‘style.css file’). You can access it by going to your WordPress Admin panel > Appearance > Customizer.
Then, you will be navigated to a new window with a list of options. Here, you can have three ways to change the Add to Cart button’s color.
The first way is by navigating to the Buttons > Background Color section.
Here, you can change the button’s background and text colors. This way, you will change the color of all buttons on all pages.
The second way is by navigating to the Shop Archive/Product Single. With the Shop Archive option, you can not only change the color background and text but also customize the position of the Add to Cart button displayed on WooCommerce shop archive pages.
On the single product page, you can also change the Add to Cart button’s background color, text and the hover effect.
The third way is the additional CSS section to add custom code to change the WooCommerce Add to Cart button color.
Copy the code below and paste it in the WordPress admin > Customizer > Additional CSS section or in the ‘style.css’ file and change colors to the ones you want.
/* Add to cart button on single product page */
.single-product .product .single_add_to_cart_button.button {
    background-color: #0c7815;
    color: #FFFFFF;
}
/* Add to cart button on archives (e.g. shop, category page) */
.woocommerce .product .add_to_cart_button.button {
    background-color: #0c7815;
    color: #FFFFFF;
}
As you can see the image, we changed the Add to Cart button color from blue to green.
You can use a shortcode to display Add to Cart buttons on any page on the website without much hassle. For example, if you have written a blog about styling clothes, you can place this shortcode to create purchase buttons directly in the blog content.
WooCommerce comes with a built-in [add_to_cart] shortcode for you to insert the button for a particular product anywhere on your online store. You just need to add the ID and/or SKU of the product you want to display the Add to Cart button for.

In addition, you can include the product price: [add_to_cart id="12" sku="woo-vneck-tee" show_price="true"].
For simple products, it will show an Add to Cart button. But a Select options button will be shown for variable products.

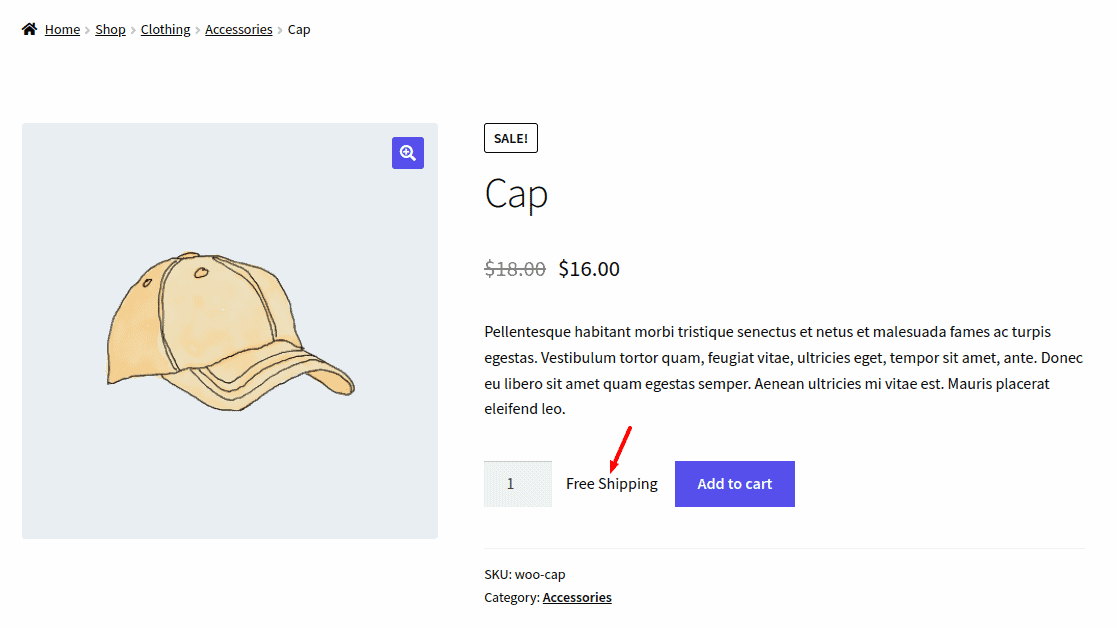
Another way to customize the Add to Cart button in WooCommerce is to add a text before or after the Add to Cart button on single product pages.
Normally, there will be a product short description above the Add to Cart button. However, you can mention a notice, a guarantee, free shipping, a return policy, etc., before the Add to Cart option.
For example, you can add the text “Free Shipping” by using the echo statement.
add_filter( 'woocommerce_loop_add_to_cart_link', 'storeapps_before_after_btn', 10, 3 );
add_action( 'woocommerce_before_add_to_cart_button', 'storeapps_before_add_to_cart_btn' );
function storeapp_before_add_to_cart_btn(){
     echo 'Free Shipping';
 }
Copy the code above and paste it into the functions.php file of the file theme, then click Update File to save everything.
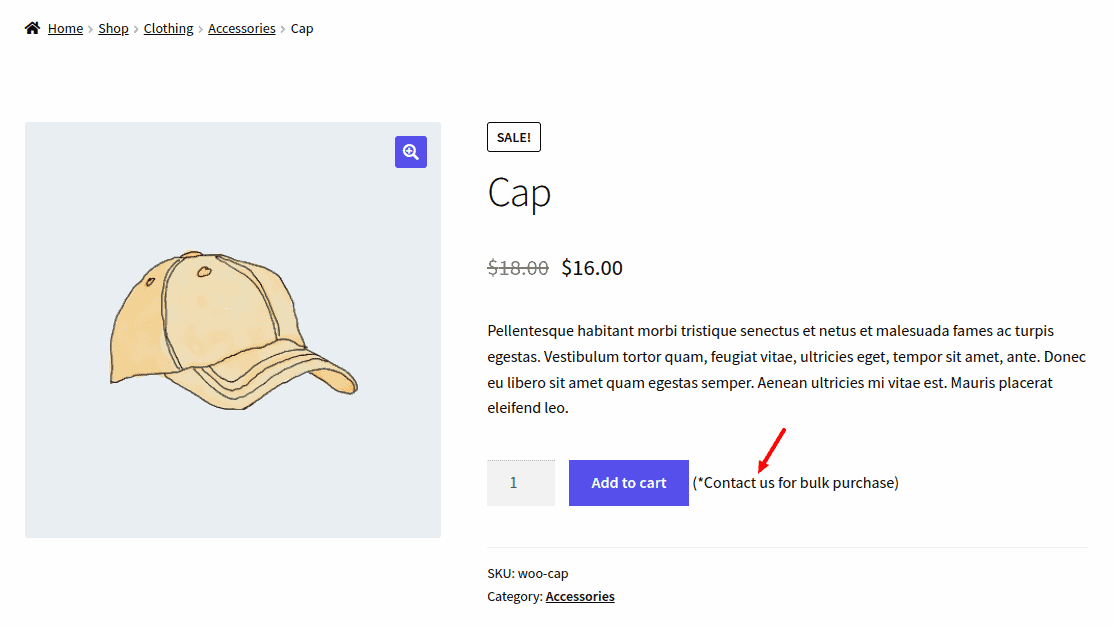
You can also add custom text after the Add to Cart button. This can be useful to notify clients that there might be discounts for bulk purchases.
In the example below, we will include the text Contact us for bulk purchase under the Add to Cart button by adding this code snippet at the bottom of your child theme’s function.php file:
add_action( 'woocommerce_after_add_to_cart_button', 'storeapps_after_add_to_cart_btn' );
function content_after_addtocart_button_func() {
 // Echo content.
 echo '
(*Contact us for bulk purchase)
';
 }
Copy and paste this code to the file and save it.
In addition to changing the text, you can replace the text with an icon or add an icon next to the button text. This is possible using some plugins mentioned below.
These plugins also help you customize buttons without code.
If you are someone who does not have any knowledge of coding, it is ideal to leverage ready-to-use plugins for customizing Add to Cart buttons.
Here are the three most widely used plugins.
WooCommerce Custom Add To Cart Button
As the name suggests, this plugin can be used to customize Add to Cart buttons to make them more appealing to customers.
Key features:
- Customize the Add to Cart button text.
- Place the cart icon next to the text on the button.
- Display the cart icon instead of the entire text.
- Customize the Add to Cart button text’s color and background.
- Choose how to show the Add to Cart button text- lowercase, uppercase or sentence case.
- Compatible with most WordPress themes.
Pricing: Free
Ultimate Custom Add To Cart Button For WooCommerce
This plugin offers additional customizations to design a button that will surely catch customers’ attention and help boost sales.
Key features:
- Customize the button text for simple products, variable products and grouped products.
- Customize the button’s background color.
- Setting color when the customer hovers over the button.
- Customize the button’s color, size and border radius.
- Add cart icons on the button.
- Setting gradient as background when the customer hovers over the button.
- Using images as the Add to Cart button.
- Customize the item quantity box with add and subtract icons.
- Create brand-specific button styles throughout the website.
- Compatible with all the WordPress themes.
Pricing: Free
Custom Add to Cart Button for WooCommerce
With this plugin, you can easily customize your Add to Cart button to suit your brand’s style and give it a unique look.
Key features:
- Customize the Add to Cart button’s colors and text.
- Increase/decrease button text’s font size and weight.
- Change the button design by configuring border size and radius.
- Set animation effects on the button to make it more appealing.
- Set background transition effects for hovering.
- Offers various icons for the cart button.
- Options to display icons before or after Add to Cart text.
Pricing: $29/year.
Replacing Add to Cart buttons with Buy Now buttons allows customers to skip the lengthy buying process and checkout at the click of a button. This contributes greatly towards improving user experience and sales rates.
We recommend Cashier for WooCommerce, developed by StoreApps, to create a Buy Now button in just a few clicks.
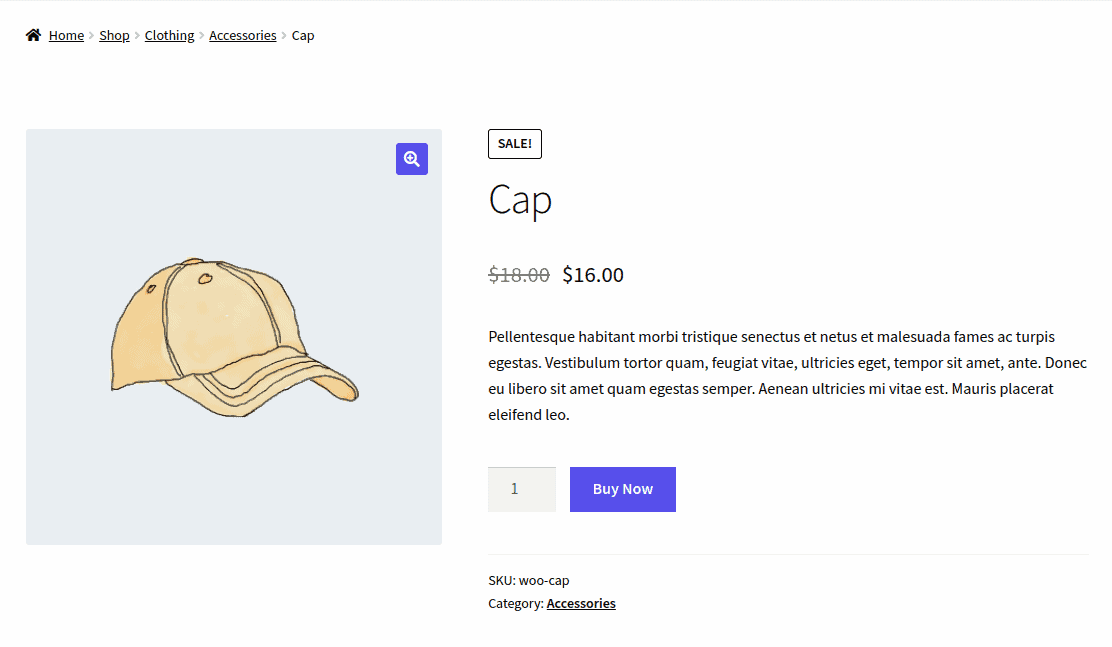
It is also an excellent plugin for optimizing the WooCommerce checkout process. You can customize your eCommerce store for:
- Direct checkout with the help of quick ‘Buy Now’ buttons/links (Skip cart and jump to checkout).
- One-click checkout via quick ‘Buy Now’ buttons/links (No cart, checkout and payment screens).
- One-page checkout with all information about orders, payments and shipping on one page.
Key features this plugin offers include:
- Convert all ‘Add to Cart’ links to Buy Now links.
- Customize the Buy Now button text and change it to ‘Quick Buy’, ‘Proceed to Payment’, etc.
- Enable the ‘Buy Now’ button for the entire store, specific products and selected product categories.
- Use the ‘Add to Cart Redirect’ functionality to redirect users to the checkout page, T&C page, blog post, or any custom URL.
- Configure the ‘Add to Cart Redirect’ at individual product variation levels and product levels.
- Enables you to activate a side cart panel as a sidebar popup to display products present in the cart without having to visit the cart page.
- Nudge the customers to buy more products with the help of the cart notice feature and product recommendations.
- Use Buy Now links in emails, social media, blog posts, or anywhere else.
- Embed Buy Now buttons to enable free shipping.
- Compatible with WooCommerce Subscriptions, SMS for WooCommerce and Customer Email Verification.
That’s how you effectively customize the Add to Cart buttons and replace them with the Buy Now buttons wherever needed.
Conclusion
Optimizing Add to Cart buttons certainly has a significant role to play in enhancing the shopping experience.
With the code and plugins mentioned here, you can easily customize your WooCommerce Add to Cart buttons as per requirements and boost your conversions.
I hope you found this blog useful. If you have any questions or suggestions, do share them via the comments box.
FAQ
What are WooCommerce shortcodes?
As the name suggests, WooCommerce shortcodes are a series of short lines of code that let you add WooCommerce-related functionality to WordPress pages, posts and sidebars. Here’s a simple guide on WooCommerce shortcodes.

About the Author – Akshat Kothari
Engineer by training, marketer by instinct. Akshat is an integral part of the marketing team at StoreApps, where he takes complex WooCommerce concepts and turns them into strategies store owners can put to work immediately. When he steps away from the screen, he’s either exploring a new city or binge watching movies.