
If you’re running an online store with WooCommerce, pricing flexibility isn’t just nice to have — it’s essential.
Maybe you sell T-shirts in different sizes. Maybe you want to offer discounted pricing for wholesale buyers. Or maybe you’re looking to show special rates to logged-in users.
Either way, showing multiple prices for the same product is a feature that can boost your sales, improve customer experience, and keep your store competitive.
The good news? WooCommerce supports this in more than one way — and with the help of plugins, managing these price options becomes even easier.
Let’s explore the two most common methods to offer multiple prices per product and how to set them up — with real examples — and why this is a great strategy for your store.
Two main types to set multiple prices per product
WooCommerce gives you flexibility when it comes to pricing — and showing multiple prices for a single product is not only possible, but a smart strategy.
There are two effective ways to do it:
- Set prices across product variations.
- Set prices across the same product based on user role, quantity, etc.
Let’s break them down.
Product variations with different prices
The most common way to set multiple prices is by using variable products in WooCommerce. For example, a Vanilla Bean candle sold in 3 sizes — 4oz ($12), 8oz ($20), and 12oz ($28). Each size is a variation with its own price, and customers see the correct one instantly when they choose an option.
Different prices for different customers
Sometimes, you may want to show different prices for the same product based on user roles. For example, a Vitamin C serum could be priced at $35 for wholesalers, $40 for returning customers, and $45 for guests — a great way to reward loyalty and drive sign-ups.
Why offer multiple prices for the same product?
Here’s why this strategy isn’t just clever — it’s effective:
- Increased conversions – The right price, for the right customer, at the right time.
- Better segmentation – Offer tailored deals to wholesalers, members, or first-time buyers.
- Higher average order value – Encourage upsells with size- or quantity-based pricing.
- Streamlined inventory – Manage all variations and prices in one place using Smart Manager.
- Improved customer experience – Personalized pricing makes buyers feel seen and valued.
5 ways to set up multiple prices per product
Trying to set multiple prices for a single product in WooCommerce? Whether you’re dealing with different sizes, customer types, or seasonal offers — having flexible pricing is a game-changer for conversions.
Here are 5 smart ways to set up multiple prices per product, with tips to make them work effortlessly for your store!
Assigning different prices to product variants based on attributes
In WooCommerce, setting multiple prices per product often starts with defining product attributes — like size, color, material — and then creating variations based on those attributes.
Let’s say you sell running shoes in various sizes and colors.
In default WooCommerce:
- Add a Variable Product.
- Set attributes (e.g., Size, Color).
- Generate variations.
- Manually set prices (e.g., $70 for White, $75 for Black).
You can still start with default WooCommerce for small catalogs. But as your store grows, you need specific and efficient tools to reduce manual work and help you avoid costly errors.
So why not make it easy with Bulk Variations Manager?
This plugin lets you:
- Choose your base product and set a base price.
- Select attributes like Size and Color.
- Add price differences (e.g., +$5 for Black, -$3 for Size US 7).
- Automatically calculates and applies prices to all combinations.
Bonus: No 50-variation cap like default WooCommerce. You can bulk-generate hundreds (even thousands) of variations at once.
So you can directly set base product and variation prices at once from a single screen.
Example:
- Base running shoe = $70.
- Black = +$5 → $75.
- White = no change → $70.
- Size US 7 = -$3 → $67.
Simple, scalable, and way less stressful.
Duplicate products and set different prices
You may want to sell similar products with slight differences—like pricing, packaging, or labels. WooCommerce’s default Duplicate option lets you do that quickly.
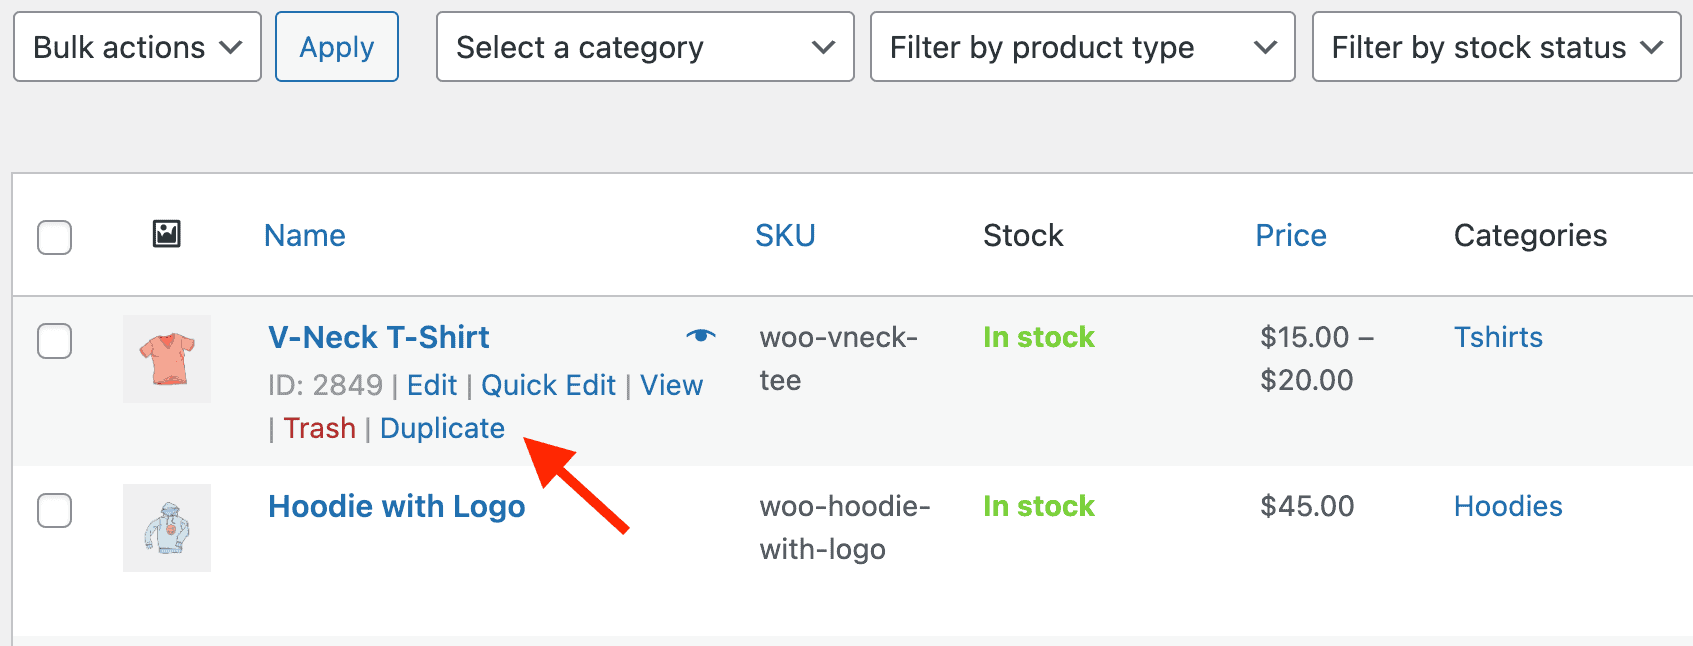
You sell a popular V-neck T-shirt for $15. Now, you want to offer a Premium Edition with better fabric and packaging for $20.
Here’s how you do it using default WooCommerce:
- Go to the original V-neck T-shirt product in your dashboard.
- Click on
Duplicate. - Edit the new product: rename it to V-neck T-shirt – Premium Edition, change the price to $20, tweak the SKU, and hit
Save.
Done-new product, upgraded style, higher value!
This method is great for a handful of products. But if you’re managing dozens or hundreds of similar items with different pricing, doing it manually can become a tedious time-sink.
A smarter choice? Use Smart Manager for speed!
Smart Manager simplifies this entire process:
- Duplicate all or selected products easily.
- View all your products in a spreadsheet-like layout.
- Use Bulk Edit to update multiple product values at once.
- Update prices, SKUs, and titles without opening each product individually.
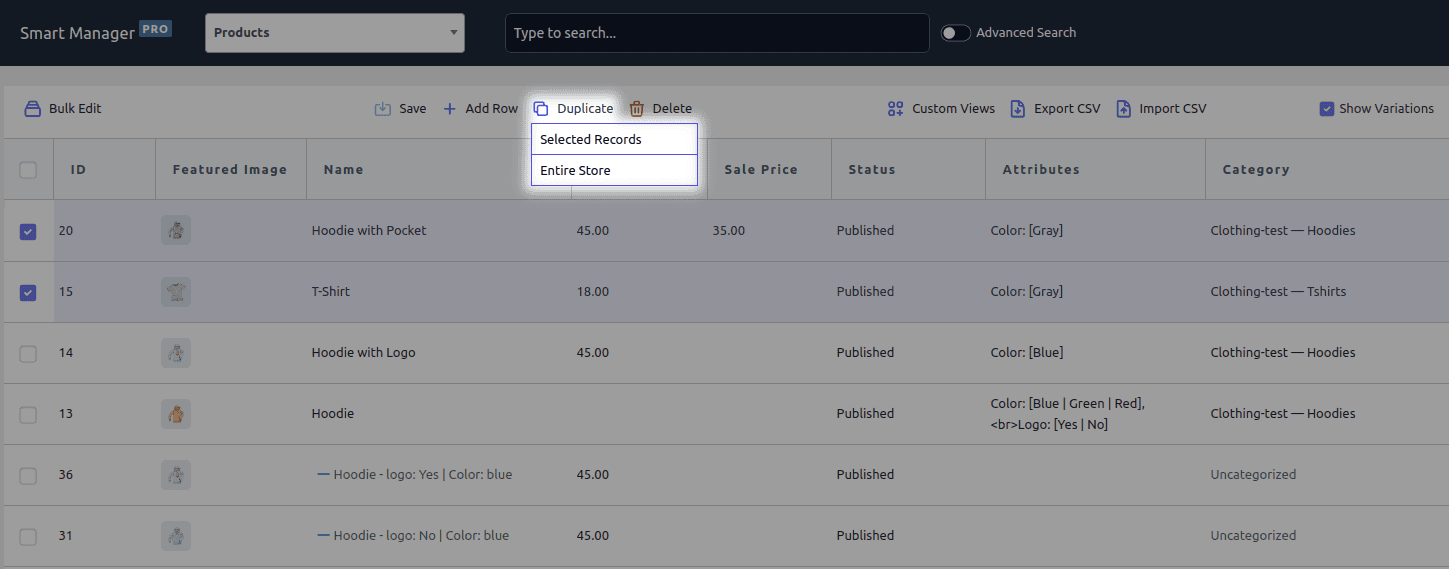
Let’s say you want to duplicate and edit the prices of a T-shirt and a Hoodie with pockets sold by your store.
Here’s how Smart Manager will duplicate the products and help edit their properties:
- Open the Products dashboard.
- Select the the product (or even multiple products) you want to duplicate.
- Click on
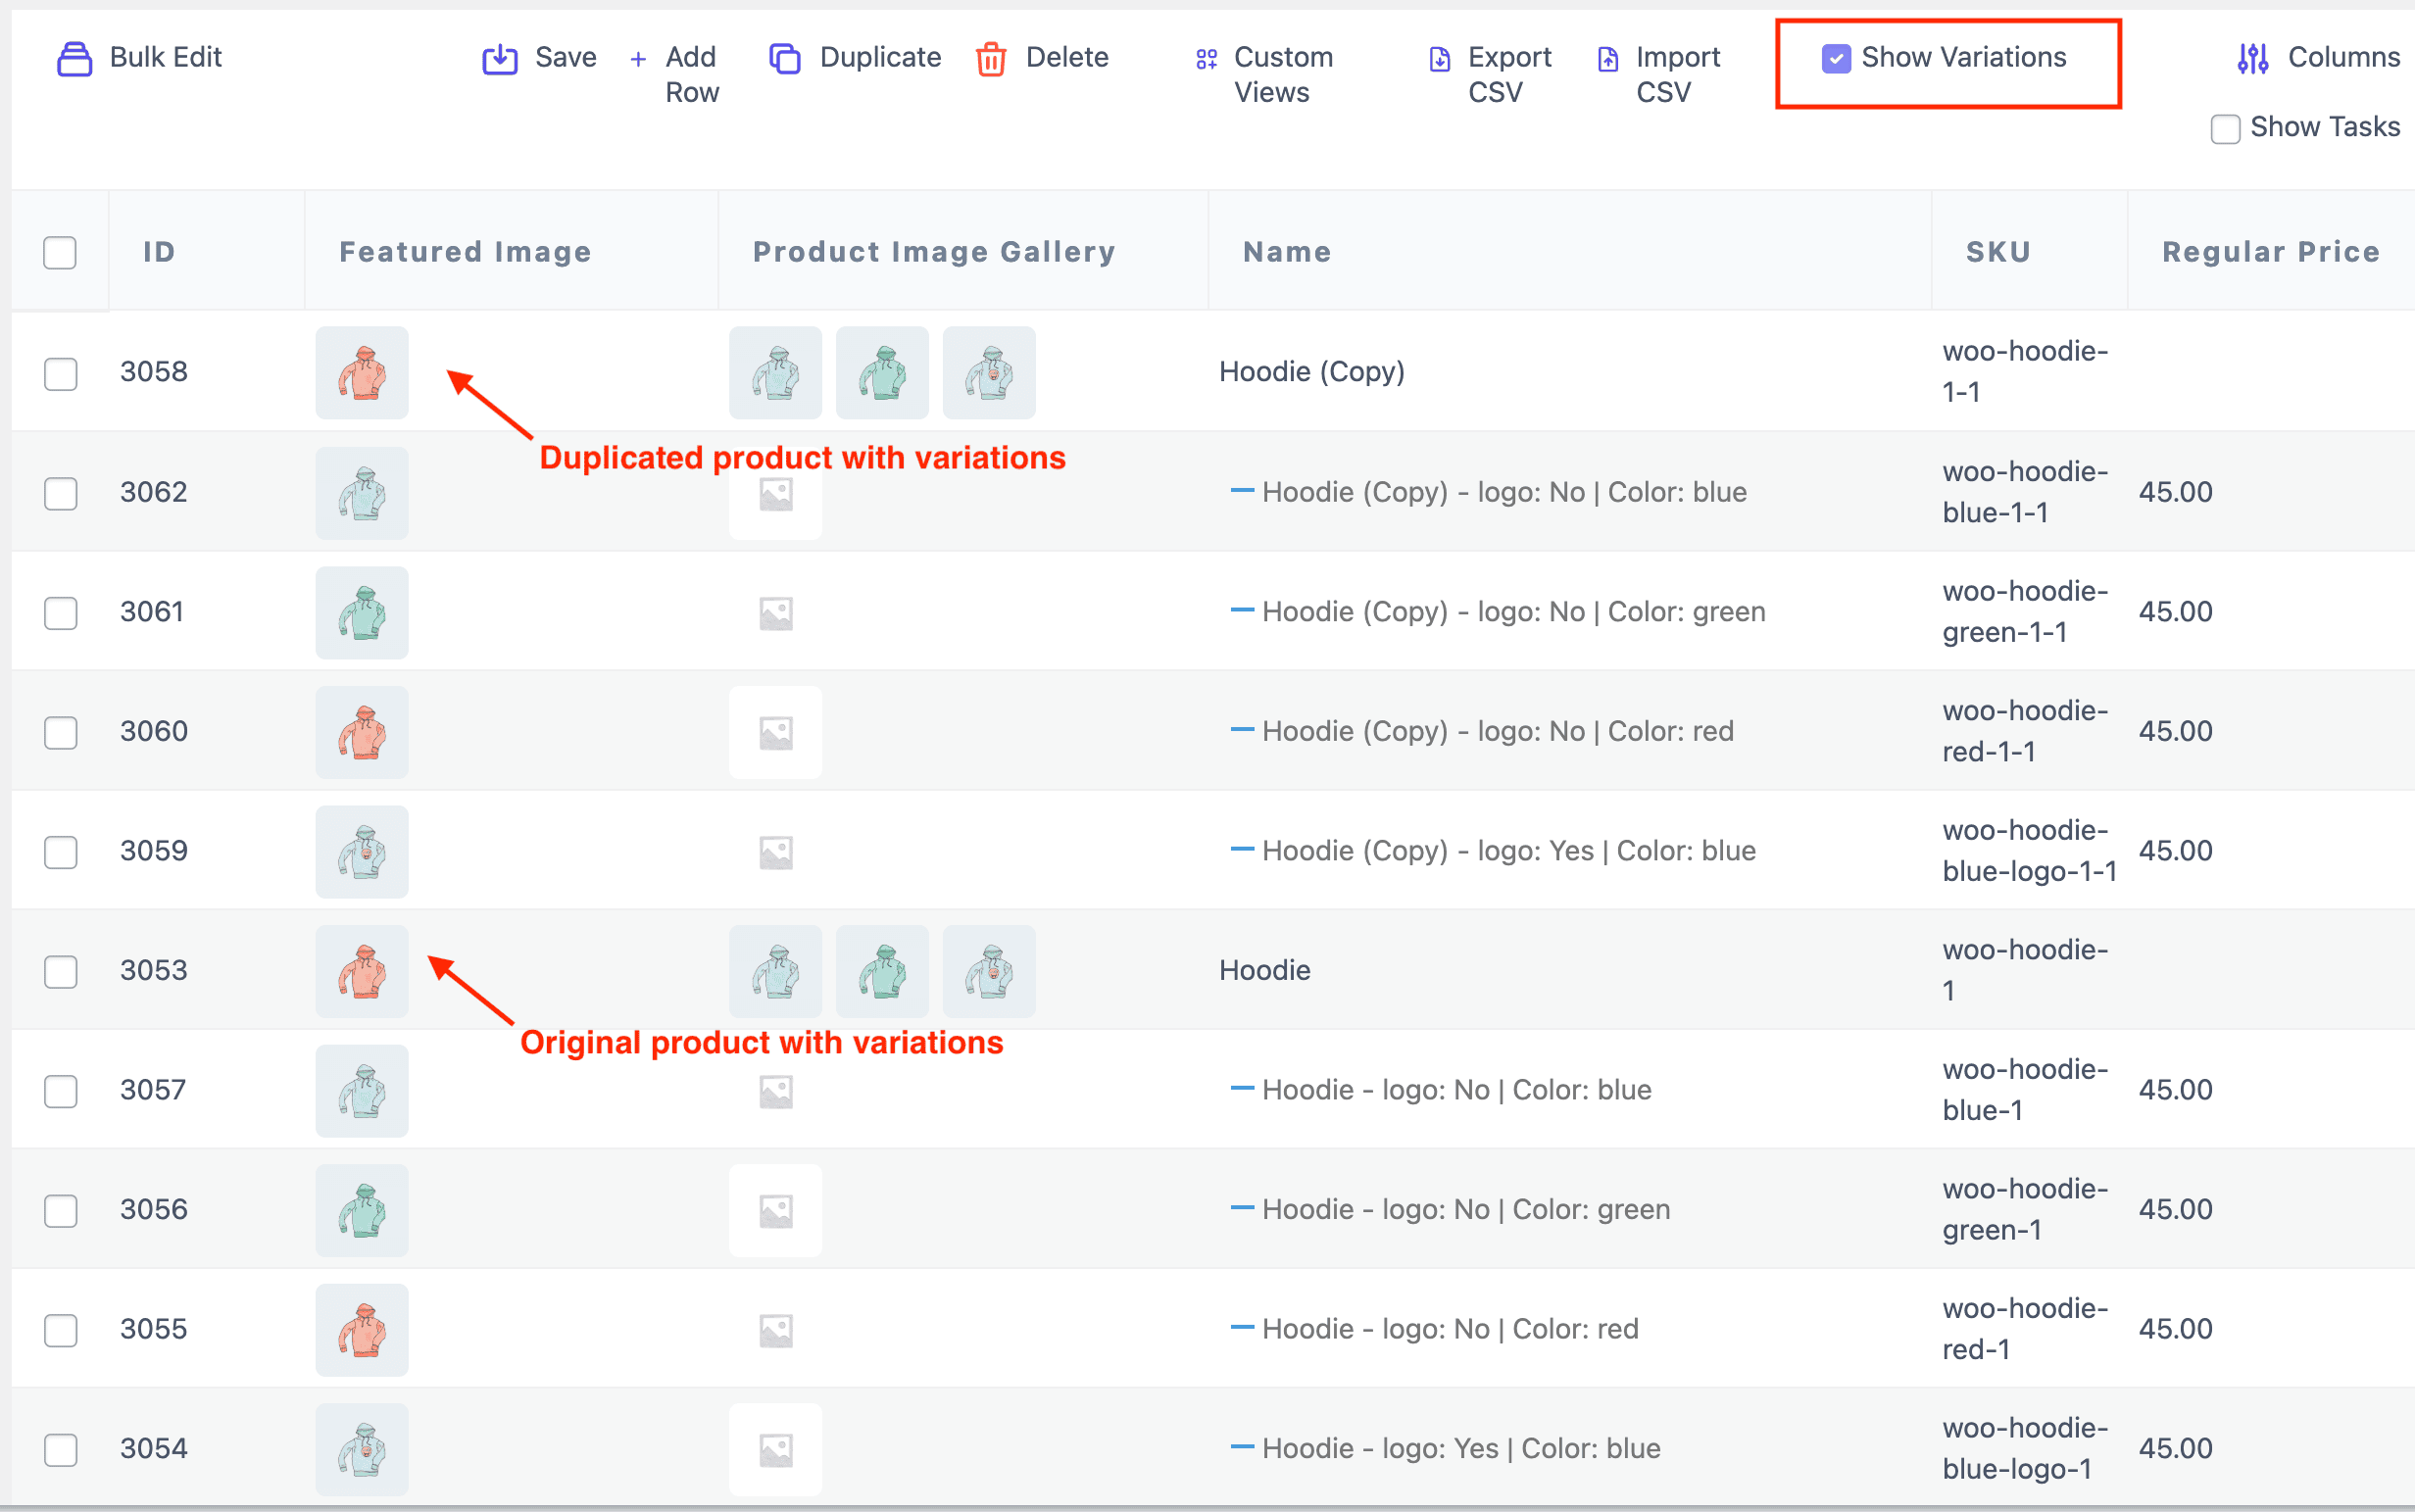
Bulk Edit > Duplicate Selected Records. - The new versions will appear with a
(Copy)label. - Right from the table, update the product name, set a new price and tweak the SKU.
In just a few clicks, you’ve created a polished product line ready for seasonal promotions — no need to open each product one by one. Super efficient, super smart.
Want a deeper dive into how product duplication works? Click here to learn more.
Show prices based on user role
What if you want to offer discounts based on user role?
WooCommerce doesn’t support this by default, but Smart Coupons makes it super easy.
You can offer targeted discounts to specific roles like Subscribers, Customers, or VIPs — all with full control.
Basically, you can restrict your discount coupons based on user roles.

Let’s say you sell an online course for $100.
But you want:
- Administrators and customers to get $15 off.
- Shop managers or others to not get discount at all.
Here’s how to do it:
- Go to
Marketing > Couponsin your WordPress admin. - Create a new coupon (e.g., ADMINCUS15OFF).
- Set it to auto-apply.
- Under the
Usage restrictiontab:- Set Allowed user roles to Administrator, Customer.
- Now just hit Publish.
Now, only users with the allowed roles will get the discount applied — making your pricing strategy smarter, more secure, and more targeted. Follow this doc to get the whole picture.
Show price variations based on location
Looking to tailor your pricing or discounts based on where your customers are located? While WooCommerce doesn’t support this natively, the Smart Coupons plugin offers advanced location-based features to help you run targeted, region-specific promotions with ease.
Imagine you’re running a summer sale just for customers in United States, United Kingdon and Australia. With Smart Coupons, you can ensure only shoppers from those regions can apply the promo code.
How it works:
- Go to
Marketing > Coupons. - Create or edit a coupon.
- Under
Usage restriction, choose the address type (Billing/Shipping). - In the Locations field, enter country, state, city, or zip code.
- Save the coupon.
Result? Only customers in the specified region can use that discount — perfect for localized promotions or geo-targeted campaigns. For further details, give this doc a read.

Set up tiered pricing
Want to reward customers who buy more? Tiered pricing is a great way to boost order value by offering increasing discounts based on purchase quantity — and the Smart Coupons plugin makes it simple to set up.
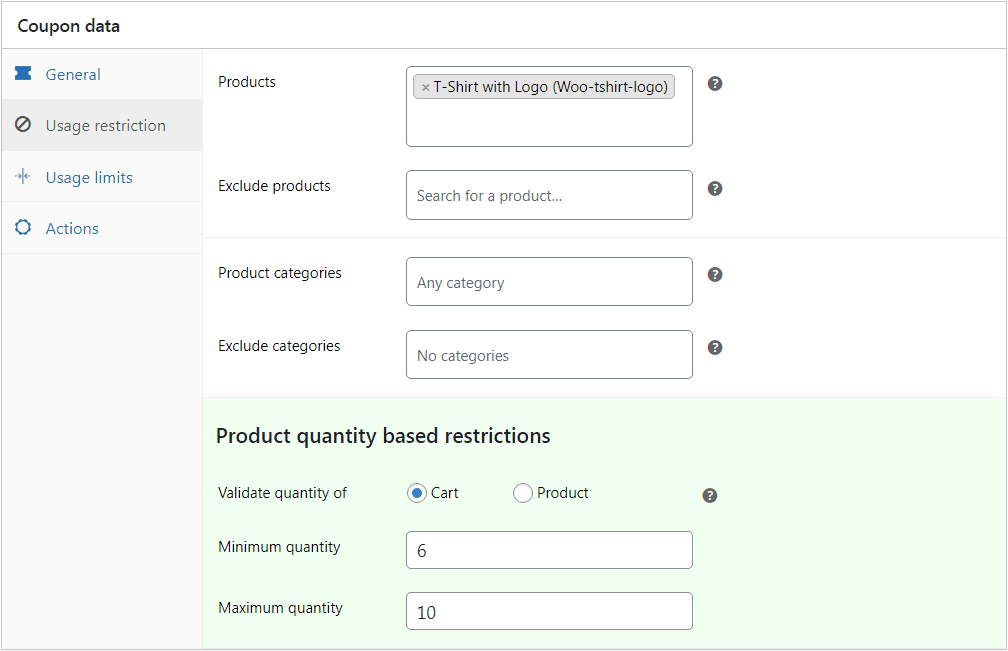
Let’s say you’re selling T-shirts and want to offer:
- 5% off for 2–5 shirts.
- 10% off for 6–10 shirts.
- 15% off for 11–15 shirts.
All you have to do is:
- Go to
Marketing > Couponsin your WordPress admin. - Create a new coupon with the Percentage discount type.
- Set the discount amount (e.g., 5%) and enable Auto Apply.
- In the
Usage Restrictionstab, choose the product (T-shirts) and set the product quantity range (e.g., 2 to 5). - Publish the coupon.
- Next, repeat steps 2 to 6 to create two more coupons —
- One with 10% off on 6–10 shirts.
- Another with 15% off on 11–15 shirts.
When customers add products to their cart in the right quantity range, the discount is applied automatically — no codes needed! Customers who purchase a single product will find no discount applied.
To know more, check this doc out.
Smart pricing strategies to boost conversions
Clever pricing strategies can make all the difference. Whether it’s psychological pricing, tiered discounts, or time-limited discounts — these tactics help you boost conversions, increase AOV, and keep shoppers coming back. Let’s dive into what works!
- Use psychological pricing: Prices like $49.99 feel significantly cheaper than $50. It’s a small difference, but human brains love bargains. Use this trick across all variations and price tiers.
- Offer bundle discounts: Create product bundles (e.g., Buy 2 T-shirts, get 10% off) to increase your average order value (AOV). You can also bundle variations like shampoo + conditioner sets.
- Use anchor pricing: Show the original price next to the discounted one (e.g., “Was $60, Now $49”) to highlight savings and urgency.
- Run time-limited discounts: Create urgency by offering flash sales or countdown-based offers for specific product variations.
- Track and analyze pricing performance: Use tools like Google Analytics, Smart Manager, or Putler to see which price points lead to better conversions — and adjust accordingly.
- Use small words near prices: Words like only, low, just make prices feel smaller.
- Show sale prices differently: Use red color, bold font, or unusual digits like $38.63 to make discounts pop.
- Use big fonts for urgency: Large price fonts feel more immediate and grab attention faster.
- Place prices on the left: Prices on the left feel lighter and cheaper due to how we read numbers.
- Reframe prices: Break down $120/year into $10/month or $0.33/day — feels more affordable.
- Use tier names smartly: Call plans Basic, Starter — not Platinum or Elite — to signal affordability.
- Group relevant numbers: A $24 price feels “right” next to 4 items with 6 toppings — because 4 × 6 = 24.
- Shrink currency symbols: Smaller dollar signs make the number look less painful.
- Sort high to low: Start with expensive items — everything else feels like a deal.
- Add space between prices: Visually separating old and new prices exaggerates the discount.
Craving more clever tricks like these? Dive into this blog for even more unique pricing ideas!
Conclusion
Setting multiple prices for the same product in WooCommerce isn’t just possible — it’s a powerful way to personalize offers, boost conversions, and grow your store strategically.
Whether you’re using product variations for size-based pricing or showing different prices to different customers, the right setup gives you more control and flexibility.
Start small. Test. Tweak. And when you’re ready, let automation and smarter tools do the heavy lifting. And if you need a helping hand, you can always reach out for the tools we talked about.