The usual cart abandonment suspects: complicated checkout forms, slow processes, and way too many steps. If your store is seeing lots of interested visitors but not enough actual sales, it might be time to rethink your checkout flow.
The solution? One page checkout. By putting everything — cart review, billing, and payment—on a single page, you make the shopping experience quick and easy, keeping buyers happy and boosting conversions.
In this blog, we’ll explain what WooCommerce one page checkout is, who can benefit from it, why it works, and how to set it up.
Let’s dive in and simplify your sales process!
Who should (and shouldn’t) use one page checkout?
Before you jump in, it’s important to know whether a one page checkout is the right fit for your WooCommerce store. Here’s a quick breakdown:
Best for
- Small to medium-sized stores: If your product range is simple—think fashion, beauty, or digital downloads—a one page checkout keeps things fast and hassle-free.
- Impulse buys: Selling items that people buy on a whim? A streamlined checkout minimizes second thoughts and helps close the sale faster.
- Mobile-first shoppers: Mobile users love simplicity. A single-page format reduces endless scrolling and multiple clicks, improving the experience on smaller screens.
- Flash sales and limited-time deals: When time is ticking, a quick, no-fuss checkout boosts your chances of closing the sale before the offer ends.
Not ideal for
- Complex product stores: If you offer FMCGs, made-to-order goods or highly customizable products, a single page can feel cluttered and overwhelming.
- B2B sites: Business buyers usually need to fill in more detailed info (like tax details or company credentials), which suits a step-by-step checkout better.
- Subscription-based models: For memberships or recurring payments, multi-step checkouts help guide users through necessary verifications and account setups.
The takeaway?
One page checkout shines when simplicity is key, but if your store requires detailed inputs or complex orders, a multi-step checkout might be the smarter route.
How to set up WooCommerce one page checkout (3 ways)?
WooCommerce doesn’t offer built-in one page checkout, so picking the right plugin is key.
You’ll find two main types:
- All-in-one solutions: Full-featured plugins that cover everything from checkout flow to payments—great for growing stores.
- Single-purpose plugins: Simple and quick to set up but often limited as your store scales.
While single-purpose plugins may seem convenient, they can become restrictive over time. That’s why an all-in-one option is usually the better long-term choice.
Enter Cashier for WooCommerce—a powerful plugin built to simplify checkout and grow with your business.
Let’s explore what makes Cashier a standout!
Introducing Cashier
Developed by StoreApps, the Cashier plugin offers a simple, structured way to set up one page checkout for your WooCommerce store.
What sets it apart? Unlike many other plugins, Cashier is built with real store owners in mind, focusing on reducing cart abandonment and boosting conversions.
Cashier WooCommerce one page checkout: key features
- No coding or complicated setup required.
- Instantly turn any page into a one-page checkout.
- Create custom one-page checkout pages.
- Fully supports PayPal, Stripe, and all WooCommerce-compatible payment methods.
Cashier gives you three easy ways to enable one page checkout:
- Pre-selected products.
- By product IDs.
- By product categories.
First things first: to get started, toggle on the One page checkout feature by navigating to:
WooCommerce > Cashier > Settings.
Next up, we’ll guide you through the setup step by step!
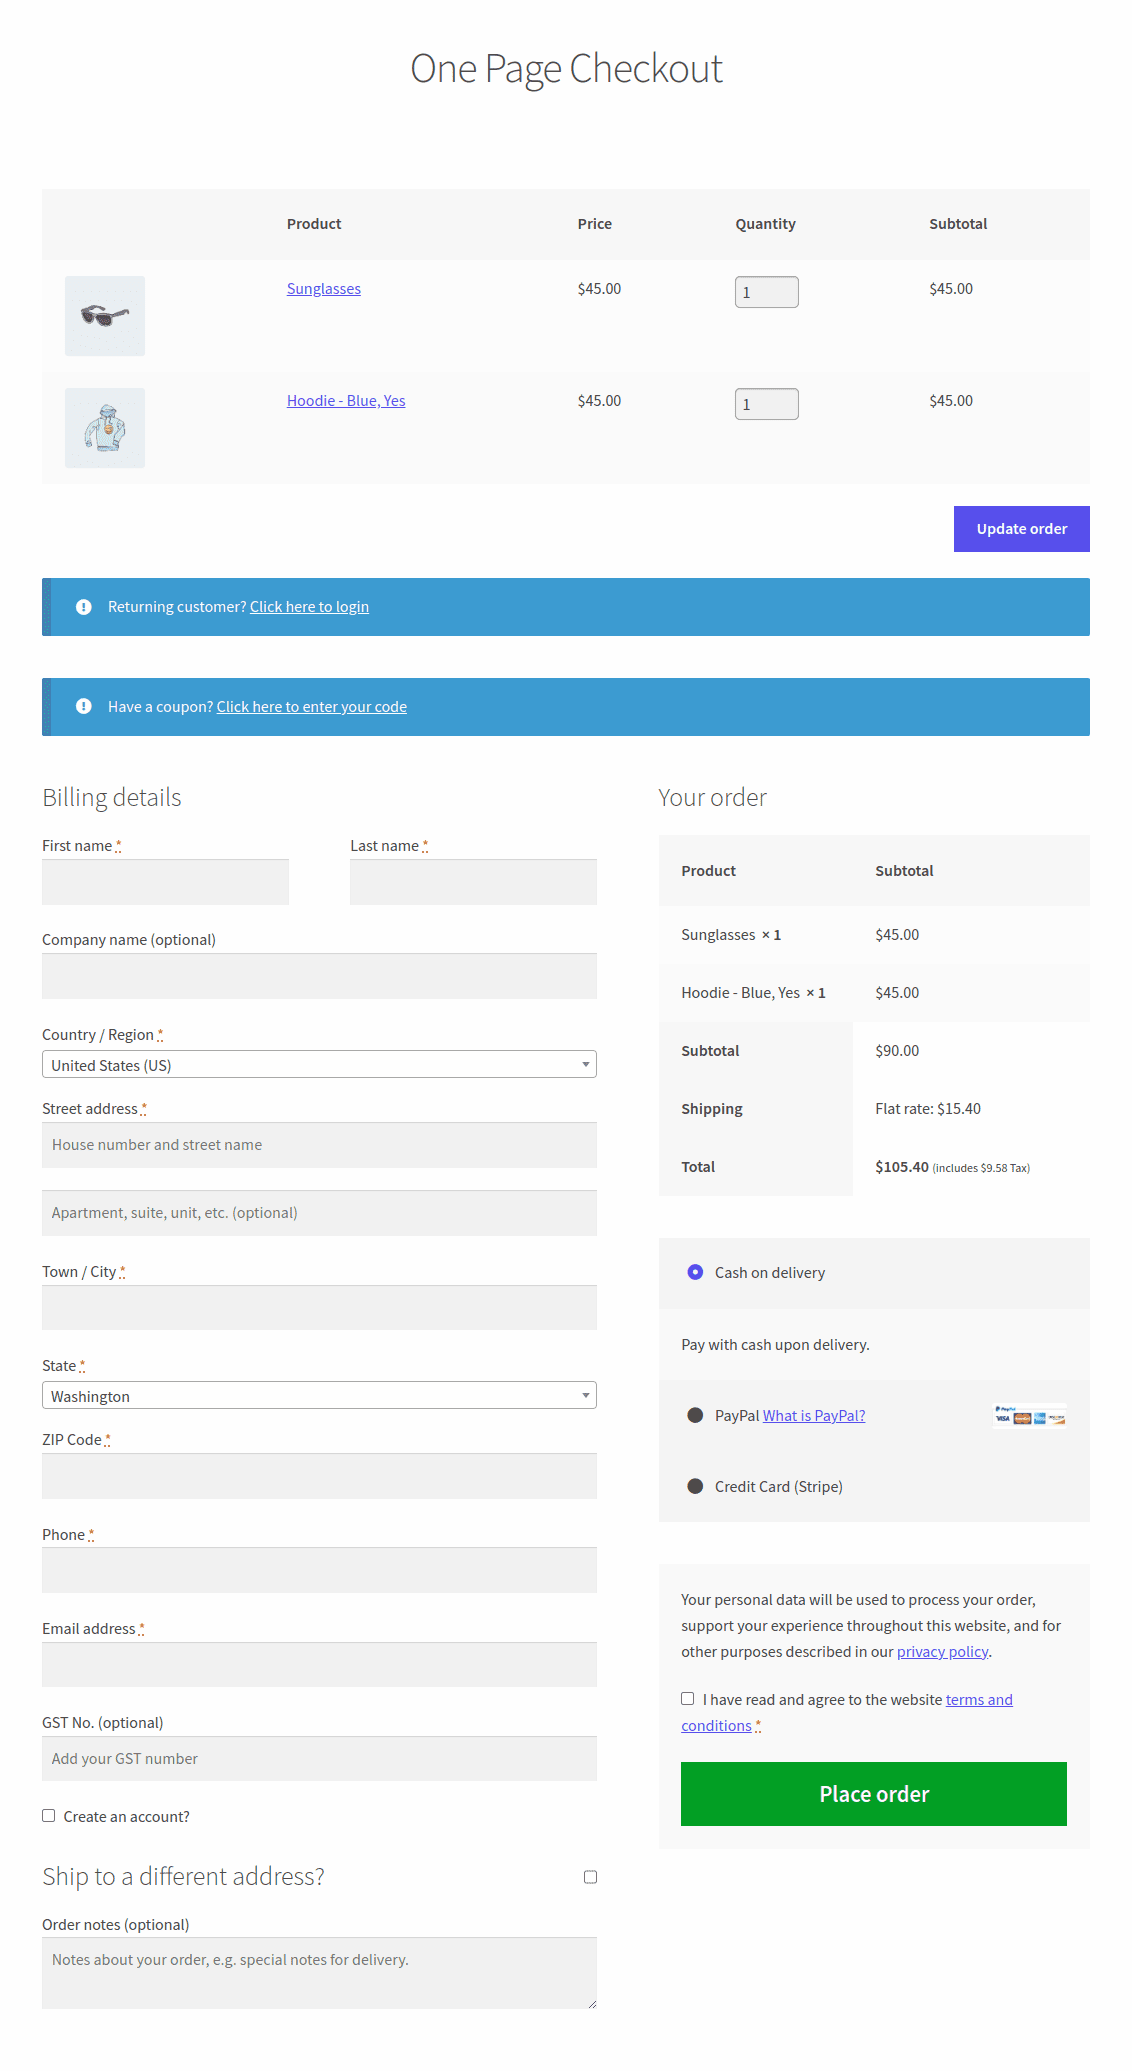
One page checkout for pre-selected products
Imagine you’re running a promo for sunglasses and hoodies and want a fast-track checkout page just for these items. All you have to do is:
- Go to WordPress Admin > Pages > Add New.
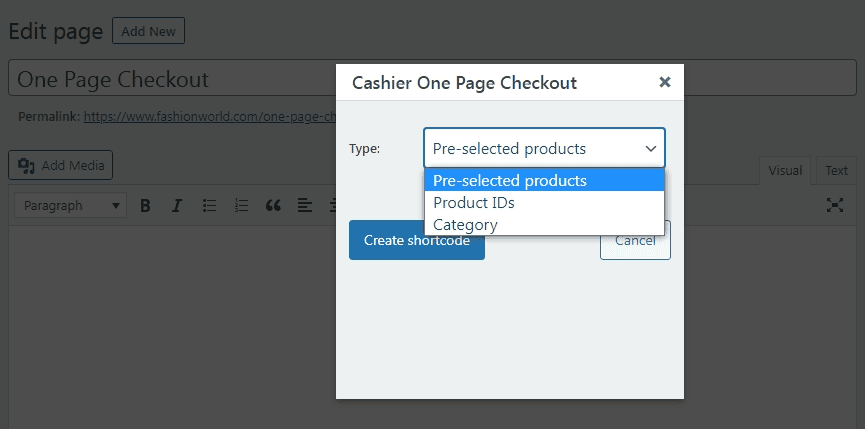
- Give your page a title, like One Page Checkout.
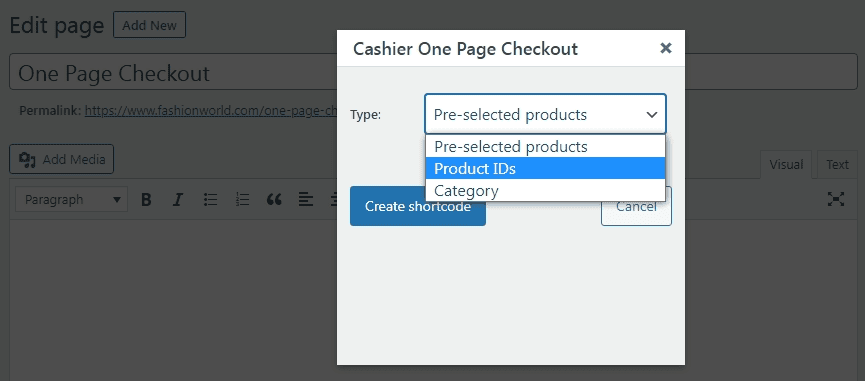
- In the WordPress Classic editor, click the OPC button on the toolbar.
- A popup will appear—choose
Pre-selected productsfrom the dropdown. - Click
Create shortcode. - Hit Publish.
- Go to Products and edit each one you want to include.
- Check the
One Page Checkoutbox and update. - Repeat for each product.
For specific variations:
- Go to Product data > Variations, expand the variation, and check
One Page Checkout. Update the product.
Let’s say your store sells red and blue hoodie. And you want to enable one page checkout for individual product variations for a blue hoodie.
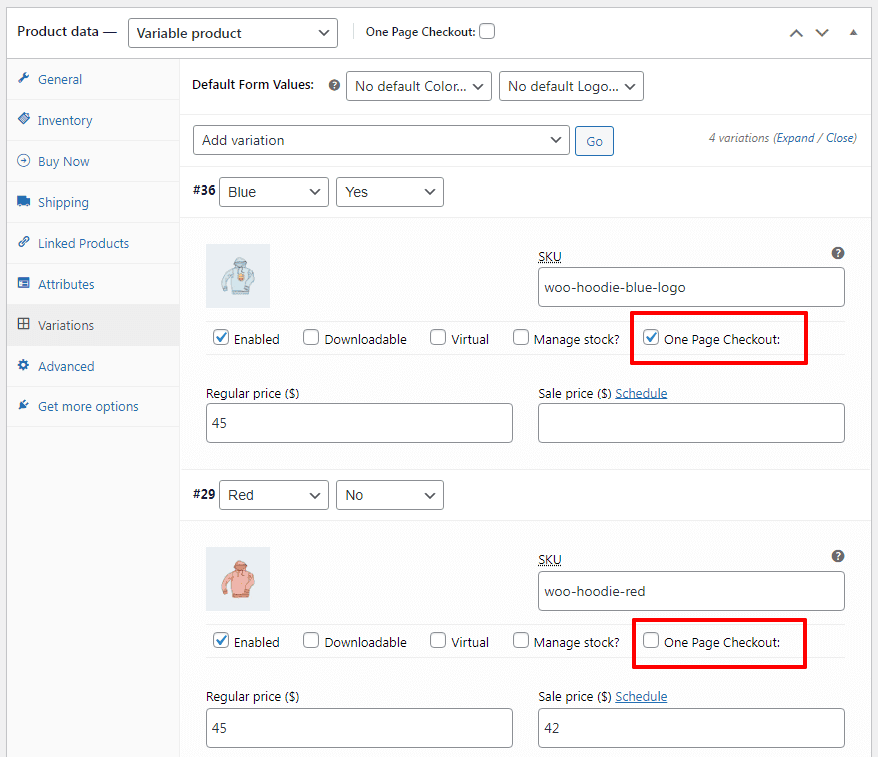
- For the blue hoodie variation, the one page checkout option is checked (enabled), meaning customers can directly check out from the product page when selecting this variation.
- For the red hoodie variation, the one page checkout option is unchecked (disabled), meaning the regular multi-step checkout process will apply.
This feature helps tailor the checkout experience per variation.
That’s it! Now you have a dedicated one-page checkout for all the products you’ve marked for fast checkout—making it easier than ever for your customers to buy in a snap.
One page checkout for product IDs
It’s useful when you want one-page checkout to apply only to certain products rather than your entire store.
- Go to your WordPress admin panel and create a new page.
- Click the OPC option and select
Product IDsfrom the dropdown. - Enter the product IDs for the products you want in the provided box, and then click
Create shortcode. - Publish the page.
That’s it. A page with all the product IDs will appear.
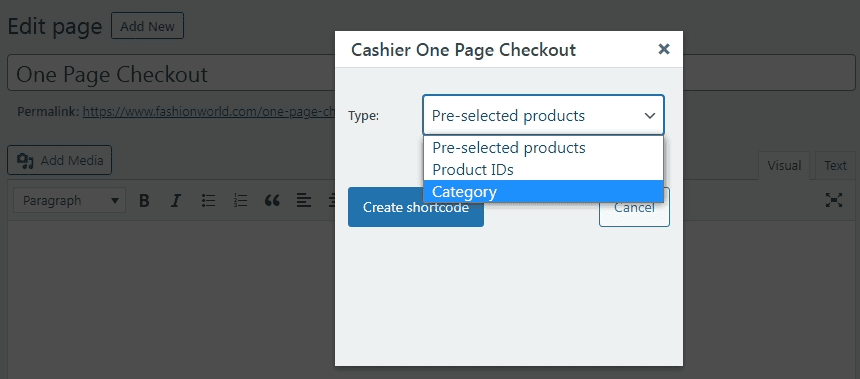
One page checkout for product categories
- After setting up Cashier, go to the popup window and select
Categoryfrom the dropdown. - Choose product categories.
- Click
Create shortcode, then Publish.
This way, your one-page checkout will only feature the products from the selected categories!
For more details, refer to this one page checkout documentation.
Some practical uses to understand one page checkout better
Each of these use cases shows how a one-page checkout can remove barriers, speed up the buying process, and boost your store’s performance!
Seasonal sale checkout (e.g., Black Friday or Holiday Specials)
During big sales like Black Friday or Christmas, set up a one-page checkout featuring all discounted electronics or category-specific deals. This streamlines shopping and boosts conversions by letting customers buy quickly without switching pages.
Product bundles (e.g., camera + accessories)
Selling a camera with accessories? Create a one-page checkout for the full bundle—camera, tripod, memory card, and case—so customers can buy everything in one go. It’s faster and encourages more sales.
VIP or loyalty customers checkout
Reward your VIP customers with a dedicated one-page checkout featuring early-access or exclusive products. This makes their shopping faster and more personal—perfect for special launches or loyalty perks.
Flash sale or limited-time offer
Flash sales thrive on urgency. For example, if you’re running a 3-hour skincare sale, a one-page checkout focused only on those discounted items helps customers act fast. It minimizes distractions, speeds up the buying process, and boosts impulse purchases—all before the clock runs out.
More about Cashier
What makes Cashier truly stand out is that it’s not just about one-page checkout—it’s a full suite of tools designed to streamline and supercharge your WooCommerce store. Here’s what else you get:
- Checkout field editor: Customize your checkout fields effortlessly. Add new fields or tweak the defaults to collect exactly the info you need—no coding required.
- Direct checkout: Skip the cart completely and send shoppers straight to the checkout page for a faster, friction-free purchase journey using Buy Now buttons.
- One-click checkout: Let customers complete their orders with a single click—perfect for regular buyers who want a quick, hassle-free experience.
- Enhanced cart features: Side carts and real-time cart notices keep your customers engaged and informed while shopping.
- Smart product recommendations: Suggest relevant products right where it matters most to boost cross-sells and increase your average order value.
- Seamless add-ons: Fully compatible with popular WooCommerce extensions like Subscriptions, Customer Email Verification, SMS notifications, and more.
In a nutshell, Cashier is your go-to plugin whether you’re just starting out or running a high-traffic WooCommerce store. It’s built to cover your current needs and scale with your business as you grow.
Conclusion
As an online store owner, your ultimate goal is simple: attract prospects, convert them into loyal customers, and keep them coming back..
The Cashier for WooCommerce plugin is your go-to plugin for an all-in-one checkout solution, especially one page checkout for your WooCommerce store. It will save you hundreds of dollars you would, otherwise, spend on getting multiple checkout extensions.
In short: smarter checkouts, smoother sales, and a plugin that grows with your business.
FAQ
What is the best checkout method – one-page or multi-page checkout?
The best checkout method depends on the issues you face and the needs of your website. The advantages of WooCommerce one page checkout have been discussed in this article.
The multi-page checkout reduces the first page loading time and lets customers review cart items during checkout. Other advantages include:
- Detailed data analytics.
- Better customer experience.
- Increase click-through-rate.
- More product recommendations.
- Increased conversions.
Can we have multiple checkout options on WooCommerce?
Yes. You can have multiple checkout options on your WooCommerce store based on product categories or variables. However, it is not recommended because it could negatively affect website SEO and security. It can also hurt credibility because customers can get confused and leave the store.