WooCommerce provides certain customisation options for taxation based on specific characteristics. One of the best features is the ability to define custom fees based on specific parameters.
WooCommerce enables you to calculate and set taxes in accordance with the rules and regulations of the nation in which your company is registered. WooCommerce assists you in this by providing numerous choices for customizing all taxes, which may vary depending on your country and particular store regulations.
There are also some excellent plugins and services available to assist you with calculating WooCommerce taxes.
While there are numerous free WooCommerce tax calculation and estimating guides available, these plugins will save you a significant amount of time.
This blog is a guide that covers important things you need to know about WooCommerce tax and setting it up.
How to set up taxes in WooCommerce?
Enable taxes
The tax settings screens can only be accessed if they are enabled first.
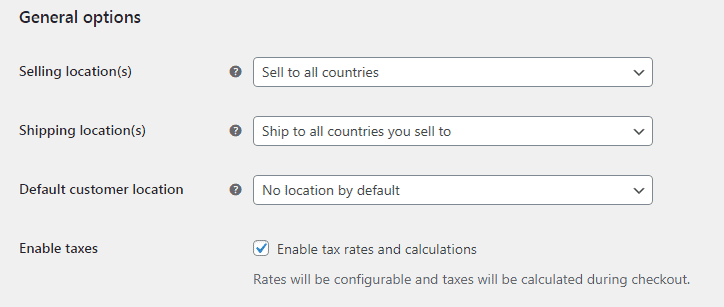
- Go to WooCommerce > Settings > General.
- Select the
Enable tax rates and calculationscheckbox. - Save changes.
Configuring tax options
To configure taxes, follow these steps:
- Go to WooCommerce > Settings > Tax. This tab is only visible if taxes are enabled.
The Tax tab provides numerous choices that can be customized to meet your needs; the settings you select are determined by the tax jurisdiction in where your store is located.
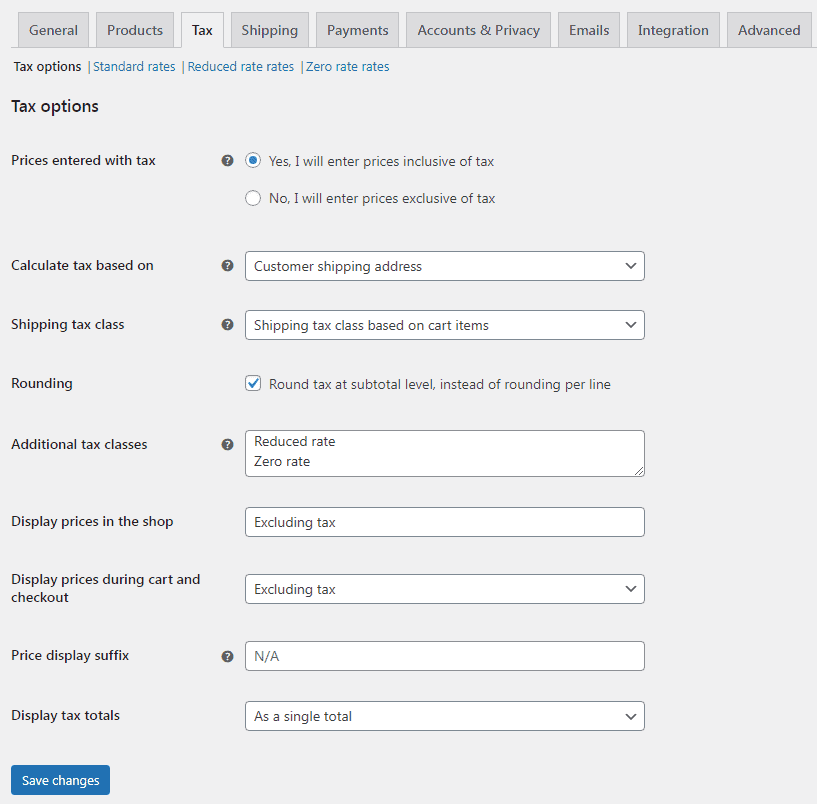
Prices entered with tax
This is likely the most significant option to consider when managing taxes on your store, as it impacts how you enter product prices later on.
- “Yes, I will enter prices inclusive of tax” means that your catalog prices are input using your store’s base tax rate.
- “No, I will enter prices exclusive of tax” means that your catalog prices need to be tax exclusive.
For example, in the UK, you would input prices inclusive of the 15% tax rate. You enter a product price of £99 that includes £13 tax. A customer in the UK would pay £99.99 as defined but a customer in the US would only pay £86.
Using the same above example, a UK shop would enter £86 as the product price. A tax of 15% would be applied on top of this during checkout making the amount payable £99.
The tax calculation for tax-inclusive prices is:
The tax calculation for tax-exclusive prices is:
Learn more about how taxes work in WooCommerce
Calculate tax based on
This option specifies which address will be used for tax calculations:
- Customer billing address
- Customer shipping address (default)
- Store base address
When you utilize a store base address, taxes are always calculated based on the location of your store, not the location of your consumer.
Shipping tax class
In most cases, the shipping tax class is inherited from the item being shipped. For example, delivering a reduced rate item like round neck T-shirts would likewise utilize a reduced rate. Choose a different tax class if this is not the situation in your area.
If the order contains various tax rates, the shipping tax will be imposed as follows:
- If you have a product with the
Standardrate in your order, it will be used for shipping regardless of whether the rate is high or low. - If you do not have a product with the
Standardrate in your order, the first rate identified in theAdditional tax classessection will be used for shipping.
Ensure you list the highest rate first in the Additional tax classes section if you don’t use the Standard class and if you need the highest tax rate to apply to shipping, for example.
Rounding
When you enable Rounding tax at the subtotal level rather than per line, the rounding is done at the subtotal level. Check with your tax jurisdiction to see if this is the case.
Additional tax classes
Your products have Tax classes allocated to them. To change the tax class, you need to go to the product page, under the ‘General’ tab, select the option from the dropdon under ‘Tax class’. In most circumstances, you should stick with the standard class.
You can add classes here if you sell goods that require a different tax class (i.e., Tax, excluding zero-rated products). To begin, WooCommerce have included Standard, Reduced rate and Zero rate tax classes.
Each class is listed at the top of the tax settings page. Click a class to see the tax rates applied to it.
Display prices in the shop
This option controls how prices appear in your shop/catalog. Select between Including tax or Excluding tax.
This series of options should be set to Excluding tax if prices are entered without tax, or Including tax if prices are entered with tax.
Display prices during cart and checkout
This option controls how prices appear in your cart and checkout pages; it is independent of your catalog prices. Select whether the tax display is inclusive or exclusive.
Price display suffix
Allows you to change the display to Prices include _ percent tax/VAT or anything else that is appropriate for your store. If you wish to include text before and after the price, use these two placeholders:
- {price_including_tax}
- {price_excluding_tax}
For example: “Price incl. VAT: {price_including_tax}” will display as: “Price incl. VAT: $15” (if that is the price, of course).

Suffixes on variable products
This functionality is turned off at variable product level as it’s not possible to know the prices that include/exclude tax.
Prices come from variations, which can have different tax classes. For example, you have a variable product with three variations and all three are priced at $20. However, one variation has a tax rate of 15%, other two have reduced rates of 10%. So, what is the price including tax?
The only way to show accurate prices would be to load the variation and get its price, which adds extra overhead and still has edge cases where the values would be inaccurate.
Variations (the price revealed when you’ve selected a variation) do support suffixes because variations have a tax class/rate.
Display tax totals
This determines if multiple taxes get displayed as one total during checkout or as an itemized list of taxes.
Setting up tax rates
The tax classes are shown at the top of the tax screen. Click on one to see the tax rates for that class.
You can define tax rates in the tax rates table (one per row). To begin, click Insert Row.
Each tax rate has the following attributes:
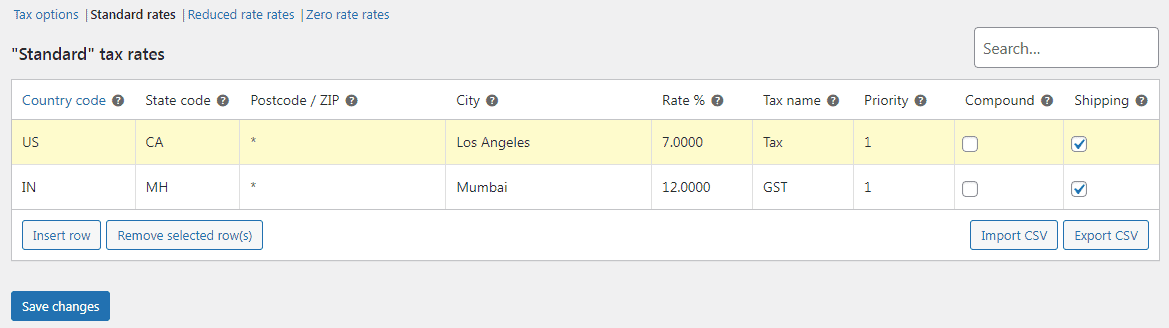
- Country code – 2-digit country code for the rate. Use ISO 3166-1 alpha-2 codes. Leave blank (*) to apply to all countries.
- State code – 2 digit state code for the rate. See
i18n/states/COUNTRYCODE.phpfor supported states. For the US, use a 2 digit abbreviation e.g. CA. Leave blank (*) to apply to all states. - Postcode/ZIP – Enter postcodes for the rate. You may separate multiple values with a semi-colon (;), use wildcards to match several postcodes (e.g. PE* would match all postcodes starting with PE) and use numeric ranges (e.g. 2000…3000). Leave blank (*) to apply to all postcodes.
- City – Semi-colon separated list of cities for the rate. Leave blank (*) to apply to all cities.
- Rate % – Enter the tax rate, for example, 18.000 for a tax rate of 18%.
- Tax name – Name your tax, e.g. GST
- Priority – Choose a priority for this tax rate. Only 1 matching rate per priority will be used. To define multiple tax rates for a single area, you need to specify a different priority per rate.
- Compound – If this rate is compound (applied on top of all prior taxes), check this box.
- Shipping – If this rate also applies to shipping, check this box.
Importing and exporting rates
Below the rate table, there are Import CSV and Export CSV buttons. They may import and export tax rates to and from a CSV file.
Ten columns are required in the CSV file for import:
Leave tax class blank for standard rates.
Deleting tax rates
Tax rates should be deleted if they were added incorrectly or if tax lines were incorrectly added to the CSV import. Here’s how:
- Go to WooCommerce > Settings > Tax > Your Tax Rates (Standard, Reduced rate, Zero rate).
- Select the incorrect lines by clicking on them. They are highlighted in yellow.
- Select
Remove Selected row(s). This deletes the highlighted row(s). - Save changes.
If you want to delete all tax rates at once, use Delete WooCommerce tax rates in WooCommerce > Status > Tools.
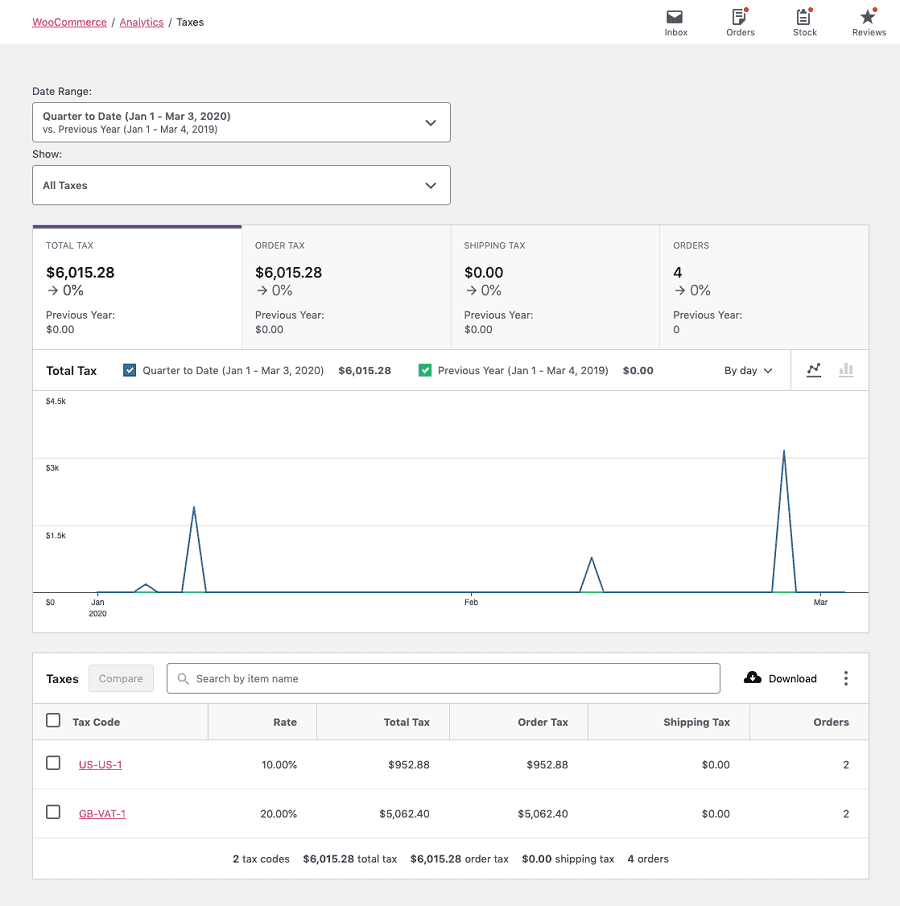
Viewing tax reports
Tax reporting can be found under WordPress admin > Analytics > Taxes. This report allows you to view taxes for a particular date range.
Automated tax calculation
If you don’t need to go the manual way above, you need to download the free WooCommerce Tax extension for automated tax calculations.
To enable automated tax calculation, first ensure that Enable tax rates and calculations is checked on WooCommerce > Settings > General.
With taxes enabled, go to WooCommerce > Settings > Tax, select Enable automated taxes and Save Changes.
Once automated taxes are enabled, many of the settings are disabled as automated taxes take over from the WooCommerce core tax settings. This means that Display prices will be set to Excluding tax and tax will be calculated using Customer shipping address.
Four popular WooCommerce tax plugins
Want some assistance for automated tax calculations, compliance and tax exemption? These plugins will surely help.
WooCommerce AvaTax
WooCommerce has teamed up with the sales tax experts at Avalara to provide users with an integrated sales tax tool that is easy-to-use and implement.
No manual work of adding a bunch of tax and shipping rates to your store. Use Avalara’s tax codes to automatically calculate the appropriate tax for each order based on your store address and the customer address.
Pricing: Free
Tax Exempt for WooCommerce
Tax Exempt plugin allows merchants to exempt certain customers and user roles from paying tax on your store.
Features:
- Allow all or selected user roles to claim tax exemption.
- Show the tax exemption form in “My Account”.
- Store admin can approve/disapprove tax exemption requests.
- Add expiry date for tax exemption.
- Email notifications for admin when the tax exemption form is submitted.
- Email notification for customers on approval & rejection of tax exemption requests.
- Allow guests to claim tax breaks.
Pricing: $59
Get Tax Exempt for WooCommerce plugin
EU/UK VAT Compliance Assistant for WooCommerce
This WooCommerce plugin provides features to assist with EU, UK and/or Norwegian VAT law compliance.
Features:
- Display prices including correct VAT from the first page.
- Record evidence of your customer’s location, using their billing or shipping address and their IP address (via a GeoIP lookup).
- Forbid vatable sales if any goods have VAT chargeable.
- Entering and maintaining each country’s VAT rates.
- Brings all settings, reports and other information into a single centralised location.
Pricing: Free version on WordPress.org, premium version for £55.00.
Get EU/UK VAT Compliance Assistant plugin
TaxJar
TaxJar by Stripe is a SaaS tool that helps with automatic sales tax calculations for WooCommerce.
Features:
- You collect the right rate on every product in over 14,000 taxing jurisdictions.
- Automatically submits your returns to the states where you’re registered to avoid due date.
- Integrations with numerous ERPs and marketplaces including NetSuite, Acumatica, and Amazon.
Pricing: Not disclosed, free trial available.
Winding up
So far, we have discussed all the important aspects of WooCommerce tax, which will help you to set up the correct configuration for your store easily.
We also analyzed some popular tax plugins which will help you to implement sales tax in an efficient way.
I hope you got all the information you were looking for. Any questions or feedback? Share in the comments box below.