
It’s a myth that customers care only about product quality.
Shipment plays a major role in the overall shopping experience. It impacts the level of loyalty customers have towards your brand.
It is the combination of shipping charges, speed of delivery and a lot more that ensures a great shopping experience for your customers.
So, if you are someone who wants to offer a wide range of shipping options to your customers, WooCommerce makes it easy for you.
Ready to master WooCommerce shipping? Let’s dive into the options, setup process, and essential plugins you’ll need.
What are the default shipping options for WooCommerce?
WooCommerce’s default shipping features streamline the checkout process. By enabling the shipping calculator on the cart page, you allow customers to select their desired shipping location and checkout method before completing their purchase.
WooCommerce offers 3 primary shipping rate types:
Flat rate
Flat rate applies to a standardized shipping charge for all shipments, regardless of location. It makes tracking easy. Plus, the shipping charges aren’t a surprise to the customers. If a flat rate is used, customers may end up paying more in shipping.
Free shipping
Offer free shipping to your customers when they spend a minimum amount.
Local pickup
Local pick-up shipping eliminates the need for a courier company, such as FedEx, DHL, USPS, or UPS.
Here, the customer visits you and collects the product. As a result, the shipping charges are free. Yet, a physical location for handing over products to customers is essential.
These were the three core shipping options of WooCommerce.
However, what you should know is that the main benefit of WooCommerce shipping comes from its extensions.
You gain these three additional shipping rates options with the help of extensions:
Real-time carrier rates
Using real-time carrier rates allows you to link your shipping to carrier services such as UPS, FedEx, DHL, and USPS. The main benefit is that the shipping rates are accurate.
However, customers have to wait until checkout to see the exact shipping charges. Therefore, the charges may be viewed as ‘too high’ by some customers.
Table rate shipping
Consider factors like volume, weight, delivery date range, etc. before setting a shipping charge. For example, if a shipment needs to be delivered overnight, you could set a certain charge.
You can charge a different price (lower than expedited shipping) if a shipment takes a standard 3-5 days to arrive. Additionally, you can set your shipping rates based on other factors like the weight of the shipment.
Local delivery
The local delivery plugin allows you to deliver products directly to customers’ doorsteps if you have a physical store and vehicles. If you do, then this plugin is a good option for you.
How to set up WooCommerce shipping zones?
A WooCommerce shipping process consists of configuring a zone, adding shipping methods, and mentioning the cost of each shipping method.
Apart from these, there are a few extra configurations including special shipping conditions or classes to receive free shipping.
The entire process of WooCommerce shipping starts with setting up a zone. Let’s take you through the quick steps.
- First off, go to WooCommerce > Settings > Shipping on your WordPress Admin dashboard. Here, you’ll get the WooCommerce shipping configurations and settings.
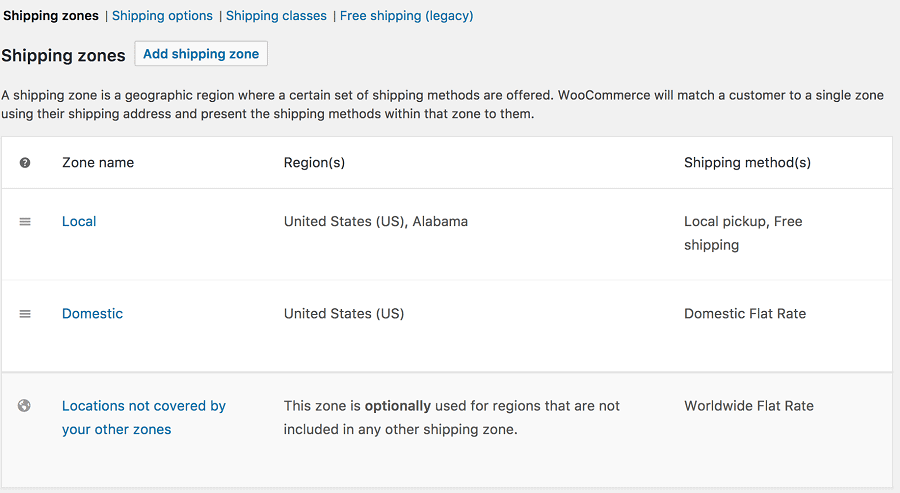
- Find the
Shipping zonestab and click onAdd shipping zone.

Note: Shipping zones are geographic areas where your e-commerce store operates. You can set specific shipping rates and methods for each zone. For example, if you’re based in Germany, you might charge more to ship to Spain than to France.
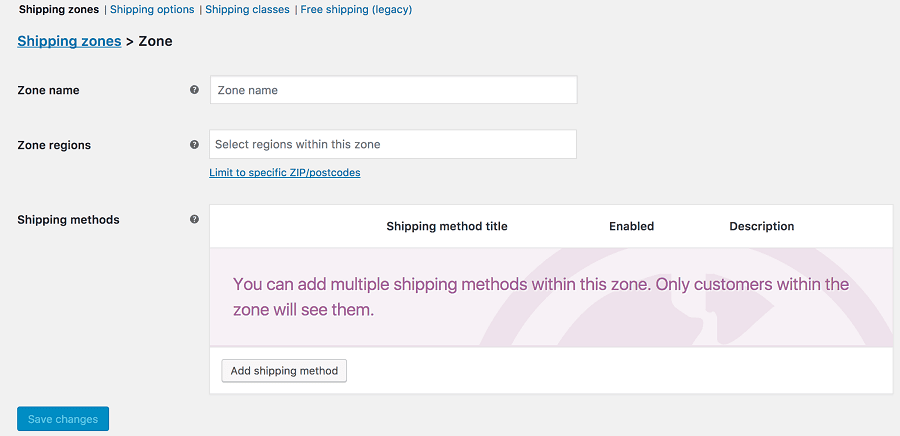
- For your reference, choose a
Zone name. And forZone regions, scroll through the drop-down list and go for the best-suited location. - Once the shipping zone is set, get to the bottom of the page and choose the
Add shipping methodbutton.

Every zone should have a shipping method, which specifies how much shipping will cost for a specific location. For example, you may opt for a flat rate shipping option for most customers, table-rate for commercial packages and local pick-up for the nearby community.
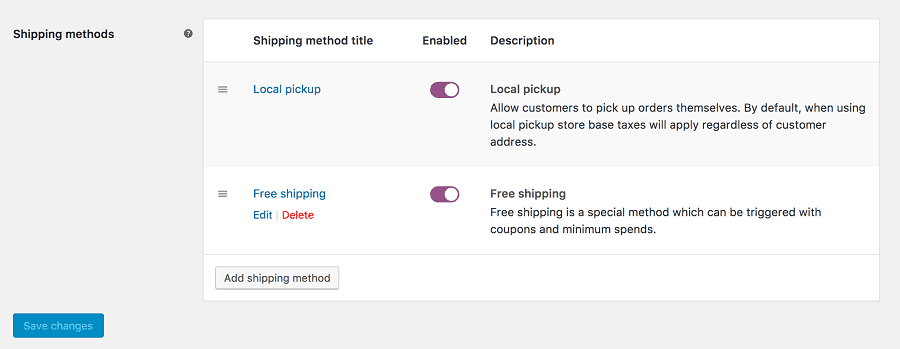
Note: You can opt to include multiple shipping options for each zone as well. To do so, click on the Add shipping method and follow the process again.
For instance, to offer free shipping for Canadian customers after they spend a certain amount, while also charging a flat rate for other orders, you’ll need to adjust your shipping methods.
So, this is how you can configure WooCommerce shipping methods. Like if you opt for free shipping, you have to set the minimum spend to activate the free shipping option.
Similarly, a few other configurations follow that you can complete by going to Shipping > Shipping Options. These are optional. So, you can decide whether or not to set it. These settings include shipping destinations, calculator, etc.
Remember to click on ‘Save changes’ to update all the choices you have entered. Next up is creating shipping classes.
How to create WooCommerce shipping classes?
Let’s start with understanding the concept of shipping classes.
When you use shipping classes, you can group similar products and apply the same shipping method and charge to all of them.
For instance, sunglasses (lightweight packages) might have a lower shipping rate than luggage bags (heavy packages).
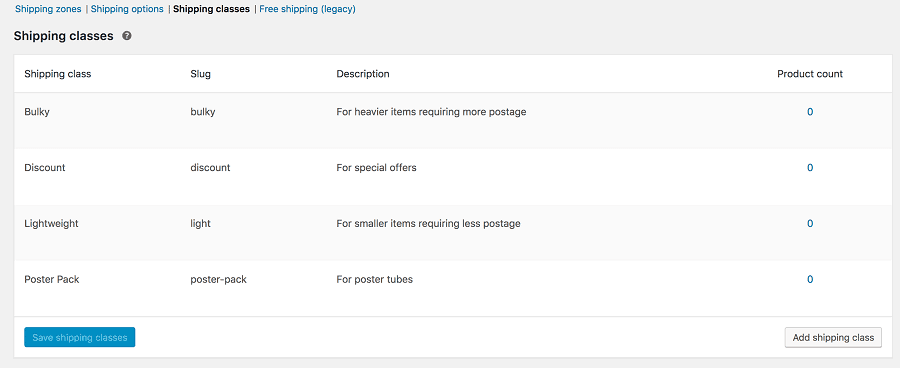
- You can find the shipping classes function alongside shipping zones. So, go to WooCommerce > Settings > Shipping on your WordPress Admin dashboard. Click on the
Shipping classesoption. - Provide a name and URL slug for the shipping class, as well as a short description. For example, ‘Sunglasses’ might represent light, smaller packages.
- Save the shipping class. You can hover on the shipping class name to edit details or remove the shipping class based on the Edit and Remove options respectively.
- Turn on shipping methods (if not done already) and choose a shipping method for the class.
- Assign shipping classes to the products. Here’s how.
- Finally, look at the shipping method settings box. Choose the Shipping class costs area. Then, choose the shipping cost for the class and set the other options for calculation type. Here’s how.
There you have it. That’s all there is to it regarding WooCommerce shipping settings. In the next section, we are going to discuss a few popular WooCommerce shipping extensions.
Best WooCommerce shipping plugins
The default WooCommerce shipping options are good. To enhance your shipping options and customize the process, you must choose some plugins based on your requirements.
Here we cover the popular shipping plugins for WooCommerce.
Table Rate Shipping
Table rate shipping for WooCommerce plugin gives you the flexibility to set multiple shipping charges based on factors such as weight, location, price, etc.
Top features:
- Flexible, customizable shipping options
- Multiple rate tables per shipping zone
- Multiple table rate calculation type
- Allows adding rules based on weight, number of items, etc.
- Allow addition of cost per item, row, etc.
Pricing: $119
Get Table Rate Shipping plugin
Shipment Tracking
The plugin allows your customers to track their shipments easily and conveniently.
Top features:
- Allows adding shipment tracking information to orders
- Allows adding shipment tracking information to customer emails
- Supports custom tracking links and automatic tracking links for popular shipping providers like FedEx, DHL, UPS, Canada Post, Australia Post, etc.
Pricing: $59
WooCommerce Order Barcodes
You can create a unique barcode for each order on your website. This is best suited for e-tickets, packing slips, reservations and a variety of other applications.
Top features:
- Can choose from five different barcode types
- The barcodes can be processed and scanned directly on your site
- Customers will receive the barcodes via emails
Pricing: $99
FedEx Shipping Method
Get accurate FedEx shipping rates for domestic and international parcels with this plugin.
The extension requires that your store uses the US or Canadian Dollars, US or Canada as a base country, and SOAP installed on the server.
Pricing: $99
Get FedEx Shipping Method plugin
UPS Shipping Method
The UPS API manages both local and international packages so you can get accurate shipping rates. It requires Simple XML installed in your server.
Ensure your store’s currency matches UPS API’s default currency to get accurate rate calculations.
Pricing: $99
Get UPS Shipping Method plugin
WooCommerce Distance Rate Shipping
Using distance rate shipping, you can offer customers shipping rates based on the total distance or time traveled.
Top features:
- Rules are set to charge based on travel time, or distance.
- Add extra charges based on total weight, total cart value, etc.
- Best for businesses that charge customers based on the distance covered for package delivery.
- The extension requires a Google Account as it uses Google Maps, Google Distance Matrix API, etc.
Pricing: $99
Get WooCommerce Distance Rate Shipping plugin
Per Product Shipping
Looking to set unique shipping costs for individual products or variations? The Per Product Shipping extension offers the flexibility you need.
Top features:
- Costs might vary according to destination
- Get import and export rates via a built-in simple CSV handler
- Allows using standalone shipping method where all the product costs add up to the final cost-or- add per-product costs to other shipping methods.
Pricing: $99
Get Per Product Shipping plugin
WooCommerce ShipStation Integration
Using ShipStation, you can reduce your shipping duties, ship faster and for less money, and fulfill all your orders with minimal effort.
Top features:
- Importing orders automatically at Woo, Amazon, eBay, Walmart.com, etc. and save time.
- Cheaper shipping by availing of the preferred courier choices
- Customize emails, shipping labels, packing slips, or brand you tracking page to enhance customer experience
Pricing: Free app download. 30-days free trial.
Flat Rate Box Shipping
Define costs for different types of destinations and decide the cost of the boxes based on the destination with this plugin.
Top features:
- Multiple box sizes as per the shipping zone
- Adding cost per box, per weight unit, and a percentage of item cost inside the box
- Define a cost for items that are unpackable
Pricing: $59
Get Flat Rate Box Shipping plugin
WooCommerce Shipping Services
This is the only solution that allows you to perform all the shipping tasks including printing labels, requesting pickups & monitoring shipment tracking status right from your WooCommerce dashboard.
Top features:
- Supports multi-carrier shipping for all the top carriers like UPS, FedEx, USPS, DHL, Canada Post, Australia Post, & many more.
- Display accurate shipping rates on your WooCommerce checkout page.
- Save time & Effort by automatically printing shipping labels.
- Automatically choose the cheapest shipping services.
- Carrier pickup requests & manifests.
Pricing: Starts from $9/month, 14-day free trial available
Get WooCommerce Shipping Services plugin
Parting words
Taking care of shipping is not only a part of the shopping process, but it’s a process in itself that requires attention. There are so many things to do. And as your business grows, handling shipping becomes increasingly challenging.
It is worthwhile to experiment with WooCommerce shipping settings to better understand the system, learn more about it, and figure out which plugins or shipping options are right for you.
Take the time to figure out what works for you and do things the right way!
FAQs
Why You Should Use a WooCommerce shipping plugin?
You should use a WooCommerce shipping plugin to simplify and streamline your shipping processes. A good shipping plugin can help you automate shipping rate calculation, label printing, order tracking, and other shipping-related tasks. It can also provide you with more shipping options and carrier integrations, which can help you save time and money on shipping.
Can I restrict certain products to specific shipping zones in WooCommerce?
Yes, you can restrict certain products to specific shipping zones in WooCommerce. WooCommerce provides a built-in feature called “Shipping Zones” that allows you to define different regions or countries for shipping. You can then assign specific products to these shipping zones to restrict their availability.
Can I assign multiple shipping classes to a single product in WooCommerce?
Yes, you can assign multiple shipping classes to a single product in WooCommerce. This can be done by selecting multiple shipping classes in the product editor under the “Shipping” tab. You can also set different shipping rates for each shipping class assigned to the product.
Can a WooCommerce shipment tracking plugin be customized to match the branding and design of an online store?
Yes, a WooCommerce shipment tracking plugin can be customized to match the branding and design of an online store. Most plugins offer customization options for colors, fonts, and logos so that they can blend seamlessly with the overall design of the store.