


WooCommerce has no dedicated “clear sale price” button, so a bulk remove sale price task takes a workaround. The native bulk editor can end sales on simple products, CSV import handles variations, and a bulk editor plugin does both in one pass with undo.
Major promotions like Black Friday often end at midnight. When they do, active discounts continue bleeding profit margin on every order. Store owners naturally look for a quick way to restore regular pricing across their entire catalog.
To restore regular prices safely, use these three proven methods. For broader catalog updates, check our guide to WooCommerce bulk editing.
[lwptoc]
When not to bulk clear sale prices
Before clearing sale prices storewide, make sure you exclude items that should stay discounted:
- Clearance and end-of-line stock: Products being liquidated should remain at discounted rates until sold out.
- Contractual partner pricing: Items tied to ongoing promotional agreements with suppliers.
- Pre-scheduled upcoming sales: Products where a future promotional date window is already configured.
- Dynamic pricing and discount-rules plugins: Some discounts are generated at cart or render time by a dynamic pricing plugin rather than stored in
_sale_price. None of the catalog methods below will remove those rules. Deactivate the rule inside your dynamic pricing plugin instead.
Comparison of methods to bulk remove WooCommerce sale prices
Choosing the right method depends on your catalog size. It also depends on whether you sell variable products:
| Method | Variable Products | 1-Click Undo | Timeout Risk | Speed and Effort | Best For |
|---|---|---|---|---|---|
| Native Bulk Edit | Simple only (skips variations) | No | High on large pages (20/page limit) | Manual pagination required | Small catalogs of simple products |
| CSV Export / Import | Yes (if variations exported) | No (requires pre-edit CSV backup) | Medium (browser-driven import batches) | Multi-step spreadsheet roundtrip | Stores without bulk edit plugins |
| Smart Manager (Pro) | Yes (catalog-wide in 1 pass) | Yes (Task History Rollback) | Low (Background batch processing via Action Scheduler) | Fast execution across entire catalog | Medium-to-large catalogs, seasonal sales |
Method 1: The native bulk edit workaround
WooCommerce provides a built-in bulk edit panel. While it lacks an explicit “Clear Sale Price” button, core WooCommerce supports a native workaround for simple products.
How to use the native bulk edit workaround
Follow these steps to end discounts on simple products in under 5 minutes using core WooCommerce tools:
- In WordPress Admin, navigate to
Products > All Products. - Check the box next to each simple product you wish to update.
- In the Bulk actions dropdown menu, select Edit and click Apply.
- Locate the Product data columns and find the Sale dropdown menu.
- Select the option: Set to regular price decreased by (fixed amount or %).
- Leave the text field completely blank, or enter 0.
- Click Update.
Selecting this action with an empty value or 0 recalculates the sale price as regular price minus zero. In practice, this sets the sale price equal to the regular price, which deactivates the promotional badge. However, the sale price field may remain populated in your database. This leftover value can affect subsequent percentage discounts or feed exports, which is why a true database clear is preferred.
Why entering 0 makes products free (the $0.00 pricing trap)
Faced with clearing sale prices late at night, many store owners make an understandable mistake.
Under the Sale dropdown, they select Change to and enter 0. They assume this will reset or delete the promotional discount.
That assumption causes an immediate retail disaster.
WooCommerce does not interpret Change to: 0 as an instruction to clear the field. Instead, WooCommerce treats 0 as an intentional promotional price of $0.00.
Your storefront immediately displays those products as free gifts with strikethrough regular prices (~~$89.00~~ $0.00). Bargain forums and social media bots quickly detect the pricing error. Shoppers rush to place zero-dollar orders. Your customer service team must then cancel unauthorized transactions and issue explanations.
To clear discounts natively, always use Sale Price with an empty value or select Set to regular price decreased by with 0.

Where the native bulk edit falls short
While this workaround functions for small catalogs of simple products, it breaks down quickly on growing eCommerce stores:
- Leaves product variations untouched: The native screen updates only simple products. It never modifies child variations such as specific sizes or colors. Your variations remain discounted.
- The 20-item pagination barrier: Screen Options defaults to 20 items per page. Raising this setting to 100 items frequently triggers PHP timeouts and 504 server errors on shared hosting.
- Zero rollback safety: If you select the wrong category, WooCommerce provides no undo feature. You must inspect and fix every SKU by hand.
- Tedious variation editing: Clearing variable products natively requires opening every variable product individually in
Products > All Products. Navigate to the Variations tab, choose the variation bulk action Set sale prices, and leave the prompt empty. Do not enter 0. Entering 0 sets every variation’s sale price to $0.00, triggering the exact zero-dollar pricing trap. For stores with dozens of variable items, editing each product by hand takes hours.
Method 2: Bulk remove sale prices using WooCommerce CSV import
If you run a medium catalog with variable products and lack a bulk edit plugin, WooCommerce’s native product CSV suite provides a reliable alternative.
This method handles product variations and bypasses pagination limits. However, the core importer runs in batches driven by your active browser session. Keep your browser tab open until the import completes.
Step 1: Export your product catalog
Follow these steps to generate your pricing export:
- In your WordPress dashboard, navigate to
Products > All Products. - Click the Export button at the top of the page.
- Under Which columns should be exported?, select
ID,Type,SKU,Name,Regular price,Sale price,Date sale price starts, andDate sale price ends. - Click Generate CSV and save the file to your computer. Always keep an untouched duplicate copy of this CSV file as your emergency safety backup.
Step 2: Clear sale price values in your spreadsheet
Open your spreadsheet tool and prepare the updated file:
- Open your exported CSV file in Microsoft Excel, Google Sheets, or Apple Numbers.
- Locate the columns titled
Sale price,Date sale price starts, andDate sale price ends. - Delete all values in these three columns so the cells are entirely empty. Do not delete the columns themselves or alter column headers.
- Keep the
Regular price,ID, andSKUcolumns completely intact so WooCommerce matches records accurately. - Export or save the spreadsheet as a standard CSV file with UTF-8 encoding.
Step 3: Import the updated CSV file
Return to WordPress to complete the update:
- Return to WordPress Admin and navigate to
Products > All Products. - Click the Import button at the top of the screen.
- Select your updated CSV file.
- Crucial step: Check the box labeled Update existing products. This instructs WooCommerce to overwrite existing database records rather than creating duplicate products.
- Click Continue, verify that the CSV columns map correctly to WooCommerce product fields, and click Run the importer.
WooCommerce processes the file in sequential AJAX batches. For a store catalog, the import usually finishes in under 3 minutes. When the import completes, all cleared sale price cells are removed.
Method 3: Catalog-wide removal using Smart Manager (with 1-click undo)
For stores with extensive catalogs, seasonal promotions, or frequent flash sales, Smart Manager provides a fast and dependable workflow.
Smart Manager displays your entire WooCommerce store in an Excel-like interface. While Smart Manager Free enables inline spreadsheet editing, Smart Manager Pro adds catalog-wide bulk updates, advanced search filtering, asynchronous background processing, and 1-click Task History rollback.
Here is how to clear sale prices across products and variations in minutes:
Step 1: Filter active sale prices across products and variations
Instead of browsing pagination screens, use Smart Manager’s advanced search to isolate every discounted item in one view:
- In WordPress Admin, navigate to
Smart Manager > Products. - Click the Show Variations button in the top toolbar so child SKUs appear alongside simple products.
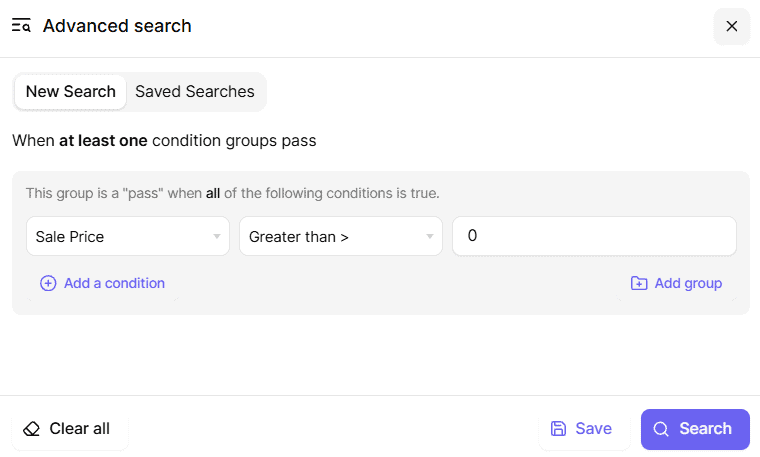
- Click the Advanced Search bar. A side panel will open up.
- Set your search condition:
Sale Price > 0(orSale Price != 0). - Click Search.
Smart Manager instantly displays all products and variations currently carrying a discounted price.
Step 2: Bulk clear the sale price field
Once your discounted products are filtered, execute the bulk removal:
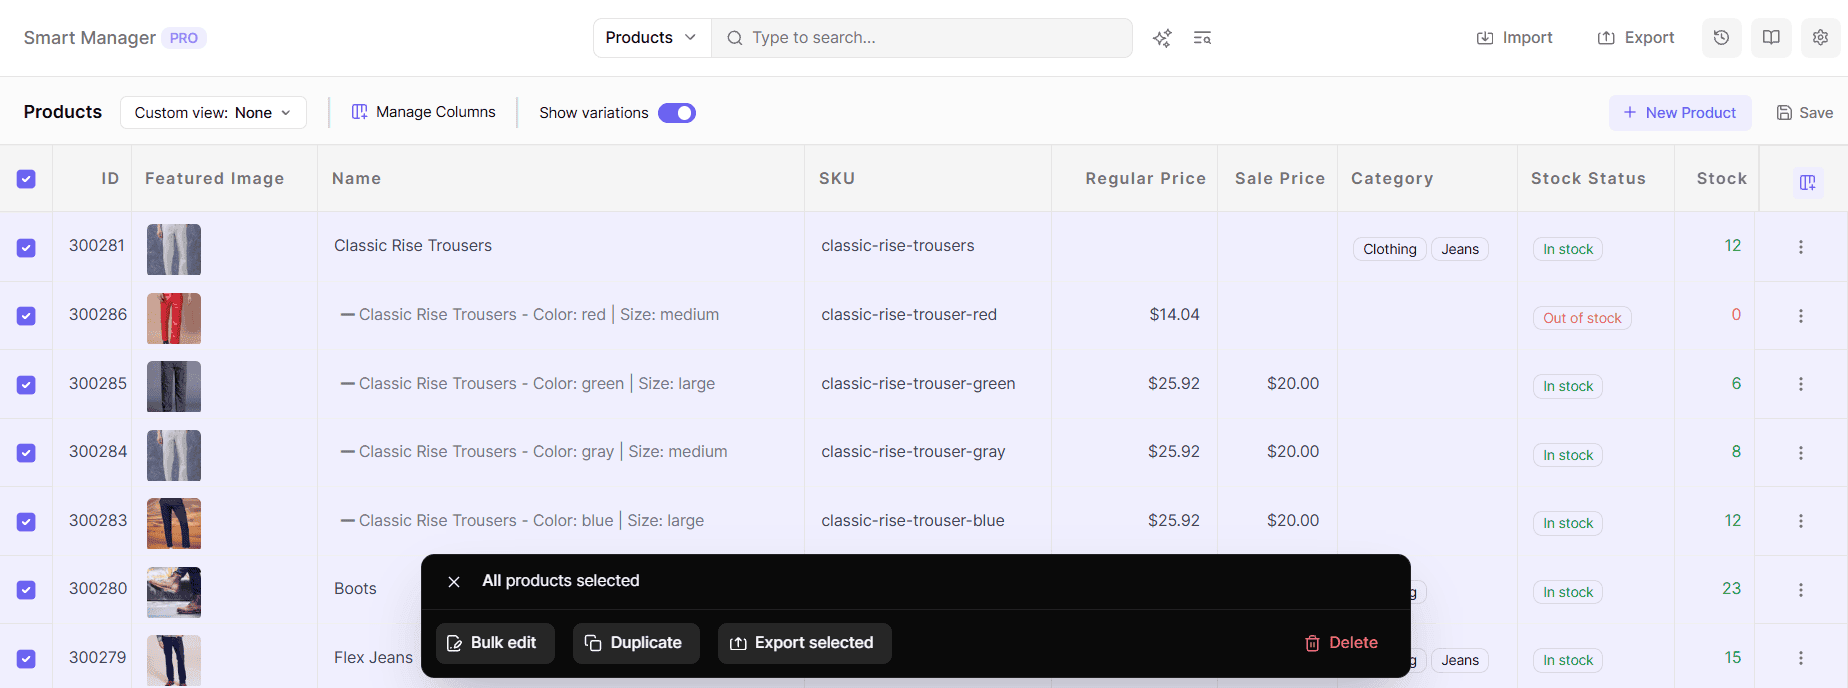
- Click the master checkbox at the top-left corner of the table header to select all filtered items across all pages.
- Click the Bulk Edit button in the floating action toolbar.
- In the Bulk Edit modal, select
Sale Pricefrom the field dropdown menu.
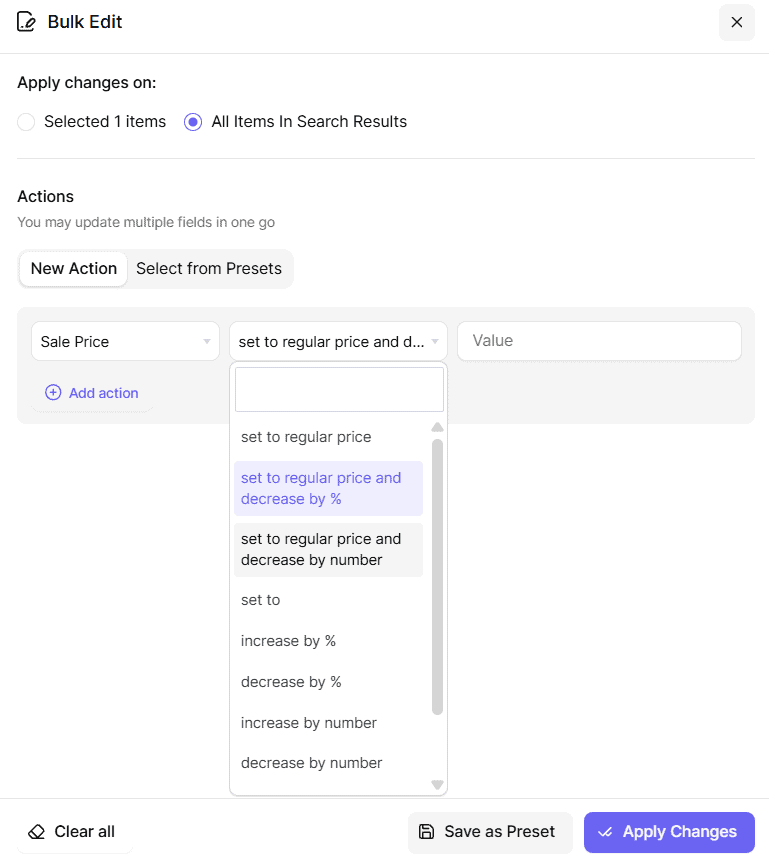
- Set the action dropdown to
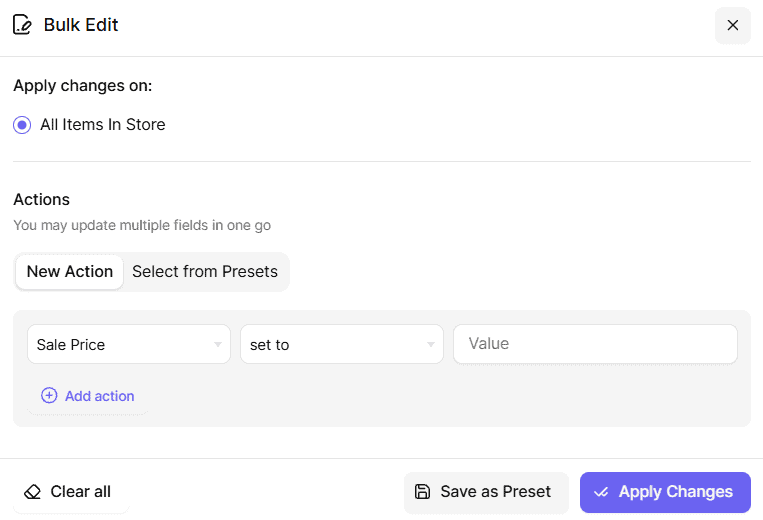
set to. - Leave the value input completely empty. Do not type 0 or spaces.
- (Optional) If you used scheduled promotional dates, add secondary action rows: set
Sale Price Date FromandSale Price Date Toto blank to clear promotional date windows. - Click Update.
Leaving this field blank instructs Smart Manager to delete the _sale_price post meta key, reset the active _price to _regular_price, and update the onsale flag in WooCommerce lookup tables.
Step 3: Process in the background without server timeouts
On stores with thousands of SKUs, attempting to process an entire catalog in a single browser request causes 504 server gateway timeouts.
Smart Manager Pro prevents server crashes by processing bulk updates asynchronously in background batches via Action Scheduler. A live progress bar shows batch status in real time. If your network connection drops or you close your browser tab, the background task continues executing safely on your server until every product is updated.
Other bulk editing plugins, including WP Sheet Editor, BEAR (Bulk Editor and Products Manager Professional for WooCommerce), and ELEX WooCommerce Advanced Bulk Edit, also offer bulk clearing features. Smart Manager differentiates itself with its unified spreadsheet view, background queue processing, and instant Task History undo.
How to undo a promotional sale in 1 click (Task History Rollback)
Suppose you discounted hundreds of products by 20% for a weekend flash sale. On Monday morning, you want to return every product to its exact pre-sale baseline price.
Rather than re-filtering products or creating complex update rules, Smart Manager Pro includes a dedicated Task History Undo feature.
How task history rollback works
Every bulk operation executed in Smart Manager is recorded as an audit snapshot:
- In WordPress Admin, open
Smart Manager > Products. - Click the History button located in the top-right utility toolbar.
- Locate the bulk edit task corresponding to your promotional launch (such as “Bulk Edit: Decreased Sale Price by 20%”).
- Hover over the task row and click Undo (or select the task and click Undo in the floating toolbar).
- Confirm the action Undo selected in the floating bar.
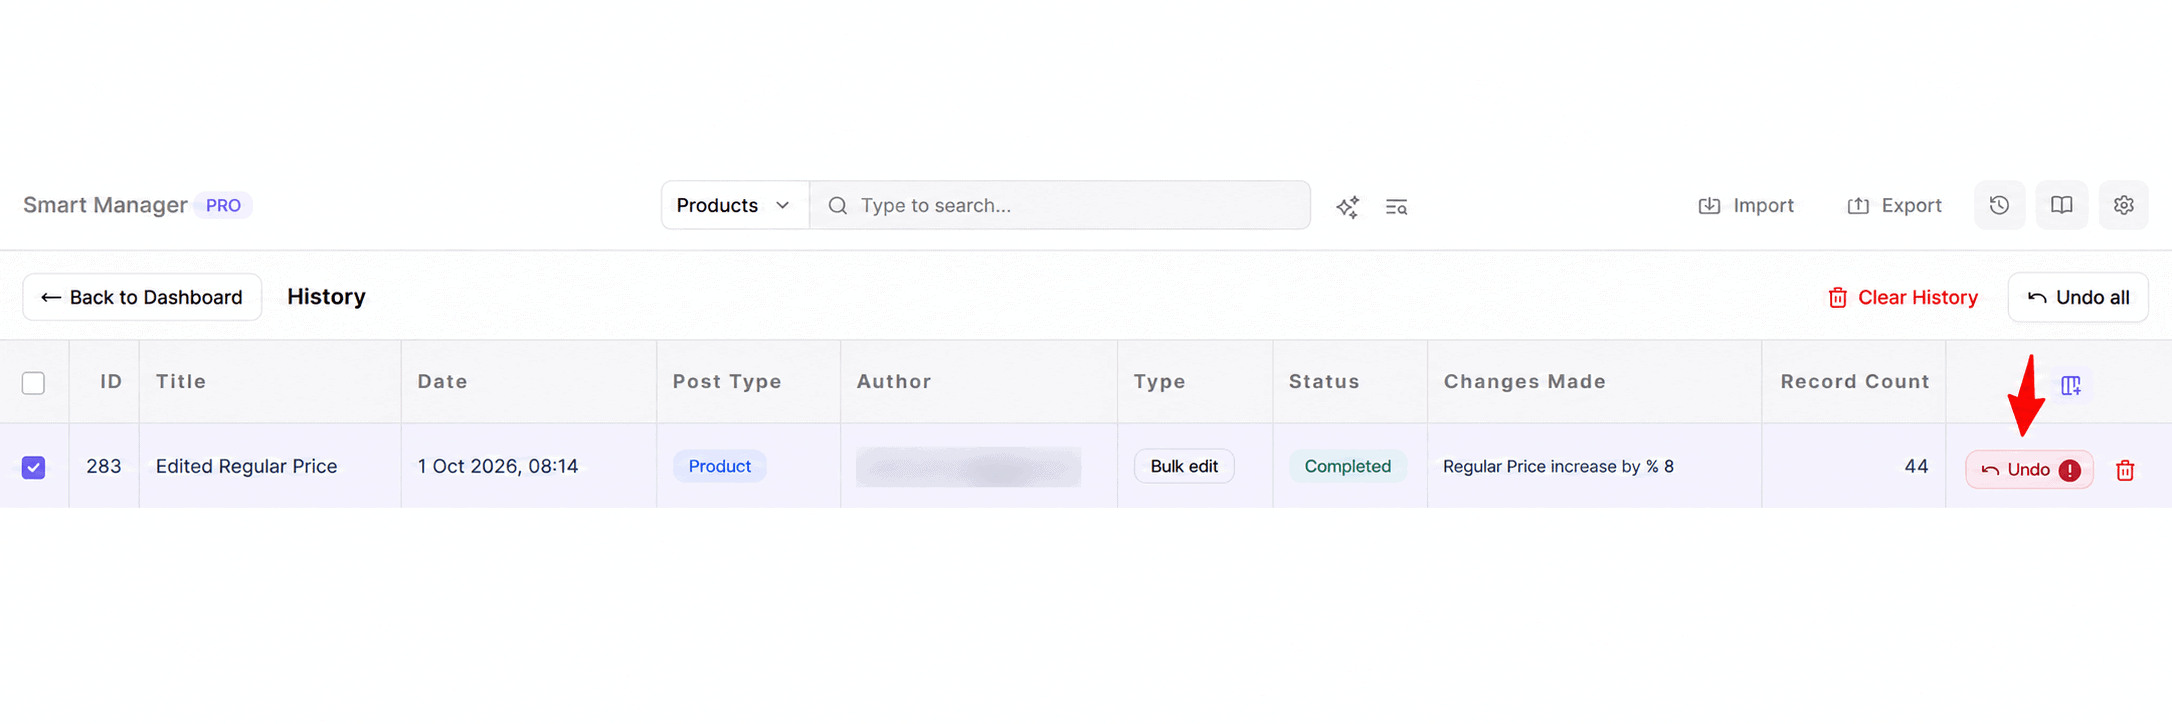
Smart Manager reads each SKU’s previous state from its task log. It then restores original regular and sale prices across your catalog. Task History Undo restores each product to its exact pre-task baseline. Any individual price adjustments made manually between the sale launch and the rollback will be overwritten.
Why past customer orders and financial reports remain 100% safe
Rolling back product pricing after a sale never alters completed orders, customer receipts, or tax accounting reports.
Store owners frequently worry that rolling back catalog prices will alter previous customer invoices or skew tax reports.
It does not.
WooCommerce stores completed order line items in dedicated database tables: wp_woocommerce_order_items and wp_woocommerce_order_itemmeta. When a customer places an order, WooCommerce writes permanent snapshots for _line_total, _line_subtotal, and _line_tax.
Smart Manager’s Task History Undo operates exclusively on catalog tables (wp_posts, wp_postmeta, and wc_product_meta_lookup). Because order line items are permanently stored during checkout, adjusting catalog tables leaves past invoices, customer receipts, and tax calculations completely intact.
For store owners reviewing broader catalog adjustments, see our guide on how to manage WooCommerce sale prices.
The hidden database hazards of clearing sale prices with raw SQL
When store operators realize native WooCommerce tools are cumbersome for large catalogs, they often search developer forums for quick database queries.
A common SQL query circulated online looks like this:
-- DANGEROUS: Do not run this on a production store
DELETE FROM wp_postmeta
WHERE meta_key IN ('_sale_price', '_sale_price_dates_from', '_sale_price_dates_to');

UPDATE wp_postmeta
SET meta_value = (
    SELECT meta_value
    FROM (SELECT * FROM wp_postmeta) AS temp
    WHERE temp.post_id = wp_postmeta.post_id AND temp.meta_key = '_regular_price'
)
WHERE meta_key = '_price';
Executing direct database updates on modern WooCommerce stores creates serious data inconsistencies. Here is why:
Why wc_product_meta_lookup creates ghost “SALE” badges
Starting in WooCommerce 3.6, WooCommerce stopped querying wp_postmeta directly for shop catalog rendering and faceted price filtering. Instead, WooCommerce introduced a dedicated lookup table named wc_product_meta_lookup.
This table stores pre-indexed values for product_id, min_price, max_price, onsale, and stock_status.
When you delete _sale_price rows directly in wp_postmeta, your SQL query bypasses WooCommerce’s internal WC_Product::save() lifecycle hooks. The lookup table never receives the update:
- The
onsalecolumn remains set to1. - The
min_pricecolumn retains the old promotional markdown. - Your catalog continues displaying visual “SALE” badges on full-price products.
- Faceted price filter widgets continue showing promotional price brackets. Shoppers who click through find higher regular prices.
The cached variation transient bottleneck
WooCommerce caches variable product pricing in transient records (_transient_wc_var_prices_{product_id}).
When a shopper opens a variable product, WooCommerce reads this cached transient rather than querying individual variation rows. Direct database edits do not purge these transients.
As a result, product pages display regular prices for individual options. However, the main archive label still shows the old discounted range until transients are cleared.
To clear promotional prices safely, an update must clean wp_postmeta. It must also re-index wc_product_meta_lookup and flush price transients across all variations.
Post-revert checklist: 3 mandatory steps after clearing sale prices
Once you clear promotional prices, your teardown is not complete. Modern eCommerce stores rely on multi-tier caching and third-party advertising feeds.
Skipping this 3-step checklist leaves old discounted prices visible to shoppers for up to 24 hours. It also risks Google ad disapprovals.
1. Regenerate product lookup tables and flush transients
If your catalog still shows ghost ‘SALE’ badges on regular-price items, re-index your lookup tables and purge cached price boundaries:
- In WordPress Admin, navigate to
WooCommerce > Status > Tools. - Locate Regenerate the product lookup tables and click Regenerate. This rebuilds
wc_product_meta_lookuprecords for your catalog. - Locate WooCommerce transients and click Clear transients.
- Locate Expired transients and click Clear expired transients.
Clearing transients takes under 30 seconds and removes stale variation bounds, which WooCommerce recalculates automatically on subsequent page views.
2. Purge server object cache and CDN edge cache
If your hosting environment utilizes Redis, Memcached, Varnish, or an edge CDN like Cloudflare, cached HTML pages will continue serving expired sale prices to guest shoppers:
- Object Cache: If you use Redis or Memcached, open your caching plugin (such as WP Rocket, LiteSpeed Cache, or W3 Total Cache) and select Purge Object Cache.
- Full-Page Cache: Select Clear All Cache to regenerate clean HTML copies of your shop archives and product pages.
- Cloudflare / Edge CDN: Log in to your Cloudflare or CDN control panel and execute a Purge Everything cache request.
Verify the result by opening your shop in a private incognito browser window. Confirm that strikethrough prices and sale badges have disappeared.
3. Resync Google Merchant Center feeds to prevent price mismatch suspensions
Google Merchant Center continuously compares product prices declared in your shopping feed (g:sale_price and g:price) against structured schema.org data rendered on your live product pages.
If your ad feed tells Google an item is $49.00, but a shopper clicks the ad and lands on a page showing the restored regular price of $79.00, Google disapproves the affected items for a Price Mismatch. Repeated discrepancies can lead to account-level merchant warnings.
To prevent feed disapprovals, complete these steps:
- Open your product feed plugin (such as Google for WooCommerce, Product Feed PRO by AdTribes, or WebToffee Product Feed).
- Regenerate your product feed data.
- In Google Merchant Center, re-fetch or re-upload your primary product data source.
- Confirm that Google processes the refreshed feed and removes the promotional
g:sale_priceattribute.
How to run seasonal flash sales without post-campaign panics
Scrambling to revert prices at midnight is stressful. Adopting two proactive habits prevents post-sale panics before your next campaign begins.
Schedule sale end dates in advance
Default WooCommerce lets you assign promotional dates on individual product pages at the calendar-date level. Core WooCommerce checks these dates during daily scheduled-sales cron execution (woocommerce_scheduled_sales) and deactivates expired discounts automatically.
With Smart Manager Pro, you can bulk schedule sale start and end dates across your entire catalog before your campaign goes live:
- When applying promotional prices in Bulk Edit, add the field
Sale Price Date To. - Set your sale expiration date.
- Update the task.
At midnight on your sale’s concluding day, WooCommerce will automatically deactivate the promotional price, returning items to regular pricing without manual intervention.
Direct sale prices vs coupons for holiday promotions
Before launching your next sale, consider whether direct sale prices or cart coupons best suit your store’s strategy.
Direct Sale Prices offer distinct conversion advantages during high-traffic holidays like Black Friday:
- They display strikethrough pricing directly in Google Shopping and Meta Dynamic Ads.
- They show visual “SALE” badges across category pages.
- They eliminate the prominent “Coupon code” input field at checkout. Research by the Baymard Institute on checkout usability indicates that conspicuous coupon fields often prompt shoppers to abandon checkout and search the web for promo codes.
However, direct sale prices require deliberate post-campaign teardown. Using Smart Manager gives your store the conversion benefits of feed-level strikethrough pricing with the 1-click teardown convenience of a coupon code.
Conclusion: Safe pricing teardowns protect your margins
Ending a holiday promotion requires just as much care as launching one. Leaving sale prices active after a campaign erodes your profit margins and invites Google Merchant Center pricing mismatch suspensions.
Choosing the right bulk removal workflow depends directly on your store’s catalog structure:
- For small stores with simple products: The native bulk edit workaround is completely free. It lets you end discounts on simple items in a few clicks without third-party plugins.
- For stores managing variable products without plugins: WooCommerce CSV export and import provides a safe, reliable way to clear sale prices across product variations. Always keep a backup CSV and leave your browser tab open while the importer runs.
- For growing stores with seasonal promotions: Smart Manager turns a stressful midnight teardown into a 2-minute task. You can filter all discounted items in one view, clear sale prices across variations without server timeouts, and undo entire flash sales with 1-click Task History rollback.
Once your prices are cleared, always remember the 3-step post-sale checklist: regenerate product lookup tables, purge object and CDN caches, and resync your Google Merchant Center product feed.
Get Smart Manager for WooCommerce →
Frequently asked questions
How do I bulk delete sale prices in default WooCommerce?
In default WooCommerce, navigate to Products > All Products, select your items, and choose Bulk actions > Edit. Under the Sale dropdown, select “Set to regular price decreased by (fixed amount or %)” and leave the text box blank or enter 0. Then click Update to end sale pricing on simple products across the current page.
Why does WooCommerce still show a sale badge after removing the sale price?
This occurs when the wc_product_meta_lookup table remains desynchronized. In WordPress Admin, navigate to WooCommerce > Status > Tools, click Regenerate the product lookup tables, and click Clear transients to purge cached variation ranges. If you use Smart Manager Pro, updating items automatically synchronizes lookup table flags.
Does rolling back sale prices via Task Undo affect past customer orders?
No. WooCommerce stores order line items as permanent snapshots in wp_woocommerce_order_items. Task History Undo in Smart Manager operates exclusively on product catalog tables (wp_posts, wp_postmeta, and wc_product_meta_lookup). Historical orders, customer receipts, and accounting reports remain completely untouched.
Can I bulk remove sale prices only for a specific category?
Yes. In Smart Manager, open Advanced Search and enter your target category name alongside Sale Price Greater than > 0. Smart Manager filters only the discounted products within that category. You can clear sale prices on those specific items in seconds while preserving active discounts across the rest of your catalog.
How do I remove sale prices from variable products natively?
To remove sale prices from variable products natively, open each variable product in your catalog. Navigate to the Variations tab, choose the bulk action Set sale prices, and leave the prompt empty. Do not enter 0, since that sets every variation’s promotional price to $0.00. Because WooCommerce cannot perform this across multiple variable products at once, stores with extensive catalogs use CSV import or Smart Manager Pro.
Does WooCommerce remove the sale price automatically when the sale end date passes?
Yes. If you configure promotional start and end dates on products, core WooCommerce runs a daily WP-Cron event (woocommerce_scheduled_sales). This routine checks for expired dates and deactivates promotional prices automatically. However, if your store lacks reliable server cron jobs or if you need prices to revert at an exact minute, manual clearing or plugin scheduling is recommended.
How do I remove scheduled sale dates in bulk?
In Smart Manager Pro, open the Bulk Edit modal for your filtered products. Add the fields Sale Price Date From and Sale Price Date To, set the action to set to, and leave the values completely empty. Updating clears the scheduled date timestamps across all selected items without modifying regular prices.
Additional resources
- How to manage WooCommerce sale prices in seconds
- Complete guide to WooCommerce bulk editing
- How to bulk edit product prices in WooCommerce
- How to bulk edit coupons in WooCommerce