Bookkeeping is the essence of any online business. Having a reliable software that can automatically manage your data everyday becomes the need of the hour.
In other words, you need a tool that lets you access your accounts anytime anywhere without the slightest bit of probability of any error.
For such purposes, QuickBooks is a highly trusted solution.
If you are using WooCommerce, integrating QuickBooks with your store will streamline the process of managing your finances. Whether you are a small, medium or big business owner, this plugin is the best for you to eliminate manual data entry and avoid errors; all in real-time.
So, in this article, we’ll see how to automate your accounting by connecting WooCommerce and QuickBooks online using the most popular plugin.
WooCommerce QuickBooks plugins and integration types
QuickBooks is an easy-to-use accounting platform. But, you cannot integrate it with WooCommerce directly.
Intuit, the brand behind QuickBooks provides a native connector. But, there are also some third-party integrations available.
These WooCommerce Quickbooks plugins help you sync data in two ways:
- One-way data transfer
- Two-way data sync
One-way data transfer
It’s best for WooCommerce businesses on a budget who are comfortable with manual data entry. A one-way transfer of WooCommerce orders to QuickBooks can provide basic information on sales, expenses and income.
For this, Zapier would be a good fit which offers one-way data transfer.
But, it can become challenging to manage as your business grows. To ensure long-term scalability, it is recommended to go for a two-way data sync.
Two-way data sync
A two-way data sync plugin offers a seamless transfer of data between WooCommerce and QuickBooks and vice versa.
This option is ideal for businesses seeking real-time updates for product information, inventory levels, customer details and order data on both platforms.
Though a bit expensive, a two-way sync plugin provides scalability for future growth and minimizes the need for manual data entry.
Here are the popular plugins for a two-way data sync:
- QuickBooks Sync for WooCommerce by MyWorks
- WooCommerce Quickbooks Integration by CRM Perks
- Webgility
Why should you use QuickBooks for WooCommerce?
Whether you are a sole trader, small business owner, or retail chain manager, QuickBooks can be your go-to solution.
Here is why you should use it:
Easy financial management
QuickBooks makes it easy to manage your financial statements, such as profit, loss, cash flow, taxes, etc. You can easily print these statements and access them whenever required without needing to log in.
Tracking inventory
Tracking inventory by the end of the financial year or when you sell them can be difficult to handle. QuickBooks keeps the account updated with total expenses, taxable amounts, etc., automatically with the sale of every order.
Efficient tax calculation
Correct tax calculation, print invoices and easy scanning and uploading are some of the biggest reasons to use QuickBooks. So, when you need it, you can view the report and download it.
Integrating WooCommerce with Quickbooks: the easy way
QuickBooks Sync for WooCommerce plugin is a very popular plugin that syncs your WooCommerce and QuickBooks data.
The plugin adds a direct connection from your WooCommerce store to QuickBooks, bringing a full-featured customer, order, payment, product, inventory and pricing sync to your platform in one robust extension.
Steps to integrate WooCommerce and QuickBooks Sync
It’s a free plugin and is actively used by 10000+ WooCommerce sites. But you would need a free or paid account with MyWorks for integration services.
Installation
- Download the plugin, install and activate it.
- You will see a new menu on your WordPress admin called MyWorks Sync.
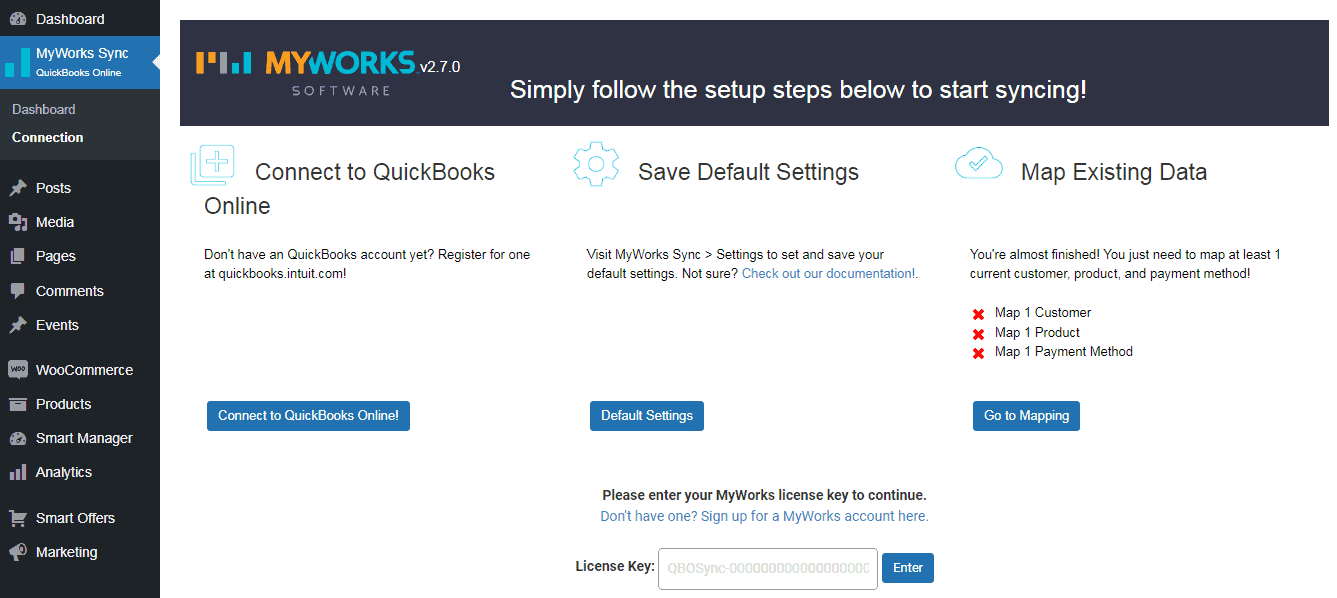
Connecting to QuickBooks
- Go to the Connection tab in the MyWorks Sync section of your WordPress admin.
- Enter your MyWorks license key from your account.
- Click the Connect to QuickBooks button.
- Sign into QuickBooks and select the company you want to connect to.
You’re now connected! Your QuickBooks will remain connected until you disconnect the app from your company.
Default settings
These settings control the data transfer between WooCommerce and QuickBooks.
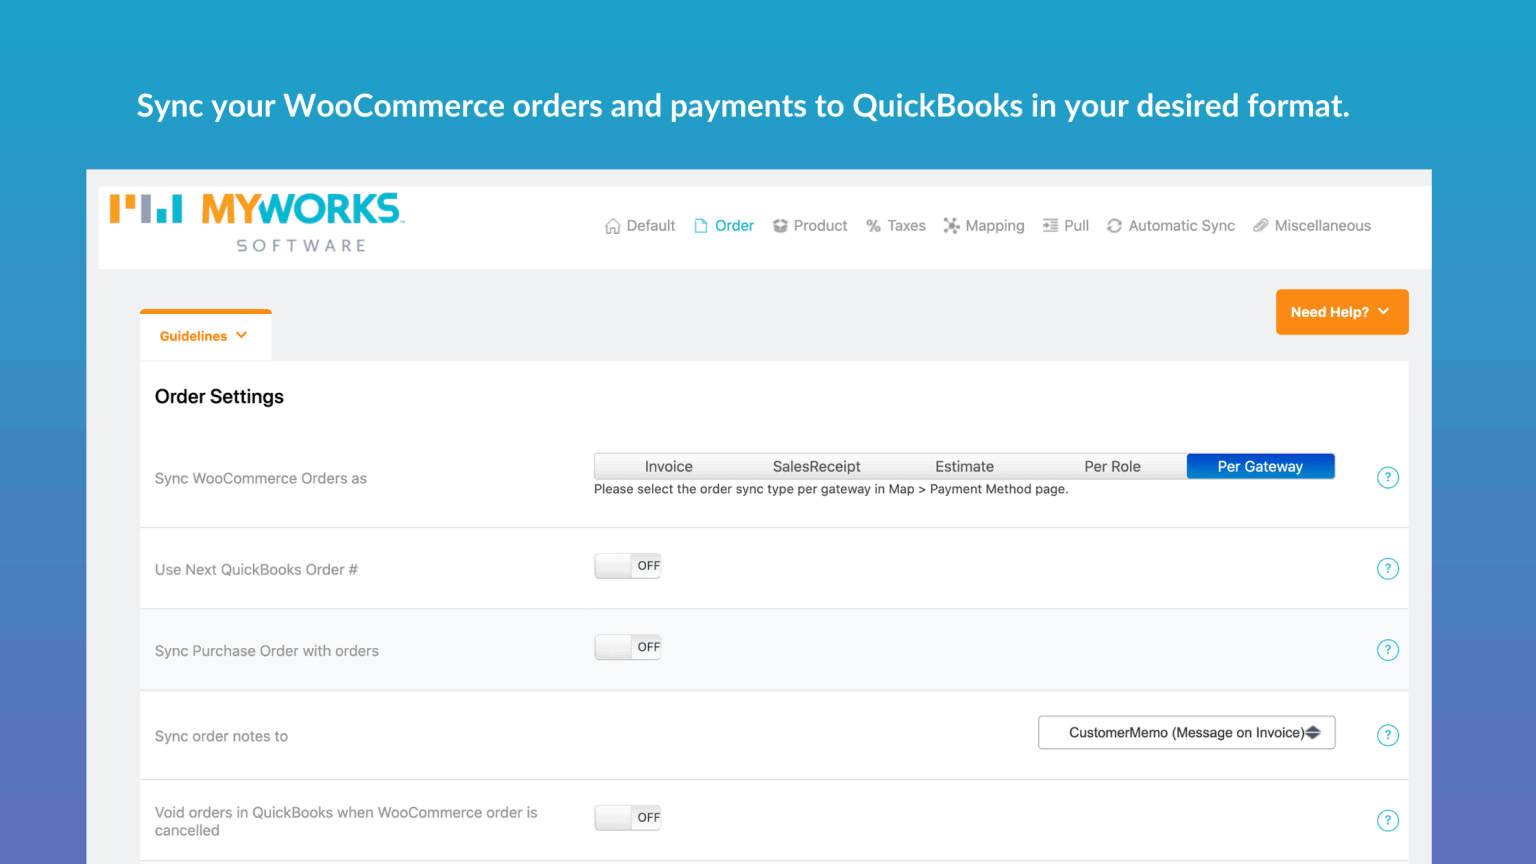
- Go to your WordPress admin > MyWorks Sync > Settings. Choose whether to sync orders as invoices or sales receipts.
- Review the optional settings to further customize the data syncing process.
- Under MyWorks Sync > Settings > Automatic Sync, control which new data is automatically synced in each direction. Note that these switches do not impact the syncing of existing data.
Map existing data
With MyWorks sync mappings, you have control over the linking of your WooCommerce and QuickBooks data. Under MyWorks Sync > Map, view and manage your customer, product, payment and tax mappings to guarantee accurate data transfer.
During the setup process, only the data that is already present in both WooCommerce and QuickBooks is mapped together.
If a customer or product is only on one platform, it is not necessary to map it. You can add the mapping at a later time.
- Under MyWorks Sync > Map, map customers existing in both WooCommerce and QuickBooks. Match them manually or use the AutoMap tool to match them automatically if their name, company name, or email matches between systems.
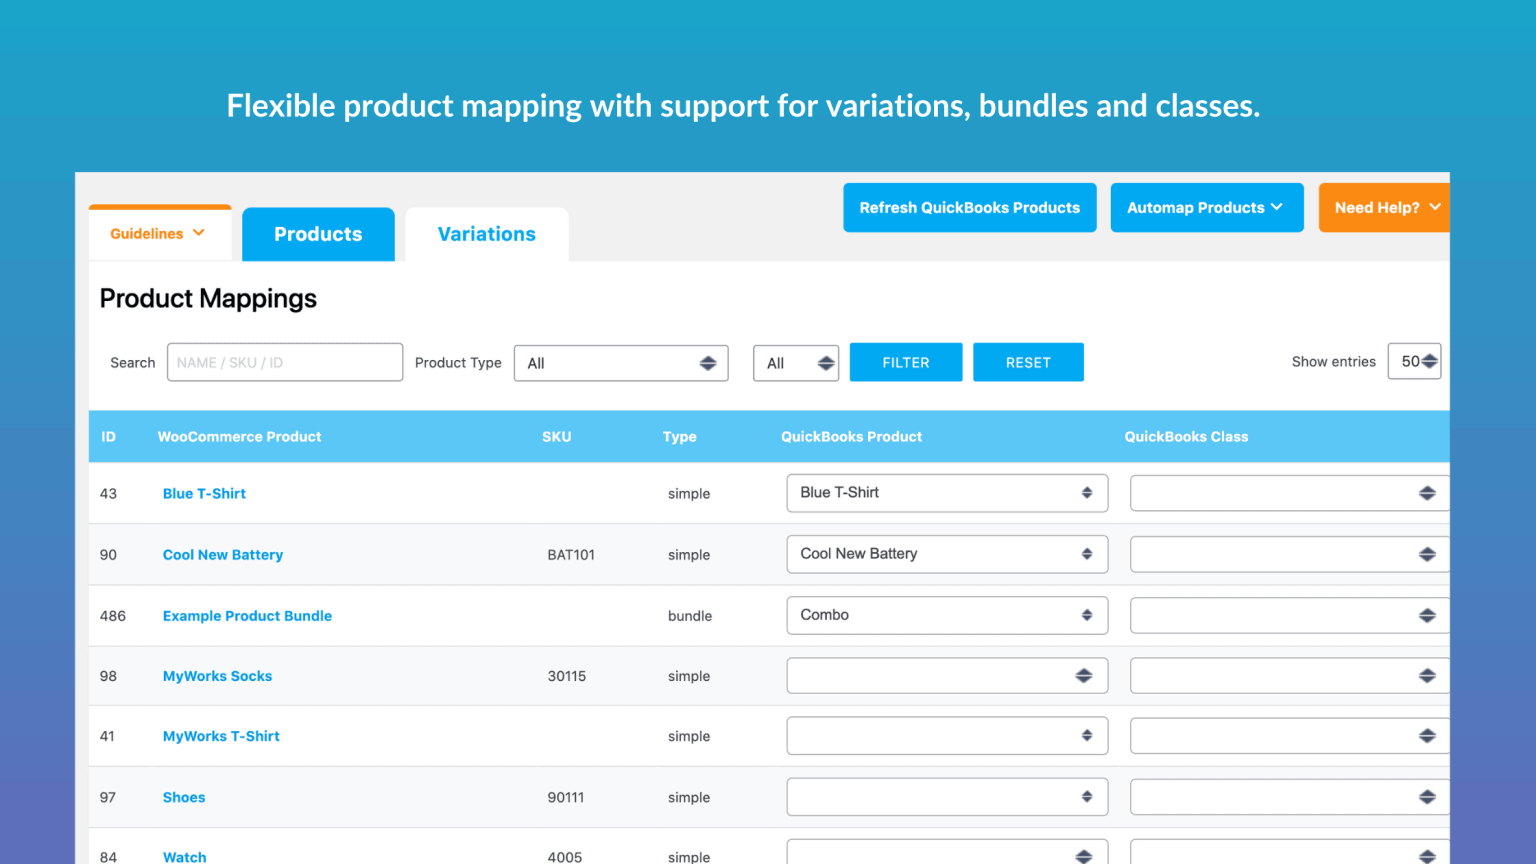
- Under MyWorks Sync > Map > Products, map products existing in both WooCommerce and QuickBooks. Match them manually or use the AutoMap tool to match them automatically if their name or SKU matches between systems.
- Under MyWorks Sync > Map > Payment Methods, select a QuickBooks payment method and bank account for each WooCommerce payment gateway. This is to determine which QuickBooks bank account we sync an order to.
- Under MyWorks Sync > Map > Tax, map tax rates only if you’re charging tax. Note – If you don’t see this section despite managing taxes, you have Automated Sales Tax enabled in QuickBooks and no mapping is necessary.
That’s it. Your sync is now fully set up and new data will automatically sync with QuickBooks.
Now, the question is what if you already have data in WooCommerce or QuickBooks before installing MyWorks? The solution is to manually push and pull data.
Manually pushing and pulling data
Since automatic sync is impossible for existing data, you need to manually push data to QuickBooks or pull it into WooCommerce.
- First, map the existing products in both WooCommerce and QuickBooks. Visit MyWorks Sync > Map > Products.
- To push existing products to QuickBooks:
- Visit MyWorks Sync > Push > Products.
- Then, select products and click
Push Selected Products.
- You can also push existing orders to QuickBooks.
- Visit MyWorks Sync > Push > Orders.
- Select orders to push to QuickBooks and
click Push Selected Orders.
- Now, to pull products into WooCommerce, visit MyWorks Sync > Pull > Products to select products in QuickBooks and pull them into WooCommerce.
Note: The plugin automatically syncs customers while syncing orders. It’s not necessary to push customers to QuickBooks.
For more details, refer to this documentation.
Benefits of using WooCommerce QuickBooks Sync for WooCommerce
- Automated accounting.
- Data is in sync automatically – as often as every 5 minutes.
- Sync your WooCommerce orders and payments in your desired format – invoice, sales receipt, sales order, or estimate.
- Completely customize how orders/payments sync with per-gateway and per-role support:
- Order notes,
- Discounts,
- Transaction fees, etc.
- Individually enable/disable automatic sync for different data types- customers, orders, products, inventory, etc.
- Special features include:
- Custom field mapping.
- Transaction fee support.
- Automatic bank deposits.
- Real-time auto sync and no duplications.
- Compatible with product variations, bundles, groups and composites.
- Support for 25+ popular WooCommerce extensions – Smart Coupons, WooCommerce Memberships, WooCommerce Multi-Currency, etc.
- Supports all WooCommerce payment gateways and major tax calculation services like Avalara, Taxify, etc.
- Flexible customer + product mapping.
Get QuickBooks Sync for WooCommerce
Final words
QuickBooks Sync plugin makes it easier to keep track of your sales, inventory and customer data, so you can focus on growing your business, rather than managing manual processes.
Download the plugin, integrate by following the steps above and share your experience.