
The core WooCommerce provides three shipping options – flat rate, free shipping and local pickup.
What about stores that sell products that vary in shape, size (weight), type and quantity? And what about urgent shipments or overnight deliveries?
You won’t charge the same shipping fee for 5lb and 20lb shipments, right? You also won’t provide free shipping to entice customers all the time and view your losses piling up.
So what shipping rate to set up to keep yourself and your customers captivated? WooCommerce table rate shipping gives store owners the ability to configure their shipping rules according to a range of different factors.
This article will help you set up table rates based on different factors for different stores. To begin with, let’s analyze the various table rate shipping factors.
Table rate shipping factors
In simple terms, table rate shipping means you can define multiple shipping rates based on the product’s destination, have multiple rates per zone, add rules based on product weight, the number of items, shipping class, and price.
Calculating the best shipping cost for your customers requires taking into account all these factors.
Product weight
When it comes to shipping prices, the most prevalent consideration has to be the product weight.
To calculate shipping, store owners can take into account not only the total product weight but also additional unit weight.
Product quantity
Create shipping rules based on the number of items in your shopping cart. The plugin also includes the ability to calculate shipping for each product added to the cart, just like it does for weight.
Cart value
Isn’t it true that everyone wants to please their customers? Table rate shipping allows you to calculate shipping based on both the overall cart value and the additional per unit rise in the cart value.
Shipping address
Vendors can also charge personalized shipping prices for certain shipping zones using table rate shipping. However, the ability to ship by nation, state, city, or even zip/postal code adds to the flexibility.
Product category
Table rate shipping takes it a step further by letting vendors determine their shipping costs based on the product categories or shipping classes they’ve put up.
Shipping rules
Vendors can use a set of criteria to calculate shipping costs depending on the above factors. Consider the following scenarios:
- If you buy three things at once, you’ll have to pay an extra $20 in delivery.
- Until the total weight of the products does not surpass 10 lbs, add $15 in delivery charges.
- If the shipping address is in Texas, offer free shipping.
Shipping calculations
When working with table rate shipping, it’s possible to satisfy more than one rule. Table rate shipping allows you to choose between the minimum and maximum shipping charges in certain situations.
How to set up table rate shipping for single-seller WooCommerce stores?
To set up table rate shipping on your store, you’ll need a plugin as core WooCommerce lacks this functionality. We recommend utilizing the WooCommerce Table Rate Shipping extension, if you have a single-seller WooCommerce store. This plugin is developed by the WooCommerce team.
About WooCommerce Table Rate Shipping plugin
You can create multiple shipping rates based on location, price, weight, shipping class or item count using this plugin. You can also match several regions with wildcards.
Plugin highlights:
- Add numerous rate tables for each shipping zone.
- Several sorts of table rate calculations: per order, per item, per line, and class.
- Add weight, number of things, number of items by class, and price-based rules.
- Costs per row, per item cost, a percentage and per weight unit included.
- User-friendly interface for adding, copying and deleting shipping prices.
Pricing: $99/year
Get WooCommerce Table Rate Shipping plugin
Installation, setting up table rates…
You may establish numerous rates based on a product’s shipping destination, have multiple rates per zone, and add rules based on product weight, the number of items, shipping class and price using this plugin.
Since each store has its products and delivery requirements, each setup will be distinct.
Installation
It’s the same steps you follow while installing other WooCommerce plugins.
Purchase the plugin, download the zip file, install and activate the plugin. You’re ready to go.
Working
When a consumer goes to the checkout page, the plugin looks at the item’s destination and then calculates total shipping using the table of rates you have established.
Depending on your shipping requirements, each destination may have its own set of restrictions or numerous sets of rules.
To effectively calculate shipping, you must first set up shipping zones and shipping regulations. From there, the plugin will take care of all the calculations for you.
Adding table rates to a zone
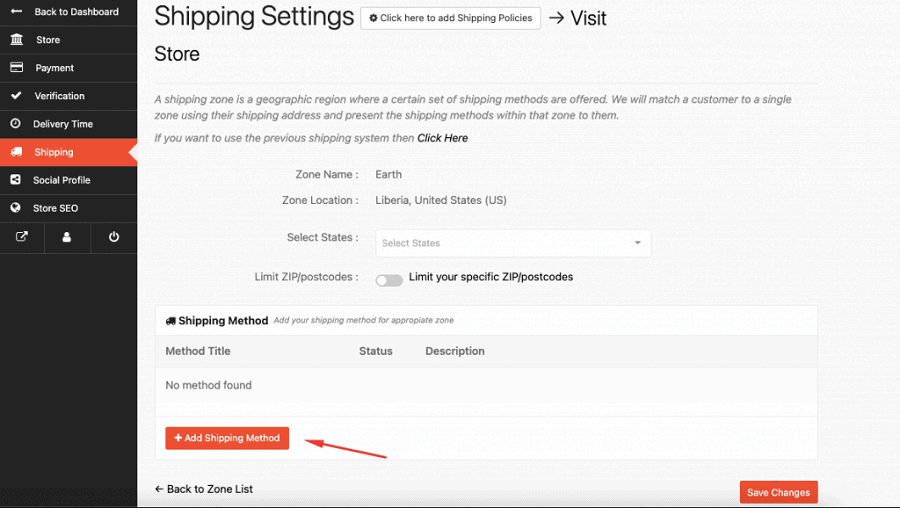
To use table rate shipping, it is essential to add it to a shipping zone. Here’s how:
- Go to
WooCommerce > Settings > Shipping. - Select
Editbelow the name of the shipping zone you want to add rates for. - Click on the
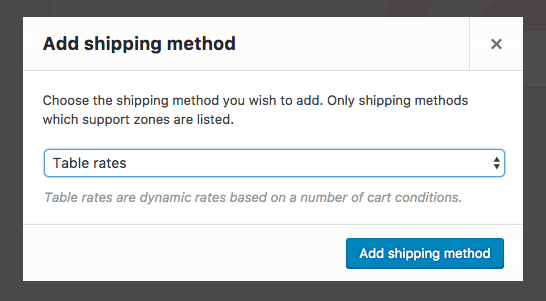
Add shipping methodbutton. This opens a modal window. - Select
Table ratesfrom the dropdown and click on theAdd shipping methodbutton. - Click on the Save changes button.

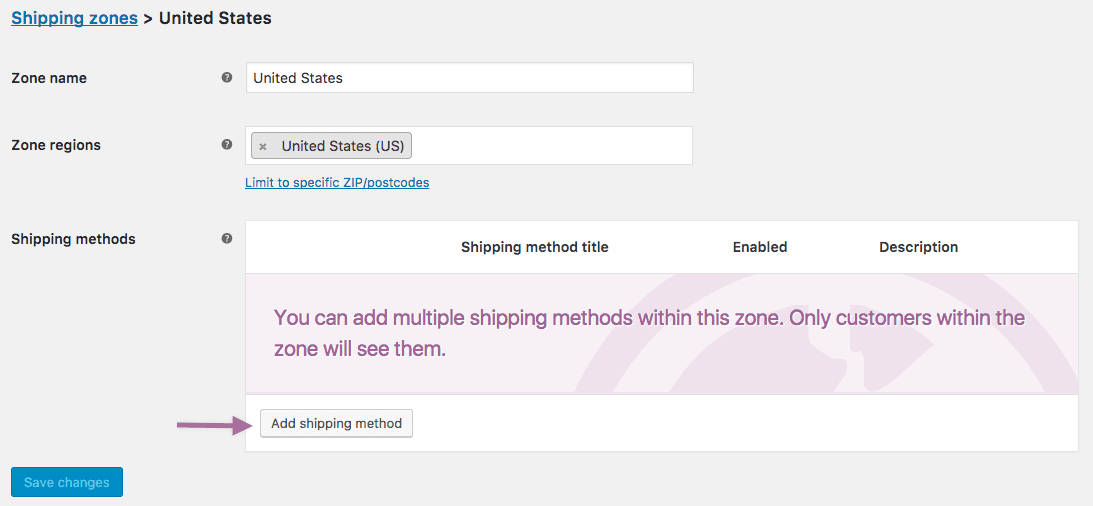
That’s it.
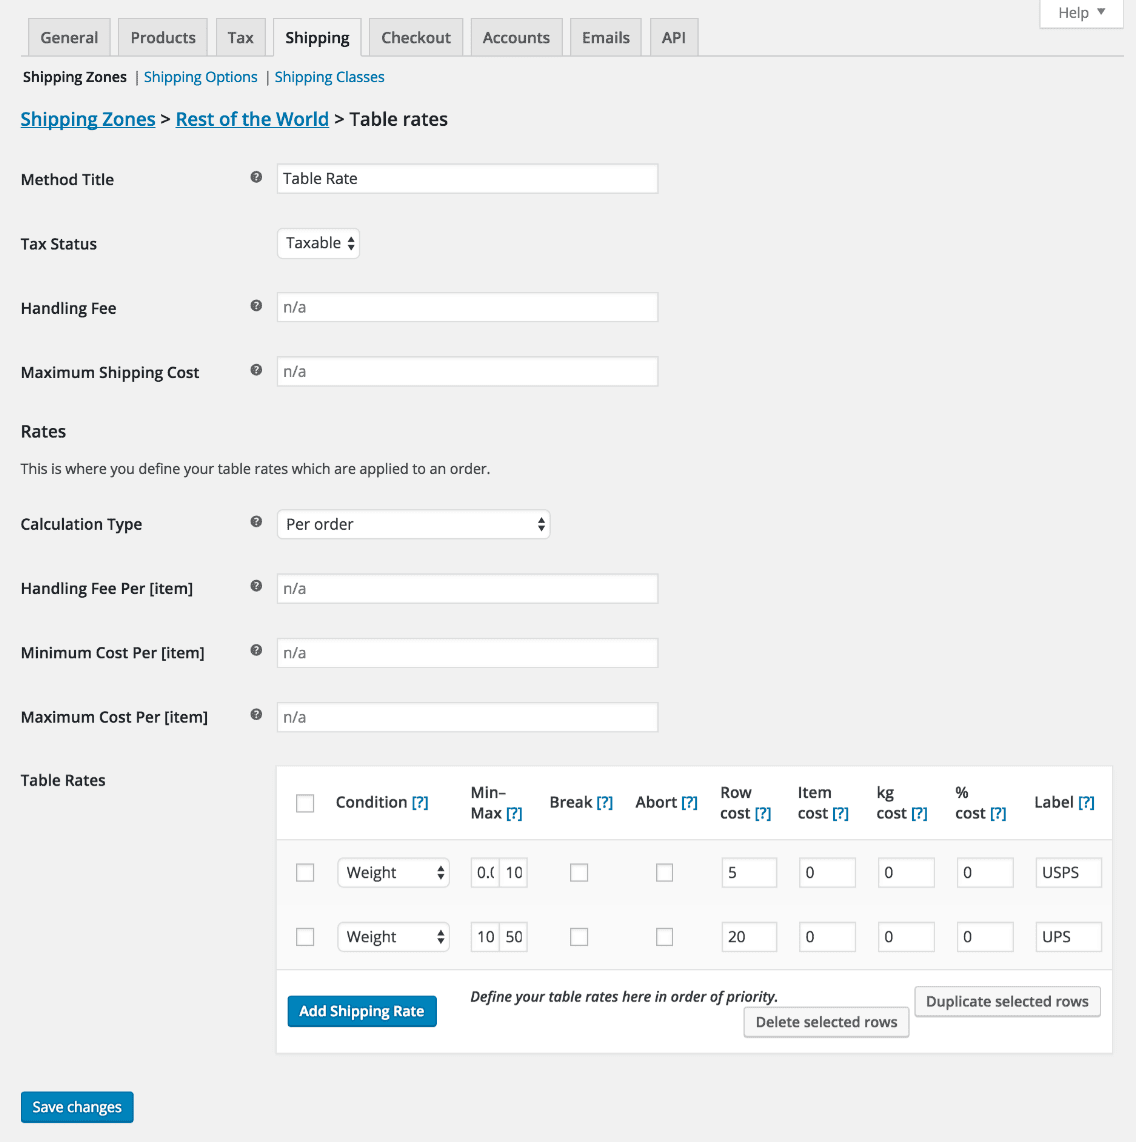
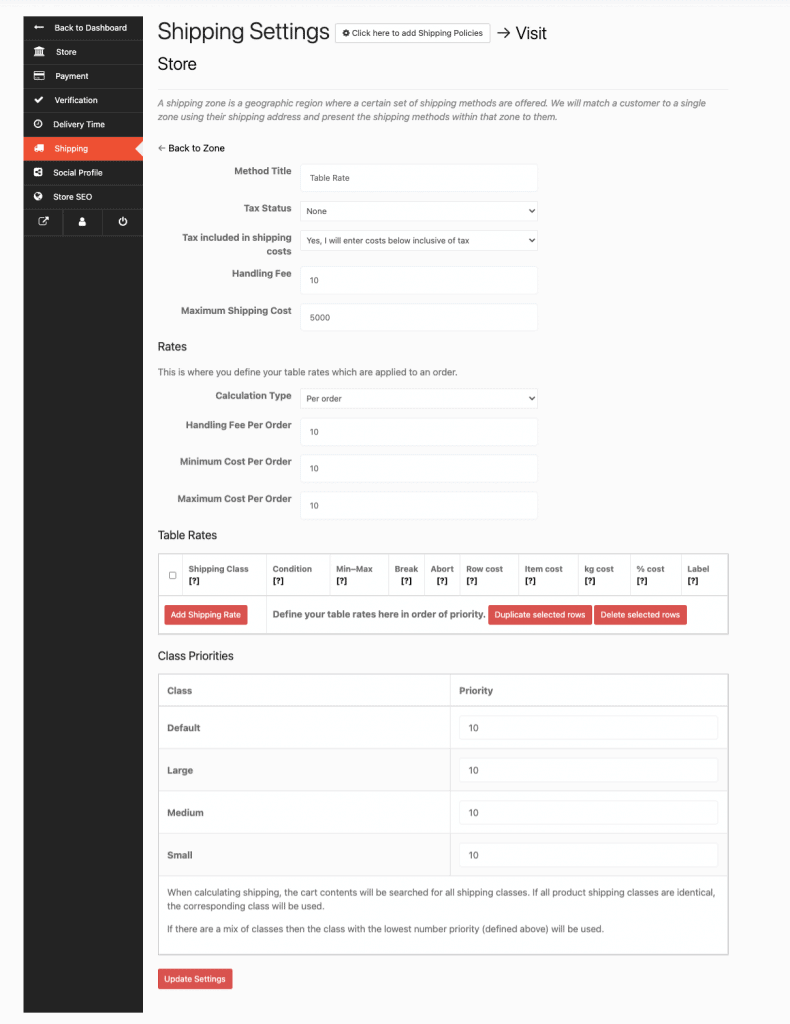
Setting up a table rate
After adding the table rate shipping method to the shipping zone, you need to apply settings for the table rate.
- If you can’t see the word ‘Table Rate’ yet, select
Editbelow the shipping zone that contains the table rate that you want to edit. This takes you to a different screen. - Select
EditforTable Rate. This will open a Settings screen for you to configure. - Enter your preferences for this shipping method.

- Method Title — name of the shipping method that will be displayed to customers. For example, 1st class and 2nd class, if there are two methods for a zone.
- Tax Status — define whether to apply tax to the shipping amount or not.
- Tax included in shipping costs — define whether the shipping costs defined in the table are inclusive or exclusive of taxes.
- Handling Fee — this is an additional fee that can be a fixed amount (2.50) or can be left blank.
- Maximum Shipping Cost — can assign a maximum cost to a method. For example, if the total calculated is greater than the maximum cost, the price is decreased to the maximum cost amount.
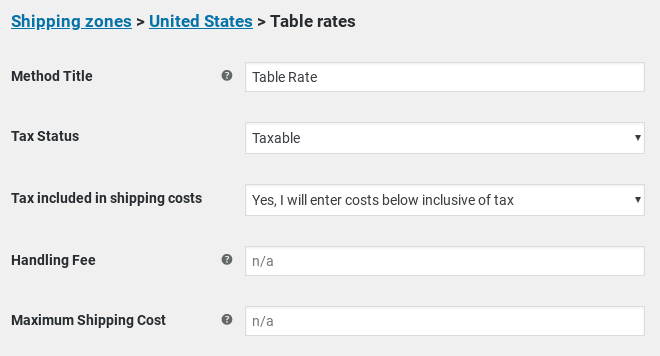
Table rate settings
Next up is to define table rates.
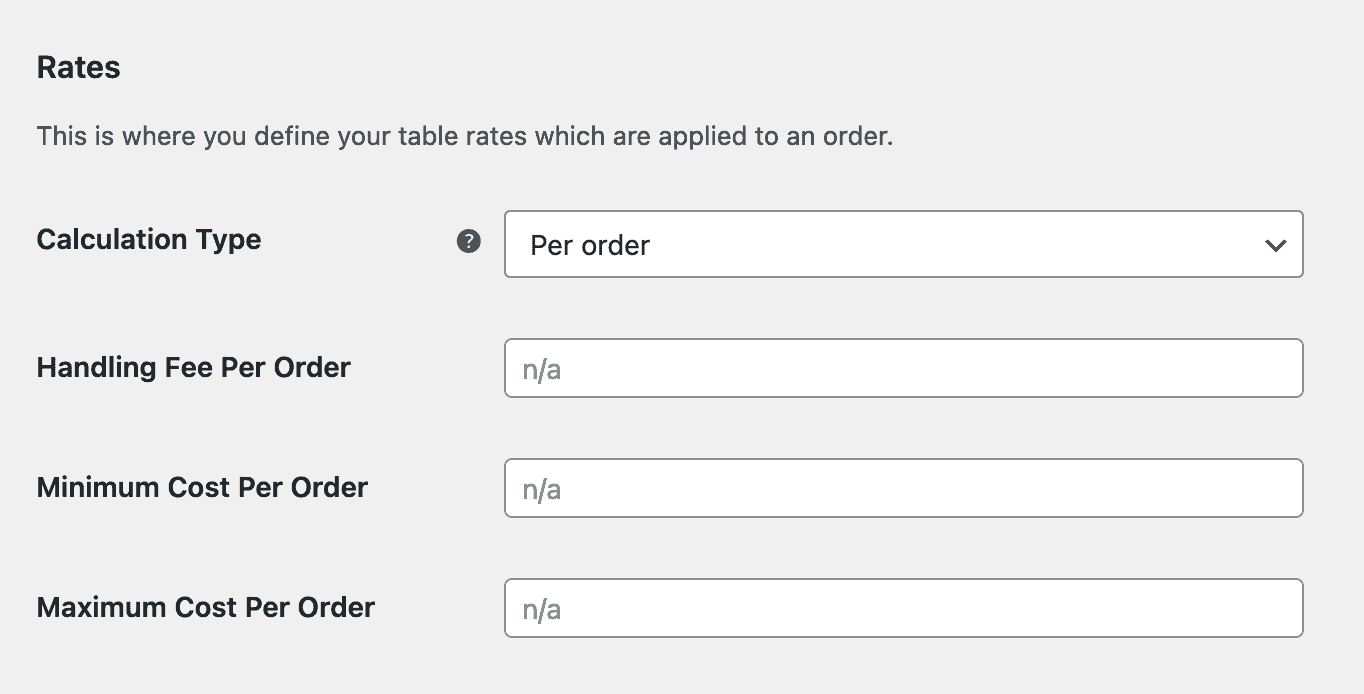
- Calculation Type — this tells the plugin how to calculate shipping on the customer’s cart. The dropdown gives you four choices:
- Per order – calculates shipping for the entire cart. If there are varying shipping classes in the customer’s cart, the class with the highest priority will be used.
- Calculated rates per item – calculates the rate by checking each item in the customer’s cart against the table of rates.
- Calculated rates per line – looks at each line in the cart and checks that against the table. Multiple of the same item are on the same line, so the customer will only be charged once for multiples of the same item.
- Calculated rates per shipping class – each shipping class in the cart is totaled and offered at a final rate.
- Handling Fee Per Order – add a flat additional fee to the cost of each calculated item (could be an individual item, line or shipping class based on the above settings).
- Minimum Cost Per Order – set the minimum cost per calculated item (could be an individual item, line or shipping class based on the above settings).
- Maximum Cost Per Order – set the maximum cost per calculated item (could be an individual item, line or shipping class based on the above settings).
Adding rates to a table rate
Once you’ve chosen how to calculate rates, you can start adding rates. The plugin will compare items in the customer’s cart against the table of rates to calculate shipping costs.

- Shipping Class – choose the class to which this rate will apply. You can also choose to apply the rate to items in any shipping class or in no shipping class.
- Condition – this column tells the plugin what product information to use to calculate rates. It gives you five options:
- None – don’t want to use product information to calculate the total
- Price – the price of the items
- Weight – the weight of the items
- Item Count – the number of an individual item
- Item Count (same class) – the number of items in the shipping class
- Min/Max – this will be the minimum and maximum amounts for your chosen condition. These will be:
- Price – the minimum and maximum price
- Weight – the minimum and maximum weight. The weight unit used is determined in WooCommerce > Settings > Products
- Item Count – the minimum and maximum number of an individual item. For example, you may wish to have one price for 1-50 items and another for 50+ items
- Item Count (same class) – the minimum and maximum number of items in a specific class
- Break – when you check this option, you’re telling the plugin to stop the calculation from going any further. This is used for:
- Per order – to offer a specific rate and no others
- Calculated – to stop any further rates being matched, with priority given to the top of the list. This is particularly important when merging shipping.
- Abort – enable this option to disable all rates or the shipping you are editing if the row you are editing matches any item/class being quoted.
- Shipping prices – this is where you set your shipping cost. You can add these following:
- Row cost – the base cost for shipping this item. This could include the cost of your packaging.
- Item cost – the cost for each individual item. This is in addition to the cost.
- Cost per kg – the cost per kg for the items.
- % cost – the percentage of the items’ total that should used to calculate shipping.
- Label – if you are creating a per-order table of rates, you can add a label for each individual rate.
Note – The calculation is determined by the ‘Calculation Type’ dropdown.
Class priorities
You’ll see this section called Class Priorities if you have created shipping classes and if you have chosen Per order as the Calculation Type.
If there are items in different shipping classes in the cart, the table rate will be calculated based on those items in the shipping class with the highest priority (or the lowest number).
Merging shipping
Sometimes, you may want to merge shipping of a specific product. Consider you have a shirt and a tie. The tie is in the small shipping class while the shirt is in the medium shipping class. If a customer orders both the shirt and the tie, you can simply bundle this shipping together. There’s no need to charge to customers for shipping separately.
If shipping for the tie is usually $1 and shipping for the shirt is $5, then you want to offer a shipping cost of $5 and not $6.
To properly merge items for shipping, you need to ensure that the table is set up with the highest rate at the top and the lowest rate at the bottom.
For more details on merge shipping and table rate examples, refer this table rate shipping plugin documentation.
Phew…that’s how you can set up different rates for different products on your store.
Get WooCommerce Table Rate Shipping plugin
How to set up table rate shipping for a multi-vendor marketplace in WooCommerce?
Only single-seller stores can use the WooCommerce Table Rate Shipping plugin. Table rate shipping becomes tough to handle when you operate a multi-vendor marketplace.
We all know that a multivendor marketplace contains a wide range of products. Some are small and heavy, while others are large but light. Maintaining adequate shipping management for these many products appears to be a challenging chore for store operators.
But not with the Dokan Table Rate Shipping plugin installed. Your merchants can use Dokan Table Rate Shipping to generate conditional shipping prices for different items. This allows businesses to charge varied prices depending on the shipment’s location, price, weight, shipping class, or item count.
About Dokan Table Rate Shipping plugin
- Multivendor support allows suppliers to determine shipping prices for their items in a variety of ways. Set up multiple prices based on the shipment’s distance, weight, price, shipping class, or item count.
- Allow your suppliers to charge customers based on their location, delivery method, and a detailed calculation based on dynamic conditions.
- Set shipping costs based on the weight of each product sold by a vendor, with a minimum and maximum weight bracket.
- Vendors can put a limit on how much they charge for shipping. If a customer’s purchase exceeds a specified threshold, they may be eligible for a discounted flat rate.
- Vendors can create a set of shipping prices for specific classes. For different shipping classes, charges for the highest class can be applied or each class can be charged separately.
Pricing: $249/year and onwards. This plugin/module is not sold alone, but rather as part of a bundle with other Dokan modules.
Get Dokan Table Rate Shipping plugin
How to create table rate shipping for your WooCommerce marketplace?
Let’s take a look at how you can utilize table rate shipping on your marketplace.
Pre-requisites
- WooCommerce
- Dokan Lite
- Dokan Pro (latest version)
You must go to the WordPress dashboard> Dokan> Modules. To activate the Table Rate Shipping module, locate the toggle button on the upper right and turn it on.
Now we’ll show how to configure this module from both ends – admin and vendors.
Define shipping class and shipping zones
This is for the admin side. If you have already configured shipping zones and shipping classes, skip this step. If not, here’s how.
Next, select your shipping zone and click on the Add shipping method button. Choose the “Vendor Table Rate Shipping” option. Click on the Add shipping method button and save your changes.

Configuring table rate shipping for vendors
From the dashboard, vendors can easily configure all of the settings.
When they click on the Shippping option, they will find the shipping zone created by the admin. They need to click on the Edit option.
There, they need to add the shipping method by clicking on the Add Shipping Method button.
Vendors will find the shipping methods the admin has selected from the backend. From there, they can select the Table Rate Shipping method.
Once the zone settings are saved successfully, vendors need to edit the shipping method to set their respective rules.
Setting up table rates, rules and settings
Vendors should carefully complete these fields based on their capabilities and scopes. That way, table rate shipping will run smoothly.
All the data fields mentioned here are the same you saw for the WooCommerce Table Rate Shipping plugin above. The difference being the appearance/design of the plugin.
Check the full documentation for Dokan Table Rate Shipping for more details.
Get Dokan Table Rate Shipping plugin
Conclusion
We hope you’ve learned how to utilize table rates effectively for your single and multi-vendor WooCommerce stores.
If your online store doesn’t have table rate shipping options, you are definitely missing out on some huge opportunities to make more money. Don’t let this opportunity pass you by.
Table rate shipping is easy to use and great for customers. You also have a good knowledge now on using the plugins as mentioned in this article. So what are you waiting for? Start setting up your WooCommerce table rate shipping rates today.