Brands would want to send their products to their customers across the globe. However, the customers’ location must not hinder sales.
WooCommerce shipping classes are a trick in the book that makes the process easy and quick.
Shipping classes allow you to group similar products and allocate the same shipping methods and rates to each group.
For example, a bag seller needs to charge more for bulkier items like luggage bags/trolley bags compared to lightweight items such as college bags.
In this article, we’ll see how you can set up shipping classes in WooCommerce. We will also discuss how to bulk assign shipping classes to products at once.
But before diving into shipping classes, we need to understand shipping zones.
What are shipping zones in WooCommerce?
Shipping zones in WooCommerce are geographical areas where specific shipping methods and rates apply. They help online store owners customize multiple shipping options in WooCommerce based on the customer’s location.
Setting up shipping zones allows store owners to offer customized shipping rates and methods based on the delivery location.
This ensures that customers receive accurate shipping options tailored to their location, enhancing the overall shopping experience and potentially reducing shipping costs.
Shipping zones are the foundation for all (and most) shipping options/configurations in WooCommerce. How the shipping zones are configured determines multiple shipping options in WooCommerce and rates customers see on the cart/checkout pages.
If you sell physical products on your WooCommerce store, you must configure shipping zones.
What are shipping classes in WooCommerce and why use them?
As mentioned earlier, shipping classes in WooCommerce are assigned to products to group them for specific shipping rates.
They allow store owners to apply different shipping costs based on the type or size of the product, enabling more precise shipping fee calculations.
A customer buying a $10 product is unlikely to pay an extra $5 as a shipping fee. Hence, the best way to fix this is by implementing shipping classes.
Here’s how WooCommerce shipping classes help:
- Increased flexibility in shipping options: Allows setting different shipping rates based on product characteristics.
- Improved customer experience: Accurate shipping rates at checkout improves the customer’s shopping experience.
- Better shipping management: Shipping classes simplify the shipping process and make it easier to manage shipping costs for different products.
- Enhanced order processing: This makes it easier to process orders, reducing the chances of shipping errors.
Note: Shipping classes aren’t always mandatory, so you do not need to apply them to every product. However, use shipping classes on any product that has extra shipping fees.
How to set up WooCommerce shipping classes?
The entire process of WooCommerce shipping starts with setting up a zone.
Go to WooCommerce > Settings > Shipping on your WordPress Admin dashboard.
Here, you’ll get the WooCommerce shipping configurations and settings:
- Shipping zones
- Shipping options
- Shipping classes
- Free shipping
Refer to this blog on setting up shipping zones and shipping rates to know more.
Before setting up shipping classes, let’s clear the differences between the shipping configuration options:
WooCommerce shipping zones vs shipping classes
A shipping zone is a geographical area to which you ship items. Shipping classes are defined as something that groups similar items that will be shipped to the respective zones.
We now see the steps to create a shipping class in WooCommerce:
- Go to
WooCommerce > Settings > Shippingon your WordPress Admin dashboard. - Click on the
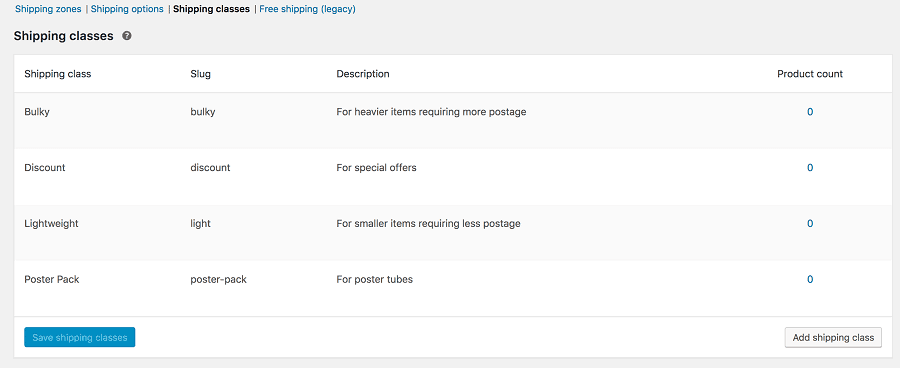
Shipping classes > Add Shipping class. - Fill in the form that appears on the screen. It includes the following three fields:
- Shipping class: This is the name of the shipping class. (eg, light).
- Slug: This is a unique identifier. You can either leave it blank for automatic generation or add your own. (eg, light-weight packages).
- Description: Provide a brief description to clarify the purpose of this shipping class. (for eg, lightweight items that require separate shipping).
- Save the shipping class.
Adding shipping cost to the class
- Click the
Editbutton under that item in the shipping class list. If some shipping methods are turned on, select a method for that class – flat rate, free shipping, or local pickup. - A special
Shipping Class Costsarea appears in the shipping method settings box. Choose the shipping cost for your class and consider other settings for the calculation type. - Click on
Savechanges.
That’s it.
Note: Each product can have only one shipping class.
How to manage shipping classes with the Smart Manager?
If you have a WooCommerce store with endless products, adding a shipping class to each product can get time-consuming.
We recommend using the Smart Manager plugin. It offers an Excel-like spreadsheet to manage and bulk edit all your products from one place.
Here are the shipping fields that you can manage with the Smart Manager:
- Shipping first name
- Shipping state
- Shipping postcode
- Shipping method
- Shipping last name
- Shipping country
- Shipping company
- Shipping city
- Shipping address index
- Shipping billing address
- Shipping tax
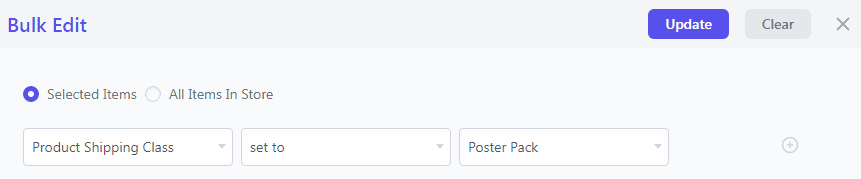
Using the Bulk Edit feature, you can assign the shipping class to all products at once. You can also apply search filters and assign specific shipping classes to specific products at once.
Here are the steps you need to follow:
- Select the
Productsdashboard. - Enable the
Product Shipping Classcolumn if not done. Here’s how. - Choose individual records or use filters to select multiple items.
- Click the
Bulk Editbutton to open the editing panel. - For example, enter the conditions:
Product Shipping Class > set to > Poster Pack. - Select
Update. You have the option to select “Now” for immediate changes or “Schedule for Later” to set a specific date and time for your bulk edit operation. - Review your changes and provide a title for the operation (if enabled).
- Click
OKto initiate the bulk edit.
Try the Smart Manager live demo
Conclusion
We hope this guide has clarified everything you need to know about setting up shipping classes in WooCommerce and using Smart Manager for efficient assignments.
Have questions or feedback? Share your thoughts below! Let’s make shipping management a breeze.

About the Author – Akshat Kothari
Engineer by training, marketer by instinct. Akshat is an integral part of the marketing team at StoreApps, where he takes complex WooCommerce concepts and turns them into strategies store owners can put to work immediately. When he steps away from the screen, he’s either exploring a new city or binge watching movies.