
Do you want to better organize your content in WordPress? You need to create custom taxonomies.
WordPress allows you to organize your content with categories and tags by default. However, with custom taxonomies, you have the flexibility to further sort your content.
But taxonomies are also challenging to setup.
So this post will show you how to create and use WordPress custom taxonomies.
Without further ado, let’s get started with understanding about taxonomies.
What is taxonomy?
In simple terms, taxonomy is a scientific word for classification, used especially for organisms to classify them into groups or types.
An example would be how living beings are classified:
- Plants
- Trees
- Banyan
- Mango
- Flowers
- Lotus
- Rose
- Trees
- Animals
- Mammals
- Elephants
- Lions
- Reptiles
- Snakes
- Crocodiles
- Mammals
Flat vs hierarchical taxonomy
You can make a taxonomy flat (only one level) or a hierarchical one (many levels).
Elephants, for example, is included under Mammals, which itself is included under Animals and Animals under Living beings. So, any item labeled with Mammals is a member of these three hierarchical ‘categories’ at the same time.
While if you consider all these trees separately:
- Banyan
- Mango
- Sandalwood
It’s a flat taxonomy as all are on the same level.
Why you need WordPress custom taxonomies?
Like taxonomy, a WordPress taxonomy is a way to organize content but here, you organize groups of posts and custom post types.
By default, WordPress comes with two taxonomies called categories and tags.
So while there are a number of in-built elements, WordPress facilitates developers to also create custom elements. This customization feature extends to post types and taxonomies too.
However, if you are using a custom post type, then categories and tags may not look suitable for all content types. More the content, more it becomes difficult to classify them into categories and tags.
With a custom taxonomy, you can create complex structures that divide your content into different sections. These can also be organized hierarchically, like our Living Beings taxonomy example above.
For instance, you can create a custom post type called ‘Movies’ and sort it using a custom taxonomy called ‘Genre’. You can add genres like Action, Romance, Comedy as per your need. This would allow you and your readers to easily sort movies by each genre.
The main advantage of using custom taxonomies is that you can refer them independently of categories and tags. They even get their own detailed descriptions in the WordPress admin area.
In WordPress, tags are flat, while categories are hierarchical. In other words, you can nest categories inside each other, while tags are just all on the same level.
Taxonomy template hierarchy
WordPress displays posts in the order determined by the template hierarchy.
The category.php, tag.php and taxonomy.php templates allow posts filtered by taxonomy to be treated differently from unfiltered posts or posts filtered by a different taxonomy.
Note: Post refers to any post type – posts, pages, custom post types, etc. These files let you target specific taxonomies or specific taxonomy terms. For example:
- taxonomy-{taxonomy}-{term}.php
- taxonomy-{taxonomy}.php
- tag-{slug}.php
- tag-{id}.php
- category-{slug}.php
- category-{ID}.php
So for example, you could format all posts in an animal taxonomy named news on a page that looks different from posts filtered in other categories.
The archive.php template provides the most general form of control, providing a layout for all archives; that is, a page that displays a list of posts.
Category hierarchy
For categories, WordPress looks for the category-{slug}.php file. If it doesn’t exist, WordPress then looks for a file for the next hierarchical level, category-{ID}.php and so on. If WordPress fails to find any specialized templates or an archive.php template file, it reverts to the default behavior, using index.php.
The category hierarchy is listed below:
- category-{slug}.php: For example, if the category’s slug is named “news,” WordPress would look for a file named category-news.php.
- category-{ID}.php: For example, if the category’s ID is “6”, WordPress would look for a file named category-6.php.
- category.php
- archive.php
- index.php
Tag hierarchy
For tags, WordPress looks for the tag-{slug}.php file. If it doesn’t exist, WordPress then looks for a file for the next hierarchical level, tag-{ID}.php and so on. If WordPress fails to find any specialized templates or an archive.php template file, it will revert to the default behavior, using index.php.
The tag hierarchy is listed below:
- tag-{slug}.php: For example, if the tag’s slug is named “sometag,” WordPress would look for a file named tag-sometag.php.
- tag-{id}.php: For example, if the tag’s ID were “9,” WordPress would look for a file named tag-9.php.
- tag.php
- archive.php
- index.php
How to creating custom taxonomies with a code?
Imagine that these custom taxonomies and the interface is implemented inside a plugin. You’ve just built your own Fiction plugin that can be reused on any WordPress website.
Consider for example: Courses taxonomy.
The following example will show you how to create a plugin that adds a Custom taxonomy ‘Courses’ to the default post post type.
Note – The code to add custom taxonomies does not have to be in its own plugin. It can be included in a theme or as part of an existing plugin if desired.
Creating a new plugin
Register the taxonomy ‘Course’ for the post type ‘Post’ using the init action hook.
/*
* Plugin Name: Course taxonomy
* Description: A short example showing how to add a taxonomy called Course.
* Version: 1.0
* Author: developer.wordpress.org
* Author URI: https://codex.wordpress.org/User:Aternus
*/

function wporg_register_taxonomy_course() {
     $labels = array(
         'name'          	=> _x( 'Courses', 'taxonomy general name' ),
         'singular_name' 	=> _x( 'Course', 'taxonomy singular name' ),
         'search_items'  	=> __( 'Search Courses' ),
         'all_items'     	=> __( 'All Courses' ),
         'parent_item'   	=> __( 'Parent Course' ),
         'parent_item_colon' => __( 'Parent Course:' ),
         'edit_item'     	=> __( 'Edit Course' ),
         'update_item'   	=> __( 'Update Course' ),
         'add_new_item'  	=> __( 'Add New Course' ),
         'new_item_name' 	=> __( 'New Course Name' ),
         'menu_name'     	=> __( 'Course' ),
     );
     $args   = array(
         'hierarchical'  	=> true, // make it hierarchical (like categories)
         'labels'        	=> $labels,
         'show_ui'       	=> true,
         'show_admin_column' => true,
         'query_var'     	=> true,
         'rewrite'       	=> [ 'slug' => 'course' ],
     );
     register_taxonomy( 'course', [ 'post' ], $args );
}
add_action( 'init', 'wporg_register_taxonomy_course' );
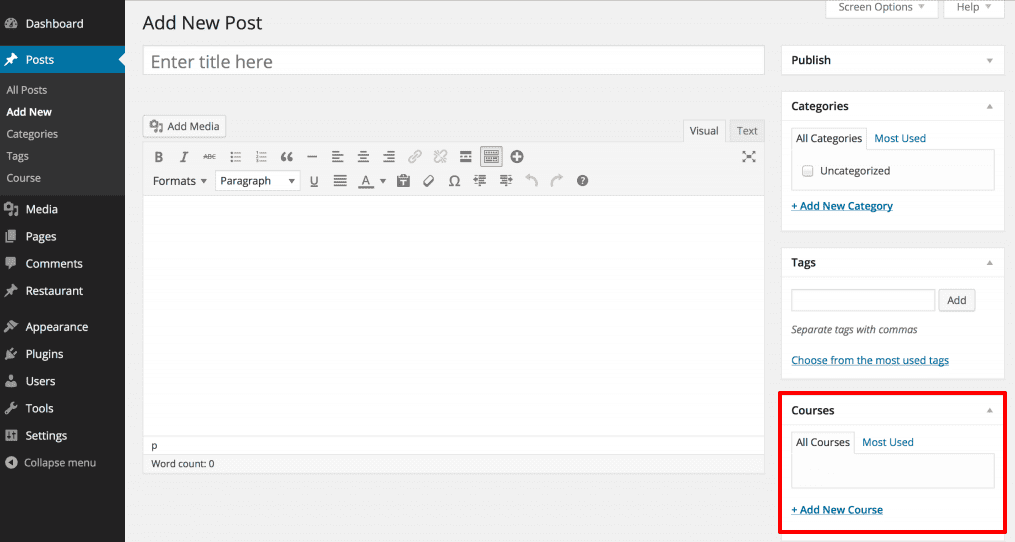
Creating a new post
Activate your plugin. Go to WordPress admin panel > Posts > Add New. Apart from Categories and Tags, you should see a new meta box for your ‘Courses’ taxonomy.
Breaking down the code
The following discussion breaks down the code used above describing the functions and parameters.
The function wporg_register_taxonomy_course contains all the steps necessary for registering a custom taxonomy.
The $labels array holds the labels for the custom taxonomy. These labels will be used for displaying various information about the taxonomy in the admin area.
The $args array holds the configuration options that will be used when creating our custom taxonomy.
The function register_taxonomy() creates a new taxonomy with the identifier course for the post ‘Post Type’ using the $args array for configuration.
The function add_action() ties the wporg_register_taxonomy_course function execution to the init action hook.
$args: The $args array holds important configuration for the custom taxonomy, it instructs WordPress how the taxonomy should work.
How to creating WordPress custom taxonomies with a plugin?
If you are not into development and don’t want to get stuck in the coding hassles, using a plugin is the best option for you.
We’ll consider the Custom Post Type UI plugin (1+ million active installs) to create WordPress custom taxonomies. Downlaod, install and activate the plugin as you do for any WordPress plugin.
Assume that we’ve already created a custom post type called ‘Events.’ So make sure you have a custom post type created before you begin creating your taxonomies.
Next, go to WordPress admin panel > CPT UI > Add/Edit Taxonomies to create your first taxonomy.
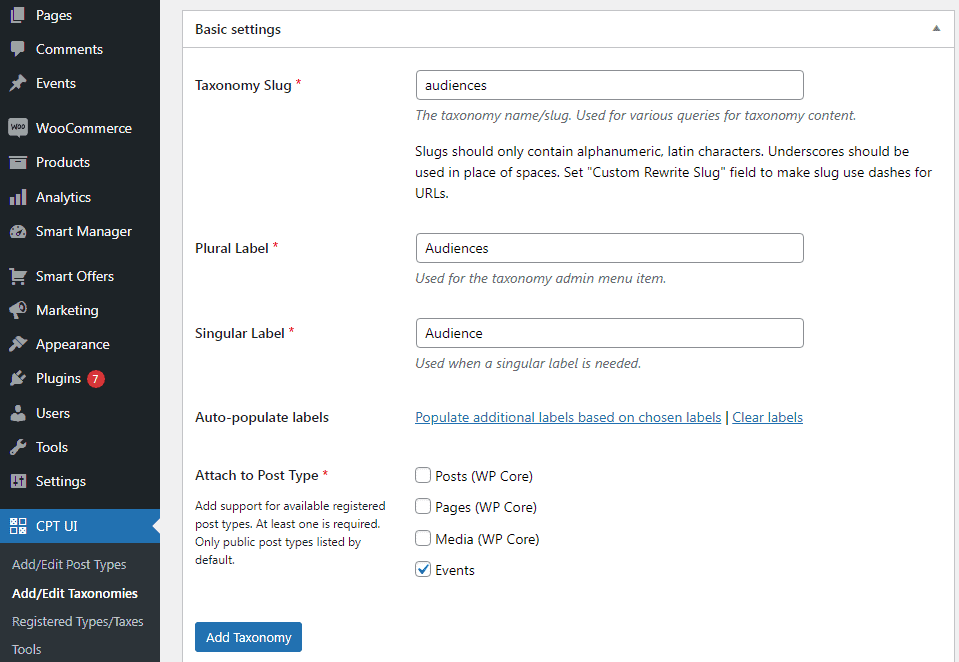
On this screen, you will need to do the following:
- Create a slug for the taxonomy. This slug is used in the URL and in WordPress search queries. This can only contain letters and numbers, and it will automatically be converted to lowercase letters.
- Next, you will fill in the plural and singular names for your custom taxonomy.
- From there, you have the option to click on the link ‘Populate additional labels based on chosen labels’. If you do this, then the plugin will auto-fill in the rest of the label fields for you.
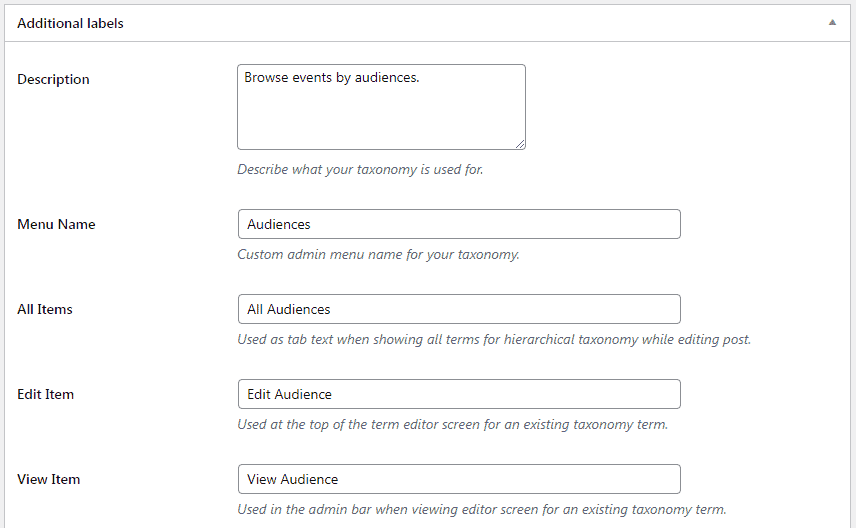
Now, scroll down to the Additional Labels section. In this area, you can provide a description of your taxonomy, custom admin menu name for your taxonomy and other labels.
These labels are used in your WordPress dashboard when you’re editing and managing content for that particular custom taxonomy.
Next up, we have the Settings option. In this area, you can set up different attributes for each taxonomy you create. Each option has a description detailing what it does.
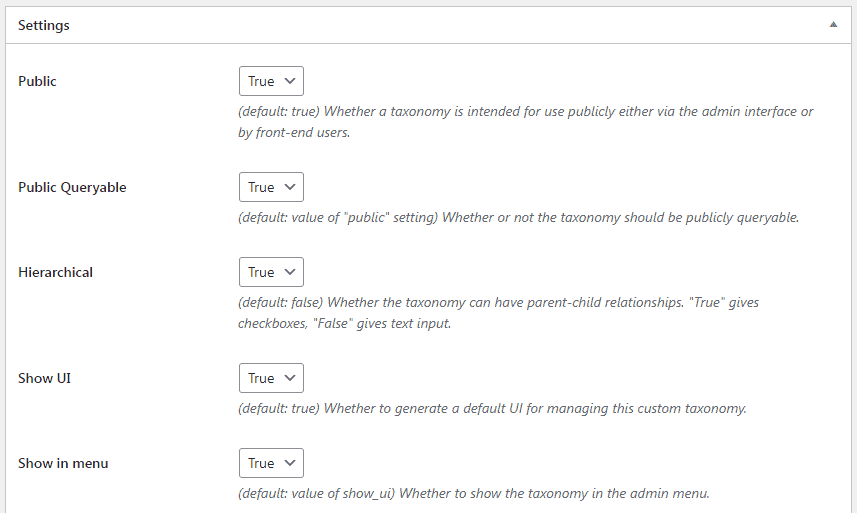
Here, we chose to make this taxonomy hierarchical. This means our taxonomy ‘Audiences’ can have sub-topics. For instance, a subject called Students can have sub-topics like college, university and more.
There are many other settings further down your screen on your WordPress dashboard you can choose.
Finally, click on the Add Taxonomy button at the bottom to save your custom taxonomy.
After that, go ahead and edit the post type associated with this taxonomy in the WordPress content editor to start using it.
Adding taxonomies for custom posts
Now that you know how to create custom taxonomies, let’s put them to use with an example.
Since we have a custom post type named ‘Events,’ it’s similar to how you’d create a regular blog post.
Go to your WordPress admin panel > Events > Subjects to add a term or subject.
On this screen, write the name, slug, parent for the subject if any and description.
Click the Add New Subject button to create your new subject. Your newly added term will now appear in the right column.
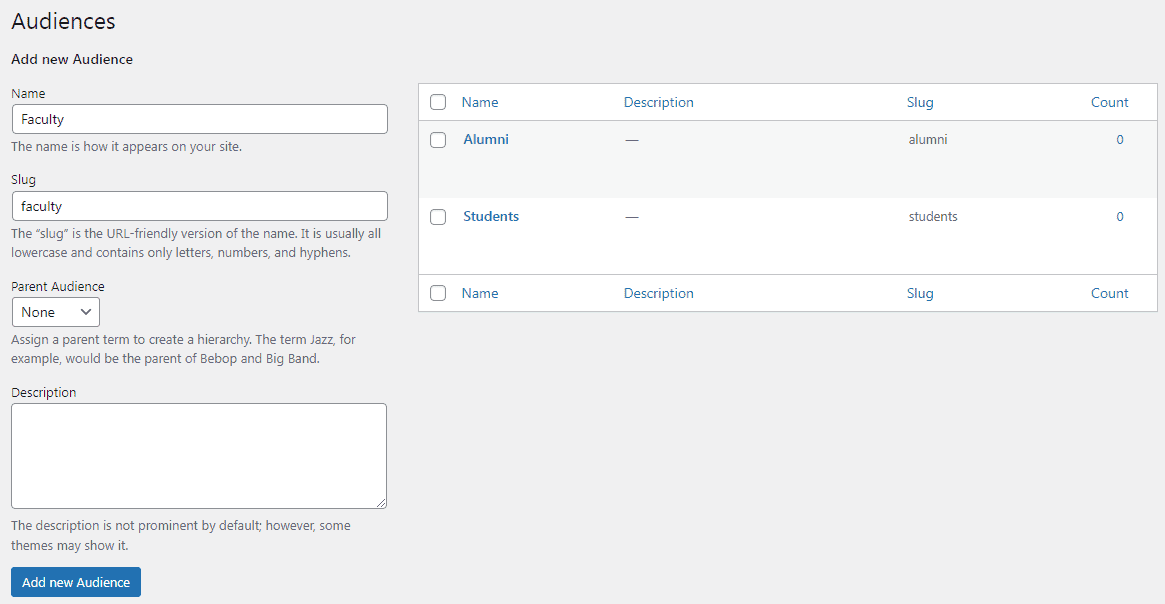
Now you have a new term that you can use in your blog posts.
You can also add terms directly while editing or writing content under that particular post type.
You may also want to display the subjects in your website’s navigation menu.
Go to WordPress admin panel > Appearance > Menus and select the terms you want to add under your custom taxonomy tab.
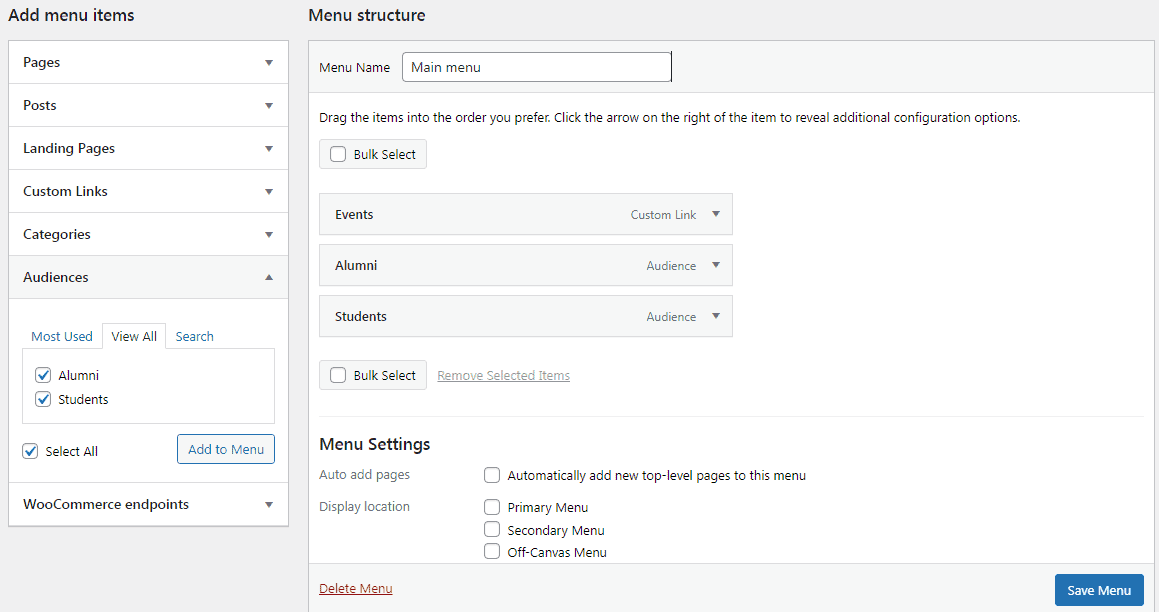
Don’t forget to click on the Save Menu button to save your settings. You can now visit your website to see your menu in action.
That’s it. It’s not as difficult as it seems. For more details, refer to the plugin documentation.
Pods – Custom Content Types and Fields
You may like to consider Pods plugin (100K+ active installs) to create WordPress custom taxonomies.
Pods plugin provides a simple interface that allows you to create and edit custom post types, taxonomy, fields, as well as extend and customize content types.
Key features:
- Easily display your custom content, whether you want to use shortcodes, widgets, the code-free Pods template.
- Approach or use standard PHP in WordPress theme templates and functions.
- Create connections between any of your content to help organize with related fields.
- Use default plugin field types, or create your own.
- Control visibility by role/capability
- All the common field options like date and time, numbers, text, color pickers and more
- Works great with Advanced Custom Fields.
How to manage and bulk edit custom taxonomies?
When you have too many content, managing taxonomies and custom taxonomies will be a daunting task.
So what if you could manage all your taxonomies from one place?
Make edits directly, assign taxonomies to multiple posts at once, export taxonomies data to CSV and a lot more…
Our Smart Manager plugin allows you to do the same. You can bulk edit and manage custom taxonomies using the Excel-like sheet editor.
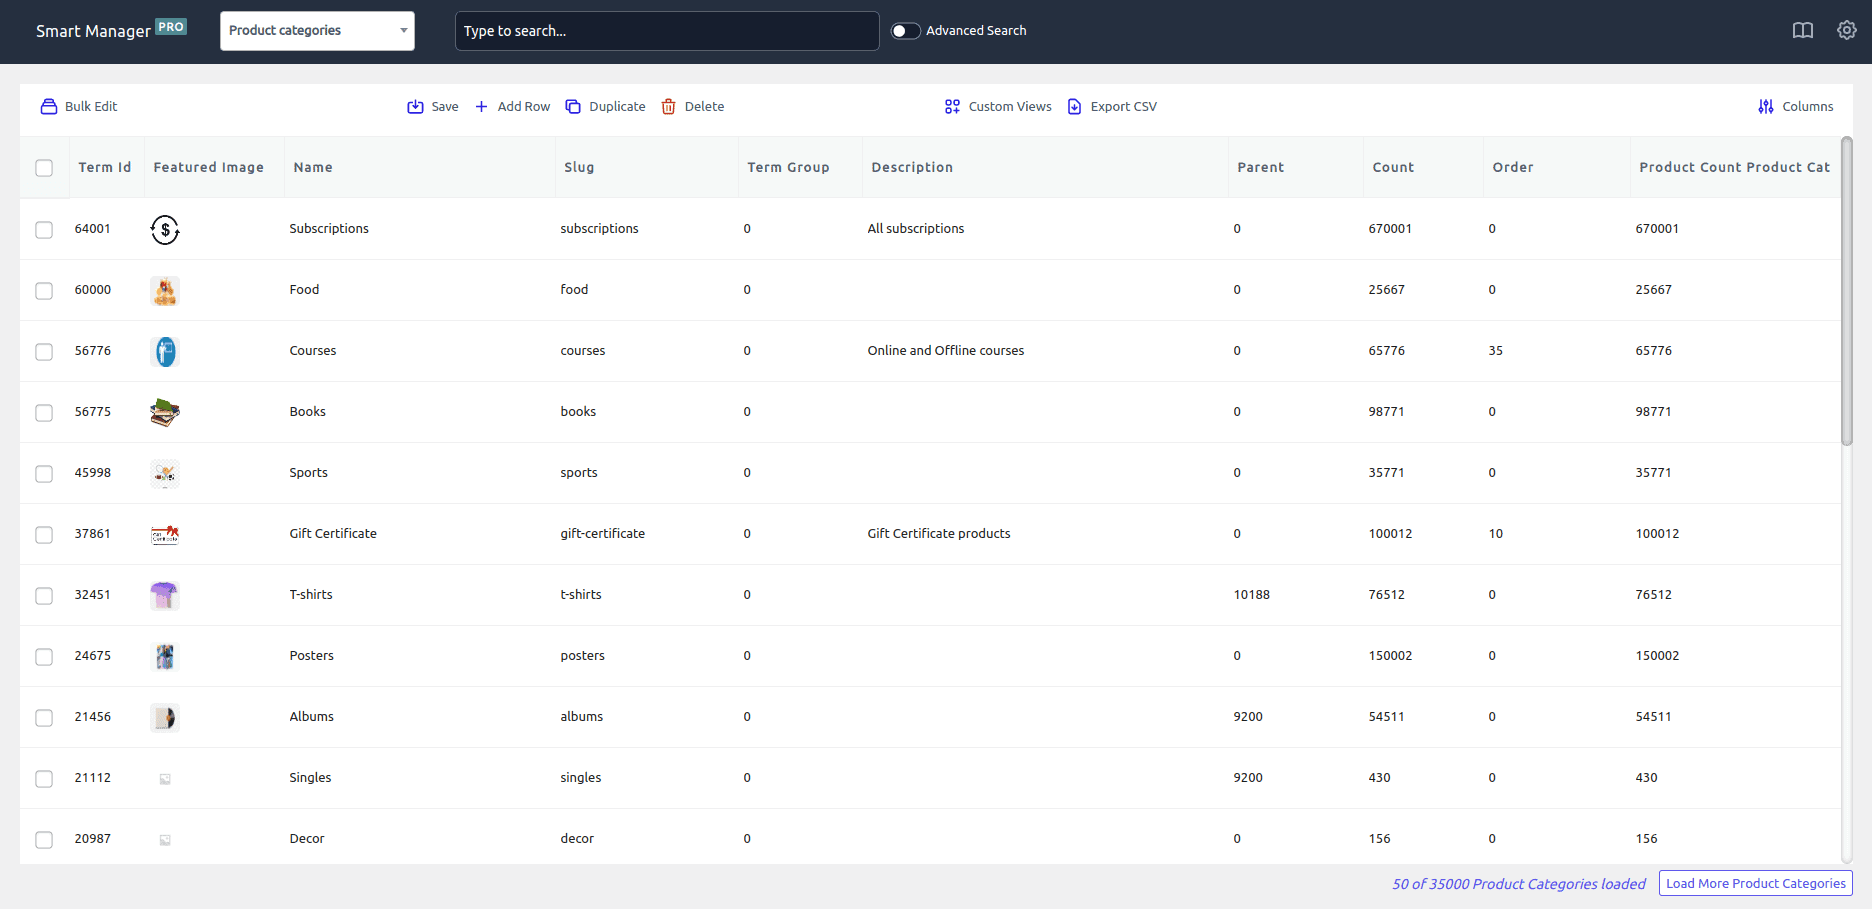
As you can see from the image, you can manage and edit ‘Product categories (taxonomy)‘ using Smart Manager’s spreadsheet-like interface.
- Inline edit (direct edit) any category name, slug, description, set featured image and other fields.
- Assign a description to selected categories in bulk based on simple or advanced search.
- Add a new product category directly to your store.
- Delete a category.
- Export categories data to CSV.
- Set up Custom Views / Column Sets that contain only specific columns for categories you want to manage frequently.
Like product categories, you can manage hundreds of other taxonomies (including custom) like coupon categories, affiliate tags, product tags, etc.
Conclusion
Phew! That was a lot of information to process.
I hope you are now well-versed with WordPress custom taxonomies and how to set them up.
For any queries or suggestions, drop your comments.