If you’re running a WordPress website, there will come a time when posts and pages just aren’t enough. Maybe you want to add portfolio items, testimonials, courses, events or products… but forcing them into regular posts feels messy.
Custom Post Types (CPTs) typically come in handy for content management. They let you structure your content your way — clean, organized and easy to manage.
Imagine running an online course site. You don’t want your lessons mixed in with blog posts, right?
Custom post types let you neatly organize content like “Courses”, “Lessons” and “Student Submissions” each with its own structure and purpose.
In this article, we’ll show you how to create and manage WordPress custom post types using plugins and code, all from one central place. Let’s dive in!
What exactly are custom post types in WordPress?
In WordPress, a “post type” is just a kind of content. You’ve got:
- Posts – Time-stamped blog entries
- Pages – Static content like About or Contact
- Attachments – Media files with metadata
- Revisions – Auto-saved versions of content
- Navigation Menus – Your menu structure
- Custom CSS – Any styling you’ve added
- Changesets – Drafts of Customizer settings
Cool, but kinda plain.
Custom post types let you add your own categories of content and your own post types. Think: Events. Testimonials. Courses. Portfolios. Whatever makes your business tick.
Imagine you’re running a membership site — wouldn’t it be awesome to have a separate section just for “Memberships”?
Or if you’re rocking a WooCommerce store, how about dedicated post types for products, Orders, Coupons or Subscriptions? Yup, that’s where custom post types come in.
They let you create content that actually fits your site’s needs. And the best part? Each custom type gets its own spot in your WordPress dashboard — super organized, super clean.
Custom post types let you manage unique content like products, events or reviews separately from regular posts or pages. You can add custom fields, taxonomies and layouts — and they get their own menu in the dashboard for easier handling.
Let’s break down how to set them up and make your content work smarter, not harder.
How to create a custom post type in WordPress?
There are two ways to create a custom post type:
- Using plugins
- Manually
How to create WordPress custom post types using a plugin
This is the easiest way, especially if you’re not into coding.
Using the Custom Post Type UI (CPT UI) plugin is most recommended. The Custom Post Type Widgets plugin is highly efficient and super popular, with over 1 million active installs.
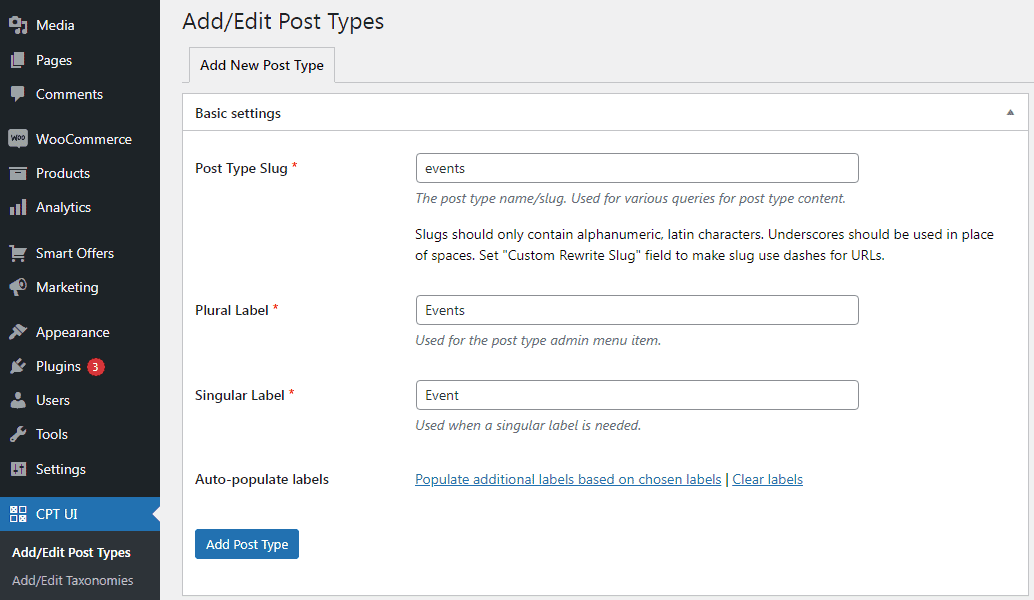
- After installing and activating the plugin, go to:
WordPress Admin Panel > CPT UI > Add / Edit Post Types. - Make sure you’re on the
Add New Post Typetab. - Enter a
slugfor your custom post type (e.g.,events). This will be part of your URL and must only have letters and numbers. - Provide the plural and singular names for your post type.
- Click
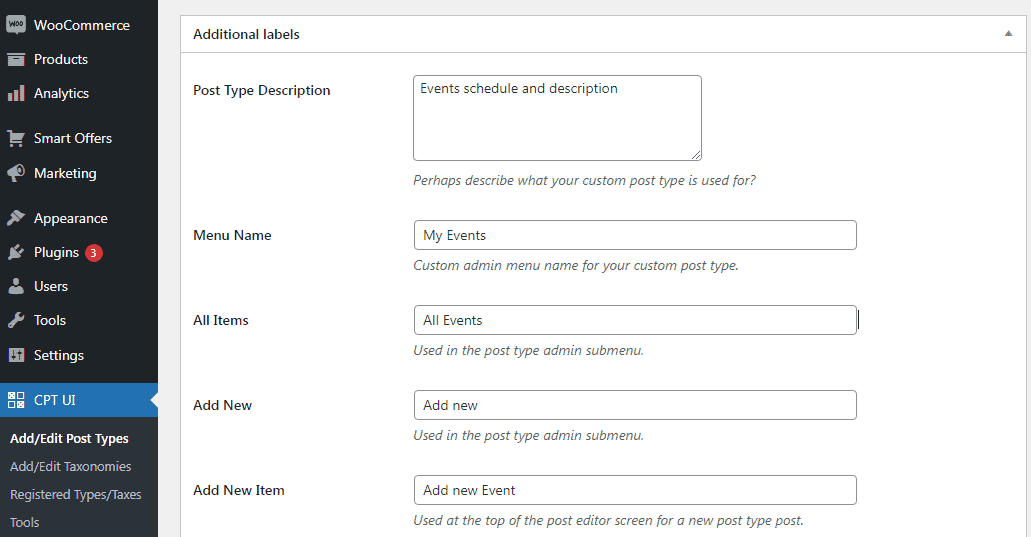
Populate additional labels based on the chosen labels— this auto-fills the rest of the labels to save you time. - Scroll down to
Additional Labels— these will appear throughout your WordPress admin when managing this post type. - Next, in the
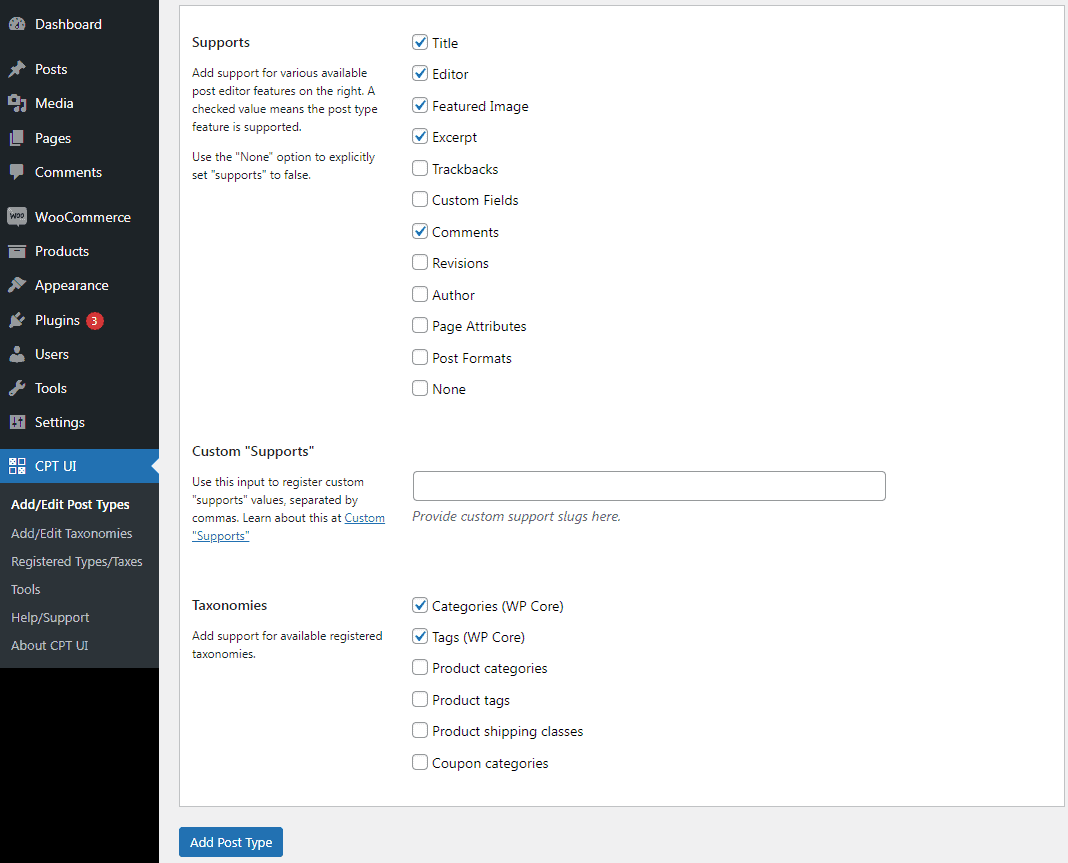
Post Type Settings, customize the attributes of your post type. Each setting has a description to guide you. - Choose if your post type should be hierarchical (like Pages) or not.
- Select the editing features your post type should support (title, editor, thumbnail, etc.).
- Finally, click
Add Post Typeto create it.

You’re done! Now you can add content to your new post type. We’ll cover how to display it later.
Creating a custom post type manually (using code)
If you deactivate the plugin, your custom post types disappear from the admin, which can cause issues if you manage a lot of content. If you’re comfortable with code, creating CPTs manually is more reliable.
- Add the code to your theme’s functions.php file or a site-specific plugin.
- Here’s a simple example:
// Our custom post type function function create_posttype() { register_post_type( 'events', // CPT Options array( 'labels' => array( 'name' => __( 'Events' ), 'singular_name' => __( 'Event' ) ), 'public' => true, 'has_archive' => true, 'rewrite' => array('slug' => 'events'), 'show_in_rest' => true, ) ); } // Hooking up our function to theme setup add_action( 'init', 'create_posttype' ); - This registers an “events” post type with basic options.
- The
labelsarray sets the names, and the second array controls visibility, permalink structure and block editor support.
Bonus: You can also hook in custom taxonomies, meta fields and REST API settings.
More advanced example with extra features
Let’s take a look at more detailed code that adds additional options to your custom post type:
/*
* Creating a function to create our CPT
*/

function custom_post_type() {

// Set UI labels for Custom Post Type
    $labels = array(
        'name'                => _x( 'Events', 'Post Type General Name', 'twentytwentyone' ),
        'singular_name'       => _x( 'Event', 'Post Type Singular Name', 'twentytwentyone' ),
        'menu_name'           => __( 'Events', 'twentytwentyone' ),
        'parent_item_colon'   => __( 'Parent Event', 'twentytwentyone' ),
        'all_items'           => __( 'All Events', 'twentytwentyone' ),
        'view_item'           => __( 'View Event', 'twentytwentyone' ),
        'add_new_item'        => __( 'Add New Event, 'twentytwentyone' ),
        'add_new'             => __( 'Add New', 'twentytwentyone' ),
        'edit_item'           => __( 'Edit Event’, 'twentytwentyone' ),
        'update_item'         => __( 'Update Event’, 'twentytwentyone' ),
        'search_items'        => __( 'Search Event', 'twentytwentyone' ),
        'not_found'           => __( 'Not Found', 'twentytwentyone' ),
        'not_found_in_trash'  => __( 'Not found in Trash', 'twentytwentyone' ),
    );

// Set other options for Custom post Type

    $args = array(
        'label'               => __( 'Events', 'twentytwentyone' ),
        'description'         => __( 'Event data', 'twentytwentyone' ),
        'labels'              => $labels,
        // Features this CPT supports in Post Editor
        'supports'            => array( 'title', 'editor', 'excerpt', 'author', 'thumbnail', 'comments', 'revisions', 'custom-fields', ),
        // You can associate this CPT with a taxonomy or custom taxonomy.
        'taxonomies'          => array( 'genres' ),
        /* A hierarchical CPT is like Pages and can have
        * Parent and child items. A non-hierarchical CPT
        * is like Posts.
        */
        'hierarchical'        => false,
        'public'              => true,
        'show_ui'             => true,
        'show_in_menu'        => true,
        'show_in_nav_menus'   => true,
        'show_in_admin_bar'   => true,
        'menu_position'       => 5,
        'can_export'          => true,
        'has_archive'         => true,
        'exclude_from_search' => false,
        'publicly_queryable'  => true,
        'capability_type'     => 'post',
        'show_in_rest' => true,

    );

    // Registering your Custom Post Type
    register_post_type( 'events', $args );

}

/* Hook into the 'init' action so that the function
* Containing our post type registration is not
* unnecessarily executed.
*/

add_action( 'init', 'custom_post_type', 0 );
- This version includes more options like support for revisions, thumbnails, custom fields and custom taxonomies (
genres). - The
'hierarchical' => falsemeans it behaves like posts, not pages. Change to true if you want a page-like structure. - The
'twentytwentyone'string is the text domain for translations—replace it with your theme’s domain. - To find your theme’s text domain, open the
style.cssfile located in your theme’s directory. You’ll see the text domain listed in the file’s header section.
How to display custom post types on your WordPress site?
Once your custom post type is created and populated, it’s time to show it off.
Use default archive template
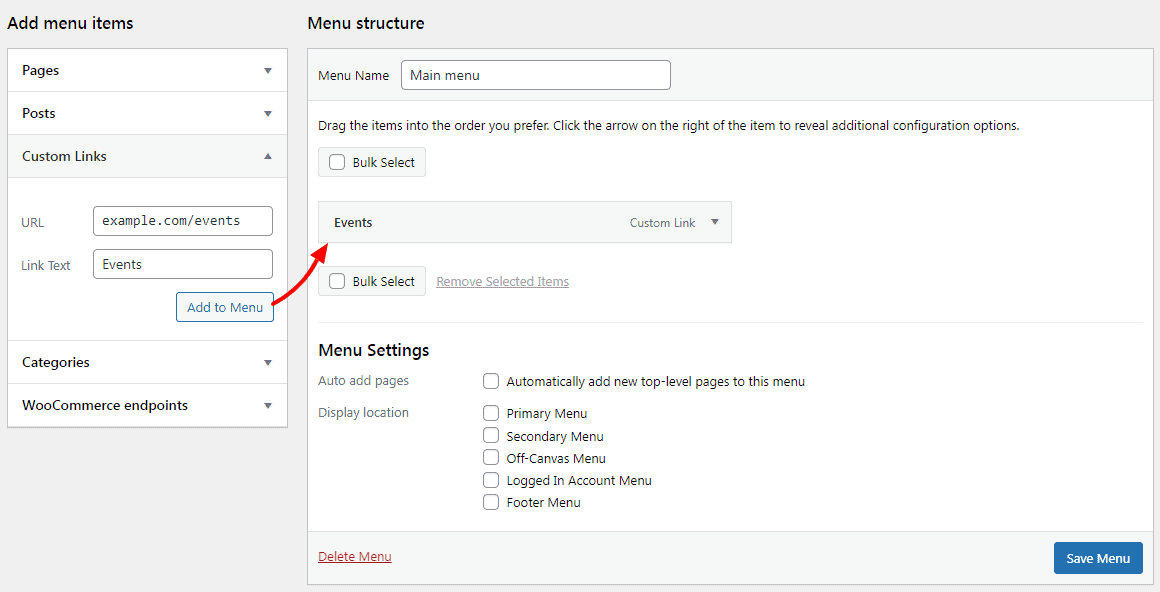
- Go to
WordPress Admin > Appearance > Menus. - Add a custom link pointing to your custom post type archive URL:
- With SEO-friendly permalinks:
https://example.com/events - Without SEO-friendly permalinks:
https://example.com/?post_type=events - Save your menu and visit the front end of your site. You’ll see the new menu item you added — clicking it will open your custom post type’s archive page, rendered using your theme’s
archive.phptemplate.
Create custom archive and single templates
The second way to display custom post types is by using a dedicated template for custom post type archives.
- Create
archive-events.phpin your theme folder (replaceeventswith your post type slug). - Copy contents from
archive.phpand modify as needed. - Similarly, create
single-events.phpfor individual post views by copyingsingle.php. - These custom templates allow full control over how your custom posts display.
Show custom posts on the front page
Add this code to your functions.php or a site plugin:
add_action( 'pre_get_posts', 'add_my_post_types_to_query' );

function add_my_post_types_to_query( $query ) {
    if ( is_home() && $query->is_main_query() )
        $query->set( 'post_type', array( 'post', ‘events' ) );
    return $query;
}
Replace 'events' with your CPT slug to include those posts on the homepage.
Query custom post types in templates
To fetch and display custom posts anywhere, use this snippet:
<?php
$args = array( 'post_type' => 'events', 'posts_per_page' => 10 );
$the_query = new WP_Query( $args );
if ( $the_query->have_posts() ) :
   while ( $the_query->have_posts() ) :
      $the_query->the_post(); ?>
      <h2><?php the_title(); ?></h2>
      <div class="entry-content">
         <?php the_content(); ?>
      </div>
    <?php endwhile;
    wp_reset_postdata();
else: ?>
<p><?php _e( 'Sorry, no posts matched your criteria.' ); ?></p>
<?php endif; ?>
This code fetches up to 10 posts from your custom post type and displays their title and content.
Display custom posts in widgets
- Install the Custom Post Type Widgets plugin.
- Go to
Appearance > Widgets. - Drag the Recent Posts (Custom Post Type) widget to a sidebar.
- Choose your custom post type from the dropdown and configure options.
- Save and check your site to see recent custom posts in action.
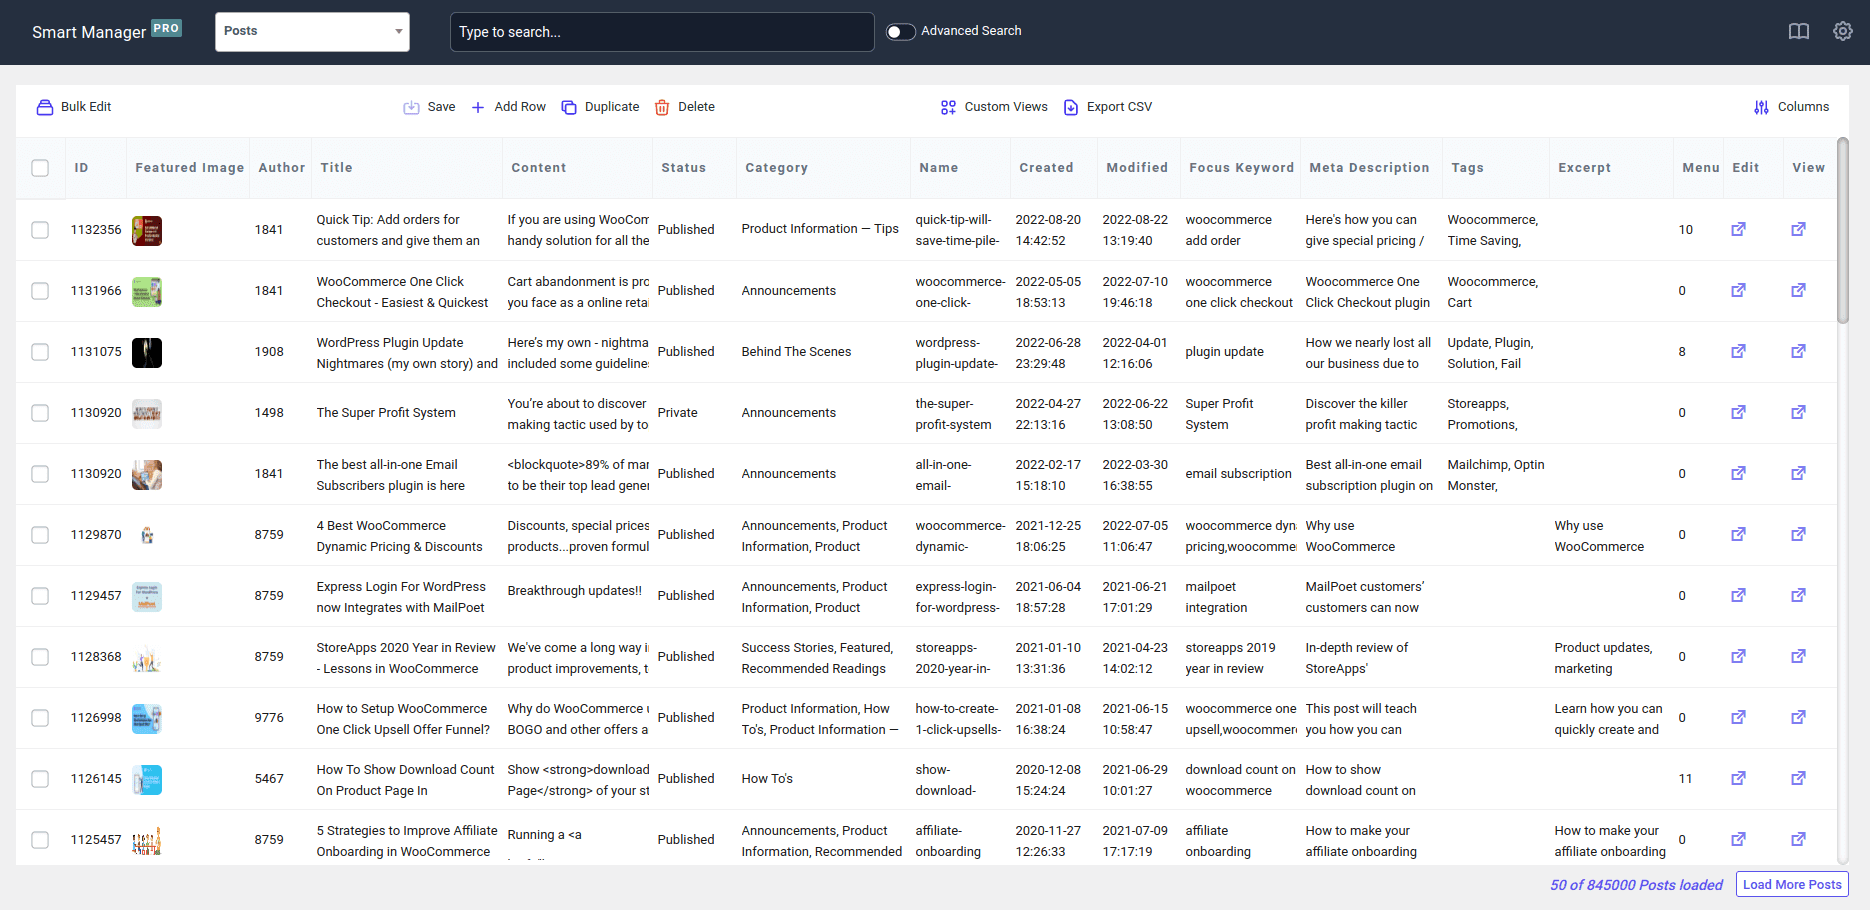
How to edit all WordPress post types in bulk?
Managing multiple post types is great… until you have 100s of entries to edit. Smart Manager is a popular plugin that helps edit WordPress post types in bulk.
Smart Manager simplifies the complexities of managing all your WordPress post types.
It helps users bulk edit, filter, export CSV, add, delete, duplicate and customize columns — all in one Excel-like dashboard.
With Smart Manager, you can bulk edit any WordPress post type — posts, pages, products, orders, coupons, you name it — even if you’ve got 100,000+ records. Yep, it’s that fast. And no switching screens needed.
Here’s how Smart Manager simplifies managing your post types:
- Bulk edit 100,000+ records with ease: Running a massive sale? Instead of updating products individually, apply a 15% discount across your entire catalog in just minutes — yes, even if you have over 100K items.
- Edit any field without limitations: Update titles, featured images, prices, SKUs, stock statuses or even switch posts from draft to published — all in one place. Refreshing your brand? Revise and publish hundreds of post types at once.
- Use filters: Search, column filters and date filters help you zero in on specific data instantly. Whether you’re tracking down posts from last October or products priced between $500–$700 that are running low on stock — you’ll locate and update them in seconds.
- Add new posts directly: Planning your content or product lineup? Create multiple blog drafts or new products straight from the spreadsheet-like interface.
- Bulk delete in seconds: Clear out old posts, expired listings, test orders or unused coupons with a couple of clicks.
- Duplicate entries easily: Need a copy of a product, post or page? Duplicate one — or many — instantly. Perfect when you’re creating a new course, page layout or product that’s similar to an existing one.
- Export fully customizable CSVs: Export exactly the data you need — across all post types and taxonomies. Ideal for reporting, inventory planning, audits or sharing information with vendors.
- One unified dashboard: Update titles, descriptions, images, pricing, stock, SEO fields and more — without hopping across multiple screens.
Smart Manager puts all your content controls in one easy-to-use dashboard. It isn’t just a plugin—it’s your WordPress command center.
Managing post types with Smart Manager (applications)
Open Smart Manager and pick the dashboard for the post type you want to work with — Products, Orders, Coupons or whatever. Now, you can edit the records accordingly.
Managing Products post-type
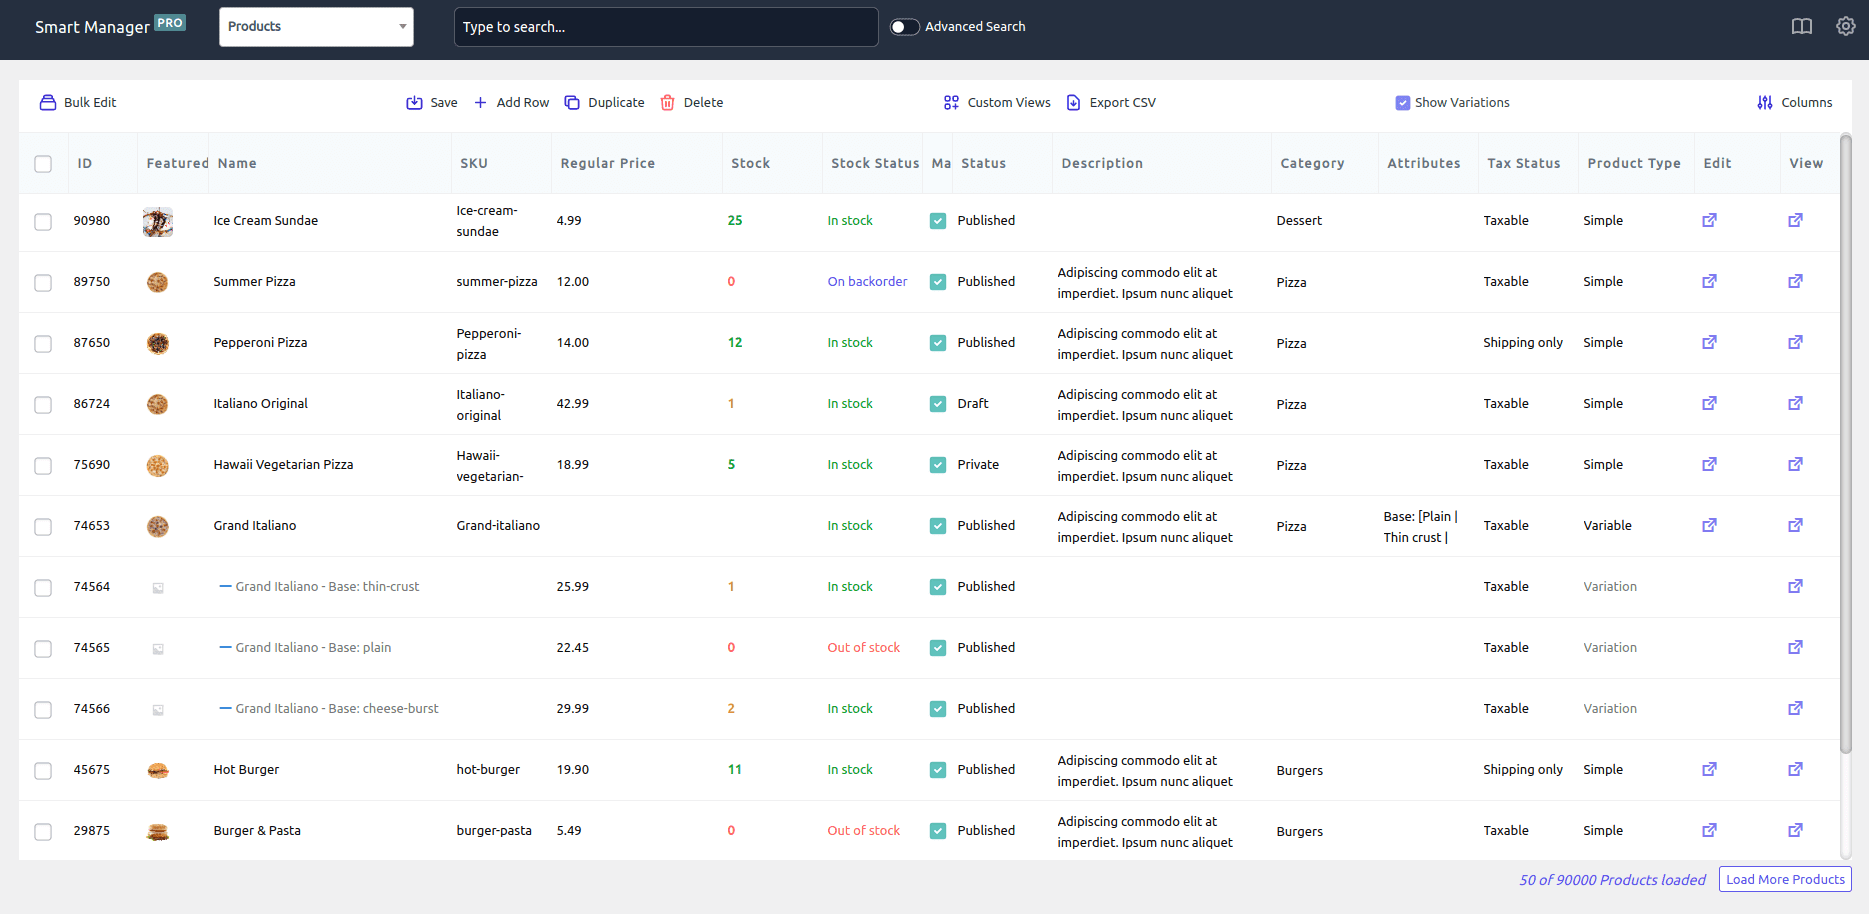
Check out the Products dashboard for WooCommerce in Smart Manager—here’s what you can do:
- Instantly update stock status, prices (regular & sale), descriptions and more—all right there in the grid.
- Add new products on the fly without leaving the dashboard.
- Use advanced filters to zero in on products, like “all items priced between $100 and $200.”
- Bulk-edit 600+ products in seconds, say, slashing prices by 10%.
- Delete test or old products permanently with one click.
- Duplicate your entire product list or filtered selections easily.
- Export product data to CSV whenever you need.
- Create custom views like a ‘stock log’ to keep tabs on inventory.
…and loads more magic under the hood. (Read the Smart Manager’s documentation)
Managing orders, coupons, subscriptions…
Smart Manager isn’t just for products. You can select your post type dashboard and manage everything with total freedom:
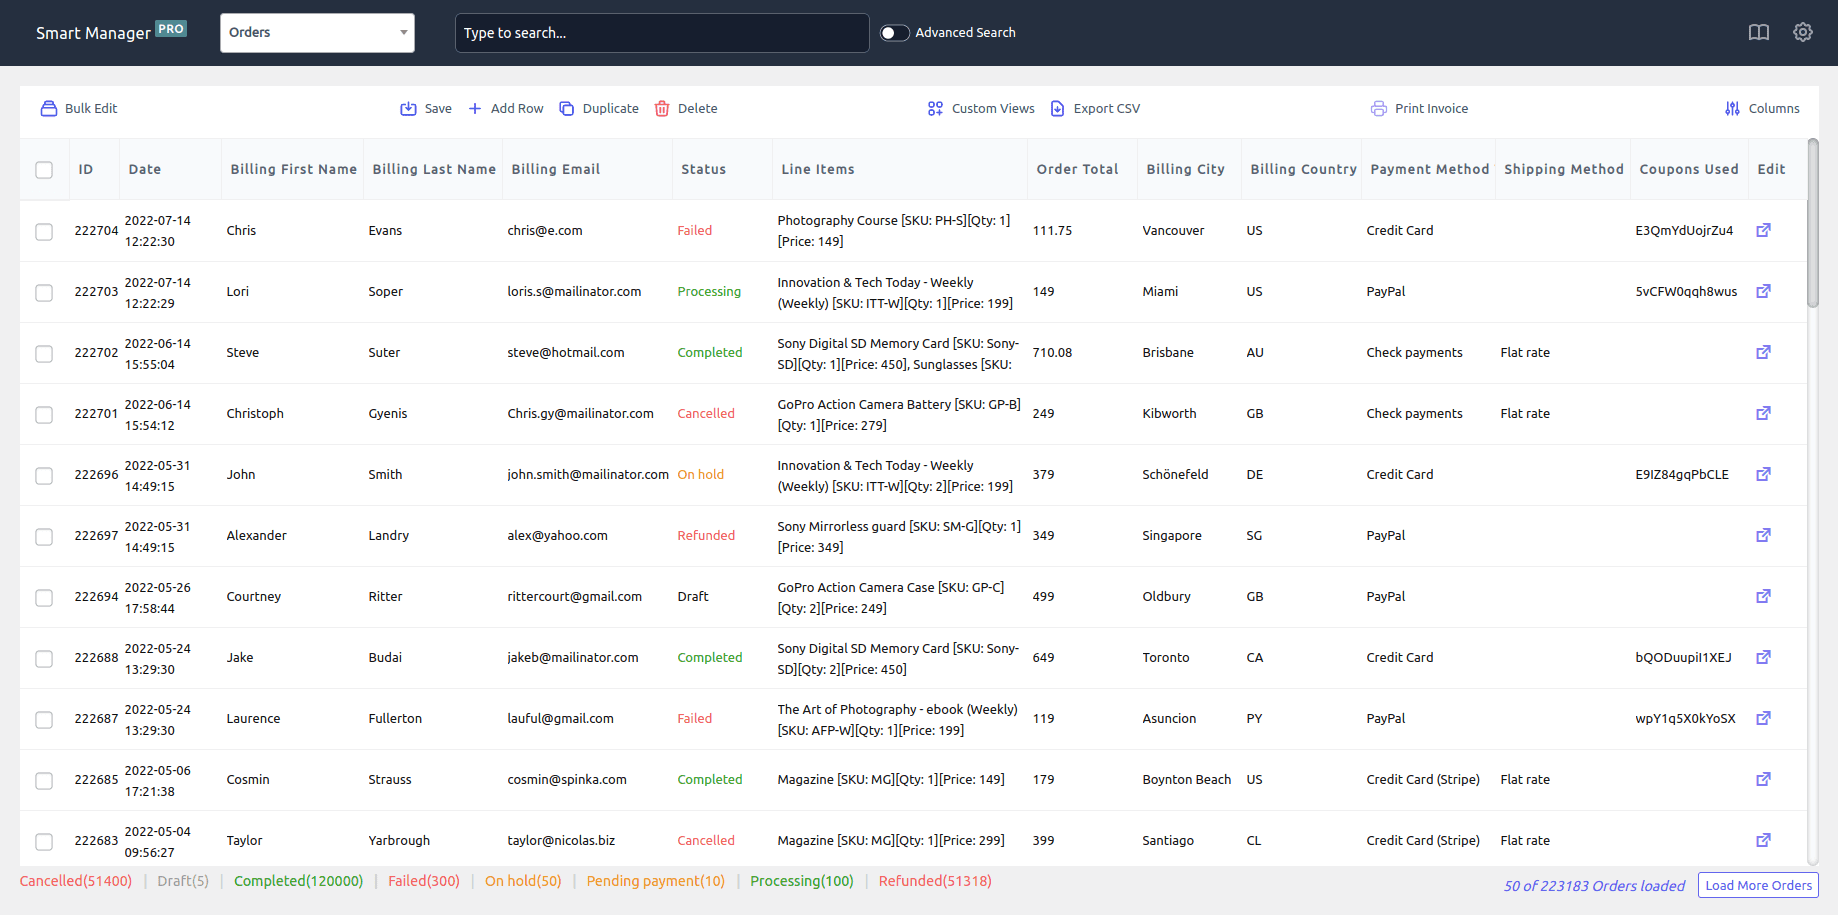
- Posts and pages: Edit titles, images and switch status from draft to publish.
- Orders: Update order status, billing/shipping info, currency and custom fields.
- Coupons: Tweak usage limits, amounts, types, expiry dates or delete coupons.
- Users (Customers): View lifetime value, update billing/shipping and change login info.
- Media: Change titles, content, authorship, menu order.
- Memberships: Export data, bulk-upgrade plans, cancel memberships and more.
- Subscriptions: Bulk reactivate or cancel, extend trials, add fees.
- Bookings: Adjust prices, reschedule, cancel, export bookings.
- Extra product options: Manage gift wrapping, shipping add-ons, upsells.
- Dropshipping: Control suppliers, stock, prices.
- Multi-vendors: Add vendors, manage shipments, commissions, customer notes.
- LMS: Handle courses, lessons, lengths, difficulty levels, duplicate courses.
- Advanced custom fields: Edit all field types — checkboxes, thumbnails, radios, files.
…and literally hundreds more post types.
Bottom line? Smart Manager is highly effective at managing all post types, including orders, discounts, subscriptions, memberships and more.
Conclusion
You now know exactly how to create, display and manage WordPress custom post types — whether you prefer plugins or clean code.
If you just want simplicity, the Custom Post Type UI plugin is your best bet.
But if you want total control over hundreds or thousands of custom posts — and don’t want to spend days editing — Smart Manager is the right tool. It handles complex editing, bulk actions, filtering and content updates with ease.
If you’re running a WordPress or WooCommerce site with lots of data, this tool will save you hours every single week.
FAQ
Q1. How to add categories to custom post types in WordPress?
To add categories to custom post types in WordPress, you need to register a taxonomy for the custom post type using the register_taxonomy() function. This will allow you to create and manage categories.
Q2. What is the difference between custom post types and pages?
Custom post types are a way to create new types of content in WordPress, while pages are a built-in type of content used for static pages on a website. Custom post types can have their custom fields and taxonomies, while the pages have a limited set of options for customization.
Q3. What are some benefits of using a custom post type generator for WordPress?
Using a custom post types generator for WordPress provides benefits such as streamlined creation and management of custom content types, improved content organization, enhanced user experience, increased flexibility in designing unique layouts and functionalities for different content types and efficient content management through customized backend settings.
Q4. Where are custom post types saved in WordPress?
Custom post types are saved in the WordPress database.

About the Author – Akshat Kothari
Engineer by training, marketer by instinct. Akshat is an integral part of the marketing team at StoreApps, where he takes complex WooCommerce concepts and turns them into strategies store owners can put to work immediately. When he steps away from the screen, he’s either exploring a new city or binge watching movies.