If you operate a WooCommerce store, you should know that each order must hit the correct note at the right moment to keep consumers satisfied and operations operating smoothly.
Whether you sell handmade candles, digital courses or B2B services, order statuses must be correctly managed.
This guide will teach you why changing the default WooCommerce order status is important, how to add, edit and manage custom statuses in bulk. You will also know how to simplify order management using the Smart Manager plugin.
Understanding WooCommerce order statuses
Let’s learn what WooCommerce order statuses are and how to effectively manage them to improve your store’s workflow.
What are order statuses in WooCommerce?
Order statuses in WooCommerce are like labels that track the progress of an order from the moment a customer clicks “Buy” to when the product lands in their hands.
Think of them as progress markers that tell you and your customers where an order stands in the fulfillment process.
WooCommerce have them built in so that you can manage orders efficiently and keep customers in the loop with clear updates.
The default WooCommerce order statuses explained
WooCommerce has a number of predetermined order statuses in its system. While some of these statuses will be assigned automatically based on certain triggers, others must be applied manually to orders, either individually or in bulk.
WooCommerce comes with eight default order statuses. Here’s a quick rundown:
- Pending Payment: The customer has placed the order but hasn’t paid yet.
- Processing: Payment is received, and you’re preparing the order.
- On Hold: The order is awaiting payment confirmation or manual review (common for high-value orders or manual payment methods like checks).
- Completed: The order is fulfilled, shipped and delivered.
- Cancelled: The customer or you canceled the order before fulfillment.
- Refunded: The order was returned, and a full or partial refund was issued.
- Failed: Payment failed or was declined (e.g., Sarah’s credit card didn’t go through).
- Draft: An incomplete order, often created manually in the admin panel for testing or quotes.
Note: All product orders require processing, except those that only contain virtual and downloadable products.
Note: This status may not show immediately; instead, it will show as pending until verified.
Managing default WooCommerce order statuses
Managing these order statuses is very easy in WooCommerce. From your WordPress dashboard, go to WooCommerce > Orders, and you’ll see a list of all orders with their current statuses. You can:
- Filter orders: Use filters to view orders by status (e.g., show all “Processing” orders to prioritize packing).
- Update statuses: Click an order and change its status manually (e.g., switch from “Processing” to “Completed” after shipping).
- Bulk actions: Select multiple orders to update their statuses at once, like marking several as “Refunded” after a product recall.
- Automate notifications: Default statuses trigger emails to customers (e.g., a “Completed” status sends a shipping confirmation).
Order lifecycle in WooCommerce
Here’s a typical order lifecycle for a physical product:
- Pending: Customer adds to cart, checks out but hasn’t paid yet.
- Processing: Payment is confirmed. You pack the product.
- Completed: You ship the order. Done.
- Refunded: If there’s an issue and you return the money.
For digital downloads, it’s usually quicker: Processing > Completed, because there’s no shipping involved.
If you sell virtual products and want their order status to switch from ‘Processing’ to ‘Completed’ instantly, the Autocomplete Orders for WooCommerce Virtual Products plugin can handle it for you automatically.
Limitations for default order status in WooCommerce
WooCommerce’s default statuses are only great for simple shops. But if you:
- Offer custom services
- Have multiple departments involved
- Need better communication between your team and customers
…then default statuses start to feel limiting.
You can’t tell whether an item is being manufactured, in quality control or stuck in customs.
Moreover, B2B or service-based stores often need more granular stages, like “Quote Sent” or “Design Approved,” which defaults can’t handle.
Custom statuses are in handy in situations like this.
Everything about custom WooCommerce order statuses
Custom order statuses empower WooCommerce store owners with improved communication with users. Let’s look at what they are, the many types of them and how they assist stores.
What are custom order statuses in WooCommerce?
Custom order statuses are user-defined labels you add to WooCommerce to reflect your specific business processes.
Unlike the default eight statuses, custom statuses let you create a workflow that matches how your store operates.
Once set, they behave like any other status:
- Show up in the order dashboard
- Can be selected from dropdowns
- Can trigger emails or integrations
There are a couple of ways to add custom order statuses in WooCommerce but first, know more about the types and benefits of custom statuses.
Types of custom order statuses (use cases)
Not every store fits the same mold. Default statuses just work for basic stores that’s why you need to factor in custom statuses.
Here are some types or use cases:
- Physical product stores: Add statuses like “Awaiting Shipment” or “In Production” or “Quality Checked” or “Out for Delivery” to clarify shipping stages for customers buying items like electronics or clothing.
- Service-based businesses: Use statuses like “Scheduled” or “Quote Sent” or “Invoiced” or “In Progress” for services like consulting or home repairs, where delivery isn’t physical.
- B2B stores: Include “Awaiting Approval” for orders needing client sign-off or “Invoiced” for bulk purchases with delayed payments.
- Subscription businesses: Track statuses like “Renewal Pending” or “Paused” for recurring orders, like meal kits or software subscriptions.
- Pre-order or backorder stores: Use “Pre-Ordered” or “Backordered” to manage inventory for products not yet available.
If you sell custom cakes, a status like “Baking in Progress” tells customers their order is being crafted, while “Awaiting Pickup” signals it’s ready at your bakery.
Benefits of custom statuses for store management
Here’s how custom order statuses benefit store owners:
- Better clarity: Everyone (you, your team and your customer) knows exactly where the order stands.
- Improved automation: You can trigger emails, reminders or backend workflows at specific status changes.
- Streamlined team operations: Assign tasks based on status. For example, your shipping team only sees “Ready to Ship” orders.
- More personalized customer experience: Inform customers at each unique stage instead of just “Processing” or “Completed.”
- Scalability: Handle complex or high-volume orders with statuses that match your business model.
Email triggers and automation for custom statuses
Custom statuses become even more powerful when paired with email notifications and automations.
For example:
- When an order moves to “Shipped”, auto-send tracking info.
- When it reaches “Awaiting Pickup”, send a pickup reminder with location and hours.
- Use webhooks or integrations to update your warehouse system or trigger SMS alerts.
Plugins like Custom Order Status for WooCommerce and AutomateWoo allow you to fully automate these actions based on the status.
For more information on managing orders, refer to our WooCommerce order management guide.
How to add custom order statuses in WooCommerce?
WooCommerce makes it possible to add your own custom statuses in two main ways. Let’s walk through both methods.
Adding custom statuses via code (developer-friendly method)
If you’re comfortable with code or have a developer on your team, you can add custom statuses directly in your theme’s functions.php file or a custom plugin. Here’s a step-by-step guide:
Register the custom status: Add the following code to your theme’s functions.php file to create a custom status called “Quality Checked”.
/**
 * Register "Quality Checked" custom order status.
 *
 * @param array $order_statuses Existing WooCommerce order statuses.
 *
 * @return array Modified order statuses including "Quality Checked".
 */
add_filter( 'woocommerce_register_shop_order_post_statuses', function( $order_statuses = array() ) {
    $order_statuses['wc-quality-checked'] = array(
        'label'                     => _x( 'Quality Checked', 'Order status label', 'woocommerce' ),
        'public'                    => false,
        'exclude_from_search'       => false,
        'show_in_admin_all_list'    => true,
        'show_in_admin_status_list' => true,
        'label_count'               => _n_noop(
            'Quality Checked (%s)',
            'Quality Checked (%s)',
            'woocommerce'
        ),
    );

    return $order_statuses;
} );

/**
 * Add "Quality Checked" to the WooCommerce order status list.
 *
 * @param array $order_statuses Existing WooCommerce order statuses.
 *
 * @return array Modified order statuses including "Quality Checked".
 */
add_filter( 'wc_order_statuses', function( $order_statuses = array() ) {
    $order_statuses['wc-quality-checked'] = _x( 'Quality Checked', 'Order status label', 'woocommerce' );

    return $order_statuses;
} );
Note: Refer to this doc on how to safely add code.
Add custom order statuses in WooCommerce using a plugin
Find below two popular plugins that help you add custom order statuses in WooCommerce.
Custom Order Status for WooCommerce
This plugin enhances WooCommerce’s order workflow by allowing you to create, edit and manage custom order statuses. It comes with unique labels, icons, colors and default status settings for specific payment methods.
Key features
- Define unlimited custom statuses with your own slug, label, icon and color for easy recognition.
- Set up rules to automatically transition orders after a specified delay or based on conditions like payment method, product, category, order amount, user role or country.
- Automatically send emails or SMS alerts to customers or admins when an order status changes.
- Assign custom statuses as defaults for select payment gateways (e.g., PayPal, cheque, COD).
- Update multiple orders at once using bulk action dropdowns.
- Modify existing WooCommerce default status labels (e.g., change “Processing” to “Order Confirmed”).
- Notify admins if an order remains in a custom status beyond a set timeframe.
Pricing
There’s a free version on WordPress.org. The paid version starts from $49/yr.
Get Custom Order Status plugin
Custom Order Status Manager for WooCommerce
This plugin launched by Bright Vessel plugin allows you to create, delete or edit order statuses to control the order flow.
Key features
- Display the descriptions of order status to customers. This can be done on the View Order page and explains the order status.
- Add action buttons or icons and create fresh order statuses.
- Incorporate bulk actions in the list for orders for new statuses.
- Re-order order statuses using drag-and-drop to change the way the admins see them.
- Replace text badges with status icons in “Orders”.
- Use custom status orders in the reports of shops.
- Incorporate new emails for an order that can use status changes to trigger.
- Use new templates for the editing of fresh email content.
- Facilitate the importation of current custom statuses from various plugins and custom code.
- Remove custom statuses safely without tampering with orders.
Pricing
There is only a free version of the plugin.
Get Custom Order Status Manager plugin
Managing and editing WooCommerce order statuses
Here’s how you can handle order statuses in WooCommerce:
Change order statuses manually
To update an order’s status:
- Go to WooCommerce > Orders and click an order to open its details.
- In the “Order Status” dropdown, select the new status (e.g., from “Processing” to “Completed”) and click “Update” to save.
Bulk edit order statuses
When handling multiple orders, bulk editing saves time:
- Navigate to WooCommerce > Orders. Check the boxes next to the orders you want to update.
- From the “Bulk Actions” dropdown, select “Change status to” and click “Apply”.
Inline editing of statuses
- In WooCommerce > Orders, enable inline editing by clicking “Screen Options” and checking “Quick Edit”.
- Select the new status and save.
Filter and search orders by status
- In WooCommerce > Orders, use the filter dropdown to view orders by status.
- Find orders by customer name, order number or status.
Set default order statuses for payment methods
- Go to WooCommerce > Settings > Payments.
- Click on a payment method and set the default status (e.g., “On Hold” for bank transfers, “Processing” for credit cards).
Assign email notifications to custom statuses
You can create a new email template for your custom status. You can also customize the subject, content and merge tags, and enable the email to trigger when the status is applied.
Why change the default order status?
Every WooCommerce store operates differently—and so do their order management needs.
For example:
- Stores offering lifetime deals or longer refund windows often process more refunds. Others may have a strict no-refund policy.
- Physical product sellers usually have to manually mark orders as ‘Completed’ after successful payment and delivery or switch them to ‘Refunded’ if returned without replacement.
- By default, WooCommerce keeps an order as ‘Processing’ even after payment, requiring manual updates for certain businesses.
Moreover, some industries require custom statuses; for instance, a jewelry store might add ‘Make to Order’ or ‘Engraving’ before marking items as ready to ship.
During high-volume sales periods like Thanksgiving or Christmas, managing hundreds of orders with only the default WooCommerce statuses can be overwhelming.
That’s why you need a powerful order status management tool, and Smart Manager makes it fast, easy and efficient.
Is Smart Manager the best plugin for managing and editing custom order statuses?
Managing orders one by one can feel like a challenging task, especially during peak sales periods.
That’s where the Smart Manager, developed by StoreApps, plays a crucial role. It’s a powerful tool to streamline order status management.
The plugin allows you to view, manage and edit all your orders from one place using an Excel-like sheet editor.
With Smart Manager, you can modify order status, add information to orders, export order data to CSV, filter orders by date and bulk edit statuses.
Smart Manager helps in performing hundreds of operations for orders quickly.
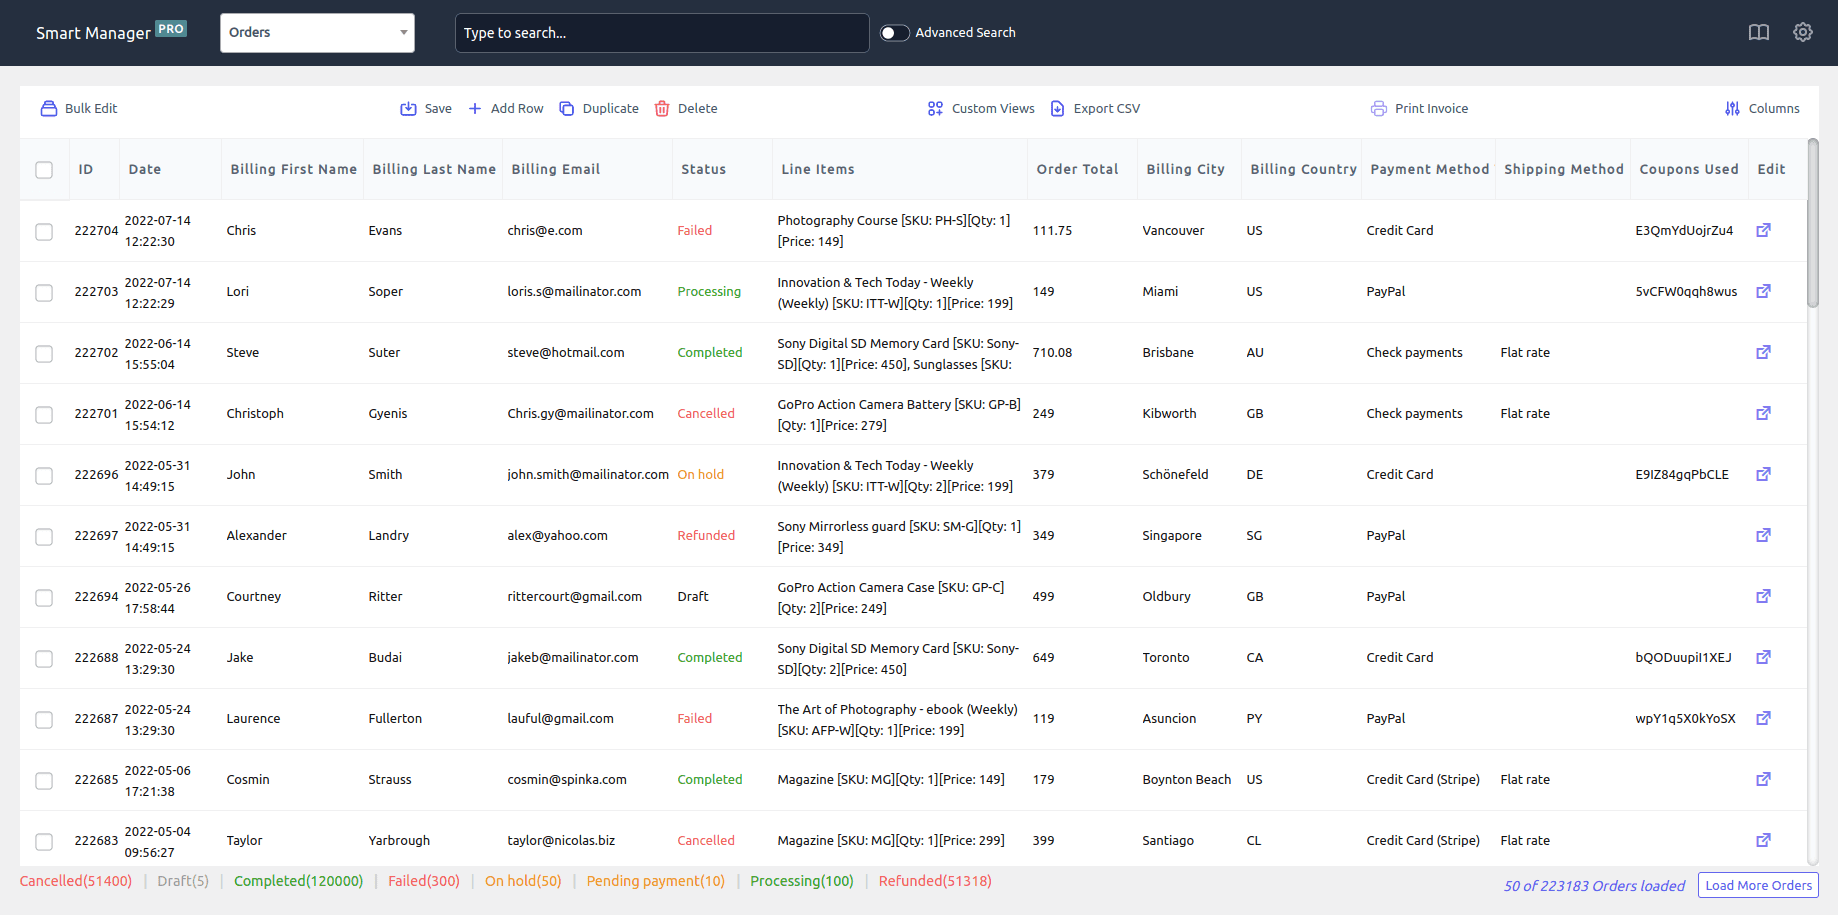
Let’s see how you can use Smart Manager to manage the core WooCommerce order statuses.
Create new orders and change order status directly
This is more useful for physical stores. For example, if the customer has placed an order for a high-end product.
Using Smart Manager, use the Add Row option to add a new order. It will be added to the sheet editor with the ‘Pending Payment’ order status as default. Then change the order status directly under the Status column when you receive the payment. This is inline editing.
Use the Add Row button to bulk add new orders and then set the status in bulk (more on that later).
Note: You can add other order details directly except for in-line Items.
Inline edit order statuses
If you want to change the order status from ‘Pending’ to ‘Completed’ or ‘Completed’ to ‘Refunded’, directly use the spreadsheet to change the status at once.
The plugin will provide you with a dropdown to select the order status. No need to go to individual orders and make the edits.
Bulk edit order statuses
Bulk editing order statuses is where Smart Manager shines the most.
You can bulk edit order statuses of countless orders at once.
Consider you added fifty new orders yesterday and want to set the status from ‘Pending’ to ‘Completed’ for all of them.
Since orders were already delivered and you received the payment via Cash on Delivery on the same day itself, updating the status right away is vital.
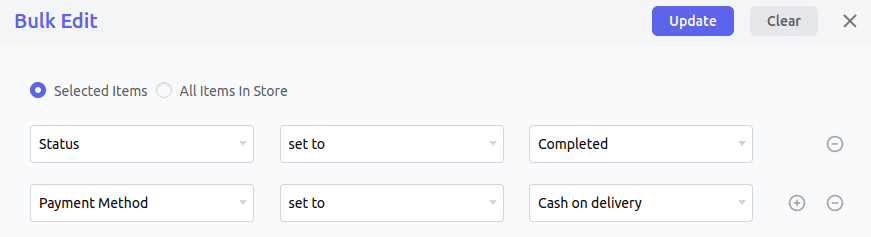
Here’s how you can do it:
- Select the orders using search filters. You can set up a filter that contains order status as ‘Pending Payment’ and the date for yesterday.
- Click on the
Bulk Editbutton on the Orders dashboard. It will open up a slide-over panel. - Enter the conditions
Status > set to > CompletedandPayment Method > set to > Cash on Delivery. - Click on the
Updatebutton. - Choose whether to bulk edit
NoworSchedule for later. - Name this task in-case you want to Undo changes. Click on Ok.
That’s it.
Be it changing order statuses, shipping details, payment method or order total, you can update them within seconds. 100 or 1000 or 10000+ orders, Smart Manager bulk edit technology takes care of everything.
Note – You can update all orders in the store or all orders in the search result at once.
You can also print PDF invoices for orders in bulk.
Filter orders by status
Smart Manager pulls accurate results amongst endless orders based on conditions. You can use operators and keywords to search for orders you want without letting random orders pop up.
Apply filters, edit order fields and save!
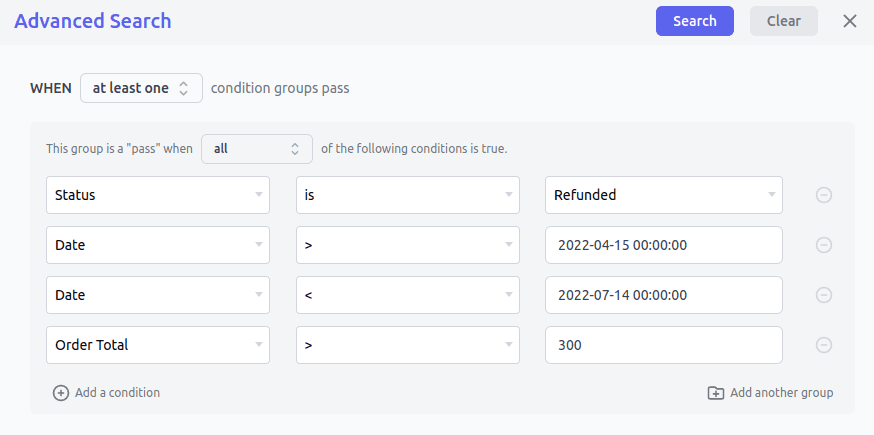
Click on the Advanced Search toggle on the Orders dashboard. It will open up a slide-over panel.
Now enter your search conditions to perform the export. For example, we want to filter orders by:
- ‘Refunded’ order status
- The date range for three months
- Order total above $300
Delete orders
Sometimes you might create test orders and want to delete them altogether. It is better to steer clear of them when not required. You can move them to Trash or delete them permanently.
Duplicate orders
If you want to create orders having similar fields related to shipping and total but different statuses, you can use the Duplicate option in Smart Manager. Further, you can make edits as and when required.
Export to CSV based on order status
You can export all orders or orders based on filters. For example, export all ‘Canceled’ orders for July this year.
You can also use multiple filters. The tool helps you to export all orders that were refunded in the last six months and whose order total was above $300.
Learn more about advanced orders export.
Custom views for order data
Now the Orders dashboard involves tons of data.
If you want to operate with some limited data fields all the time, you can set up a special dashboard with only those data fields (this is a custom view) and then keep on making edits to that custom view as and when required.
Use the Column filters to choose only specific data columns you want to view.
Read this to learn how to create custom views.
Access privileges
Your shop managers can view Orders data but you also want to restrict them from viewing and managing data related to Products, Users and other post types.
Smart Manager plugin allows you to give access to only specific dashboards to specific users. You can also assign access privileges for custom views.
Notes and email notifications
Just like in WooCommerce, transactional notes will also be added to the order on status change via Smart Manager.
Moreover, customers will be sent an email when the order status changes. You can also edit ‘customer-provided notes’ for the order.
Note: Except for line items (products purchased), you can manage and edit all Order data fields for now.
Try the Smart Manager live demo
How to autocomplete order status for virtual and downloadable products?
Now, WooCommerce can automatically mark orders as complete only for downloadable products. But for virtual products, it leaves the order status as ‘Processing’ after the payment is received.
In such cases, manually marking each order as ‘Completed’ is too time-consuming.
This is where the Smart Manager can be a saving grace, It can help you with marking these orders as ‘Completed’ using the bulk edit feature quickly.
Another option is to use our WooCommerce Auto Complete Virtual Orders extension to mark these orders as completed automatically. It also works with the WooCommerce Subscriptions plugin.
Not just orders, you can also manage products, coupons, subscriptions, bookings, courses and more – any WordPress post type using Smart Manager.
With Smart Manager, you can:
- Extend coupon expiry limit for hundreds of coupons issued in bulk.
- Bulk assign categories and attributes to products.
- Search for all expired subscriptions and delete them (move to Trash).
- Cancel all bookings made between a date range.
- Inline edit a membership based on search filters.
- Duplicate courses with similar data, make edits, and set up new courses quickly.
Conclusion
Custom order statuses in WooCommerce give you the flexibility to run your store your way.
Plugins like Custom Order Status for WooCommerce make it easy to add and manage statuses, while tools like AutomateWoo take automation to the next level.
Managing core and custom WooCommerce order statuses with Smart Manager is game changing. It helps you stay in full control of your order management.
This will help store owners and their teams save time and focus on more important things to improve their businesses.
So look no further than Smart Manager and start managing your orders more smartly today!
FAQ
Q1. Where to find WooCommerce’s status?
You’ll find it under WooCommerce → Status. Please refer to this doc for more details on how to get it.
Q2. What are WooCommerce order notes and how are they used in the order management process?
WooCommerce order notes are messages or comments that can be added to an order by the customer or the store admin during the order processing stage. These provide additional information or instructions related to the order, such as special delivery requests, product customization details, or customer service inquiries.
Q3. How can I notify customers of a failed order in WooCommerce and provide them with the next steps?
You can notify customers of a WooCommerce failed order in WooCommerce by setting up an email notification or you can also display a notice on the checkout page for customers to see if their order fails. This can be done by adding a snippet of code to your theme’s functions.php file.
Q4. How is the WooCommerce order number generated?
The order numbers in WooCommerce can be generated sequentially, randomly, or based on the order ID. An automatic reset can be set for the sequential counter on a daily, monthly, or yearly basis. New orders will be assigned custom numbers automatically.